Ultimate Bodyguard 380 Laser Button Fix.

Joined
Nov 6, 2010
Messages
3
Reaction score
4
This may belong in the smithing the smith subject, however I don't really consider this smithing... I posted this fix previously elsewhere that they were having problems with the buttons. I don't know if anyone else has come up with this solution already here, or posted it at any rate. I didn't see a similar fix. Read below to find out how I finally fixed the buttons...

Okay, so like everyone else, I too found the laser buttons impossibly hard to activate... I looked at all sorts of fixes elsewhere on the net and here, and none of them seem to really accomplish the goals of easing the activation, and making it a little harder to accidentally remove the buttons at the same time. I used a small tube from the middle section of a cheap q-tip, cut a small section out, and placed it around the nipple of my button. Let me explain in detail.

First, remove the buttons. Easy to do by just pinching and puling them. They come out way too easy in my opinion.

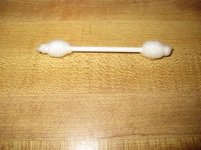
Next, find a q-tip that has the plastic tubular center section. Another type of small tube may work, I just happen to discover that these are the exact size.

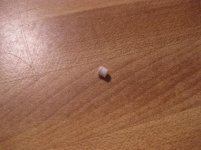
Third, clip a small section of this tube. This is the trial and error portion. Too long and the button won't go back in, or the laser will be too easy to activate, etc. Too short, and you will not accomplish anything. I discovered, at least on my gun, that the same length as the nipple seemed to work really well. In the next step, you will use a lighter to round or soften the ends of the tube so allow for that when you cut the length of tube.

Next, hold the tiny piece of tube with tweezers or something so you don't burn yourself. Take a lighter, and just barely touch the end of the tube with the flame. About 1/10th of a second is all it will take. The tube will curl slightly back on itself. This is what we want. This will help the tube seat in the rubber button, and will soften it for the foil switch on the laser unit. Do this to both ends of the tube.

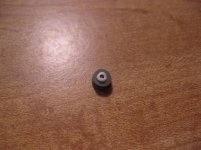
Now, take the small tube and place it around the center nipple of the switch in the void area. If it is in right, it should just barely protrude from the void, and stick out about the same amount as the central nipple.

Next, reinstall the buttons. It will now take a little more effort to get them in the gun. I suggest using a small very dull implement to help you seat the o-ring portion. You can, however, put them back in with just your fingers and a little twist, it just takes a little more effort. If you want to make sure it is completely seating, remove the laser from the frame. Instructions for this are in the owner's manual.

You should find that the effort required to activate the laser is now significantly reduced. I played with mine for about an hour before I found the right length to give me the best of both worlds, you should expect to do the same if you want it to be perfect. I now have laser buttons that do not activate in my pocket or holster, however I can easily activate the laser with either my trigger finger or support thumb mid draw, and it is light and intuitive. I discovered that the laser buttons are seated more firmly as well as the void is filled around the nipple. Bonus discovery!

I take no responsibility for damage you may do to your gun or buttons if you do this yourself. Good luck, happy shooting.

Feel free to pass this one on, just give me credit please as I am also approaching S&W about a similar fix, however permanently installed in the button. I haven't seen any other variations of this, or found anything that I think works better. If you have something though, let me know. Always looking for that better mousetrap.

I will post pictures with this when I get back to my home computer.
 
Register to hide this ad
Had they made the button out of a less pliable material the nipple would not have compressed as much during activation.

Your idea looks very good although I might add to be very careful with the extension added to the button as if to long permanent damage could be done to the bronze switch.

Frank
 
Yeah, so far no signs of damage on my foil switches... I suggested the same thing to our LEO rep from Smith and Wesson, and he said he forwarded the advice about the buttons up the line... We'll see.

The real key here is getting the tubes the exact right length. It is a time consuming fix, but worth it IMHO...

Here are the pics.
First is the q-tip, second the cut and rounded section, third the switch with the tube installed.
 

Attachments

  • IMG_2273.JPG
    IMG_2273.JPG
    36.4 KB · Views: 2,510
  • IMG_2276.JPG
    IMG_2276.JPG
    28 KB · Views: 3,460
  • IMG_2278.JPG
    IMG_2278.JPG
    26.7 KB · Views: 3,881
Very nice pictures. Although I am not having a real problem with the switch I am going to try your suggestion.

Thanks

Frank
 
BG380LEO,
Brilliant idea on fixing an inactive button on the laser site. I had two inactive buttons when using my thumb but both worked if I pushed with my finger nail. Not pleasant. Based on your proceedure, I did both buttons and now they work with ease. Thanks for the insight. I made a few discoveries that may help others that follow your proceedure.
1. Didn't have a hollow tube from a Q-tip. Found that an ink tube from a ball point pen was perfect.
2. Cut the tip off a wooden toothpick and inserted it in the heated/rolled end to hold it while heating the other end. The toothpick also helped keep the hole from melting shut.
3. For the life of me I couldn't insert the button back into the hole to reset the "flange". I took the laser site off "see manual". It made it much easier to push the button back in place.
4. While the laser was removed, I found I could push the tube onto the nipple of the second button without removing it. Used a tweezer to place the tube over the nipple, removed tweezer and insert it through the laser lens hole and pushed the tube in place while holding the button with my other thumb to prevent it from falling out. With a little patience it worked well and the button remained in place.

Both buttons activate the laser with ease. The locking pin and the laser button fixes now makes my BG380 the perfect CC. Hope Smith picks up on your idea. Between all of us, we'll help Smith make a much better 380.

By the by: they finally replaced my EAA6xxx, with the take down pin problem, with a new framed EAB5xxx. Shoots like a charm and the lock down pin stays in place.
 
Last edited:
Hi...here is an easier fix...take the button off...rub them between your fingers and reinsert them...the material needs to soften..after I did this the laser activates fine...no need for Q-tips...Im not sure how that would affect the warranty?

Good Luck!
 
Not to discount that rubbing them between your fingers worked for you, but for me, it took this fix. The issue isn't that the buttons need to be softer, rather the opposite. Maybe you got a newer gun, one with firmer buttons?

I have about 1000 rounds through mine now, trouble free other than the buttons, which I now fixed...

If rubbing them between your fingers works for you, awesome. I know several people here, and on other forums, suggested manipulating the little nipple with tweezers to ensure it is centered, or other temporary fixes. For me, (I carry every day, everywhere, no exception), these were exactly that, temporary fixes... As soon as the button was jarred or manipulated any real amount, back to square one.

I can't remember if I stated this earlier, but easiest removal and installation of the buttons, (at least to ensure they seat), is with the laser module removed. I actually removed my module, inserted the buttons, installed the tube, and then reinstalled the module. Seemed to work best. May take several attempts, be patient.

And hey, 1000 ways to skin a cat, do what works for you...
 
Hi everyone, I'd like to add one more fix that worked for me. I had to use extreme force to activate the laser buttons so this is my solution.
I got a small leather punch which cuts small round holes in leather and used it on a paper-plastic business card which is about half the thickness of a regular credit card and punched two small holes to use as round shims. Don't use just paper as it will break down after time. I then scotch taped one each over the pressure sensitive buttons on the laser, centering them in the exact middle. The cutouts were just a little smaller than the switch button. This worked perfect with just the right pressure to activate the laser but not too easy to turn it on in my cc holster.
After a thousand rounds it still works flawlessly.
I hope this also helps other people with the same problem.
It seems that the customers will be the one's that will solve the problems.
 
I purchased a brand new BG380 when it was first released and i will say i was very disappointed with the functionality of the laser on my particular gun i also carry all day everyday with no exceptions as im in the real estate business and deal with a lot of short sales and foreclosures in ruff areas and for some odd reason the laser on my BG was just extremely hard to cycle on and off... atleast my buttons were, however after coming across this fix i spent a few minutes trying it out and after following the simple steps my laser now works great!!
I followed the instructions however i chose to use the ball point pen tube as mentioned on the thread by another member and i will say it worked like a charm! Now i effortlessly tap the laser button on either side and its instantly on and or off! im truly amazed on how easy it cycles now! This is def a great fix...A+ hopefully S&W will pick up on this and create a smiliar factory fix! Thanks for sharing!
 
Engineering Mod Of the Year Award...

I spent some quality time with my newly acquired BG380 tonight watching the tube and applying your mod, with the alteration of using a ball point pen tube. This in my mind, warrants consideration for the Engineering Mod of the Year Award, and it amazes me the SW didn't think of it first. My left button was basically inop, as many have reported, but the right button worked. Now both buttons work as they should have when leaving the factory.

I've never considered owning an SW before until the BG380, and the reported problems with this firearm, the rest of which I hope to avoid, led me to be patient and wait for later serial numbers. However, I was ultimately not immune. I would certainly hope SW studies the design and manufacturing processes responsible for the problems with this weapon thoroughly, and learns from this reputation-tarnishing experience.

Kudos to your study and easy solution this one, obviously burdoning problem of the BG380.

B.
 
Last edited:
Great tip guys. My laser buttons work fine but if they act up I sure know what my next step will be.

Thanks for sharing BG380LEO and others!
 
Another laser button fix

I also had too much trouble pushing the buttons. However, since I carry it in a fairly solid holster, the last thing I want is for it to activate in the holster and wear out the batteries. My fix, I'm afraid is a little less of an engineering feat. However, it made the push considerably easier, but not too light.

I took the laser out and noticed that both the little nipples were somewhat pointing downward. This probably happened during initial assembly. I also noticed that the foil switches have more play on the top than at the bottom. I simply rotated the rubber plugs 180 degrees in their sockets, reassembled the laser and gun, and now both the switches have the perfect one-hand push to activate.

Before you start melting things, you might just give it a try. What do you have to lose?
 
I bought a 380 bodyguard two days ago, 12-18-10. From the get go I notice it was hard to press the buttons to turn on the laser. After a web search to find out if this was common I found your post on how to fix the hard button problem using a q-tip. I followed your directions and the fix worked perfectly. Even though the gun is new I could tell it was going to be a needed fix so why wait. After I've had the gun awhile I'll post again to let everyone know how I like it and how the fix is working.
 
Just got my BG and have the same laser button issue. Will S &W do the fix? Bothersome; just had to return my Neos to Beretta for safety lock issues. How can they sell this stuff without recall mods done?
 
http://*****************/
first of all try this link.. this might help you out... I have a feeling that if i saw this i would have never bought it. there is some useful info in here.

Smith just got mine, after takeing a lot longer than 2 days to get there. I think it being holidays and with the snow we had here on the East coast. I 'll cut them some slack.

I am sorry that you are having problems like alot of people on here have had.
I believe if you pack,send it back to smith they will fix it or if you want to fix a brand new gun I believe they might send you the buttons and you can fool with it.
Good luck
 
S & W repair of laser switch for BG380?

I have sent my BG380 back to S&W for repair of hard to activate laser switch twice. Each time they sent me a new clip which was nice but did not fix the switch. So I called customer service again only to be told that the switch is supposed to be hard to turn on and that it should be activated with the thumb nail! Never mind that that makes the laser totally impractical for self defense!
I have read the various fixes on the forum but think that S&W should be making these switches work properly. Has anyone had any success with S&W fixing the switch? Has a modification been made to newer models? I haven't sent the pistol back for a third time after the S&W rep told me they were supposed to be difficult to turn on.
 
Last edited:
Besides the q-tip fix which I didn't want to do unless it was the last thing available, someone else suggested; the technique of removing the rubber button and rolling it around between your finger and thumb. I worked for me; actually it was perfect and lasted too. That little nub needs to get straightened up and then placed back in the hole. OH yea, unless your floors need a good t-shirt dusting, work on it somewhere open or protected because the little rubber buttons grow wings at the most inopportune times. It took me 20 minutes in my office lying on the floor with a flash light to find it in an area way out of the realm of possible bounces. I had to revert back to crime scene search technique and do the whole room, quadrant by quadrant. I am self submitting for the "dumb sh*t" award of the week.
 
Cop,
I applaud you taking on this exercise your self. I love to tinker as a lot of guys do. I was not going to take on this adventure on a gun where the receipt ink was not dry yet.There are waaay to many choices out there for people who want it done right the first time.
I am glad that it did work out for you.

Jim,
I dont know what to tell you.I sent mine back for most of the reasons that most of us on here and on the BG380 dot com site too.I hate to see people that dont get any satisfaction.I see your Magazine collection is growing,but i am sure that you would trade them in for a working Pistol.

The Rep is full of Horse Puckey(thanks Col Potter) I sent my EAB58XX back for EXACTLY the same thing you did. I sent it out just before Christmas(bad timing on my part) and got it back this week.I tested BOTH buttons and they are a lot better than they were when i sent it out- in short they fixed that and did a fantastic job! that much they got right.

I also had an issue with the Safety. they fixed that too... the other issues will have to wait till i get to the range. I was so upset that i had to send it out that i bought the SIG p238. If when i get to the range and it is not working I wont send it out again. I'll sell it ON THE SPOT and buy another Sig.

I applaud those who will continue to support their country and buy only American. I try to when ever i can.

Third time is always a charm. Best of luck to you.
 
I have 3 BG380,s a EAA and 2 EAF. All three work flawlessly except for the Laser button. Here,s my repair and only in my case. I put a tiny drop of heat gun glue, the size of a pin head on the center of the button. That added stiffness to the center portion of the button. Be sure to have extra buttons as at the first try as I melted the first few buttons. Now if S&W design people had just made the button out of stiffer material no one would have had any trouble with the buttons.

By the way I just called S&W and told them what I was doing and they sent me 6 buttons to work with.
 
Back
Top