Don’t get mad at me, I picked these up as is…

samandglove1

Member
Joined
Jul 20, 2010
Messages
1,257
Reaction score
1,516
Location
Massachusetts
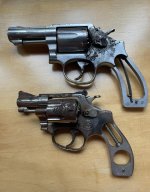
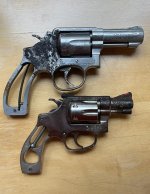
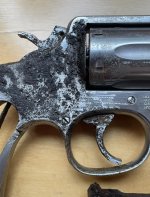
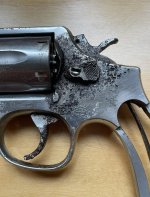
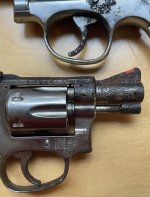
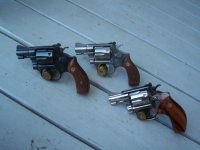
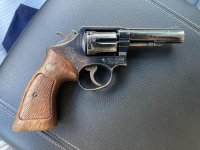
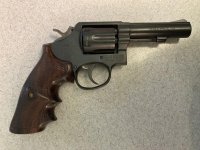
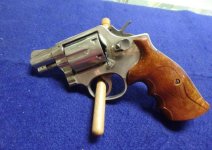
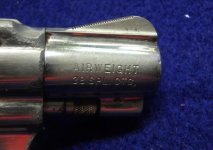
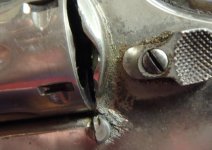
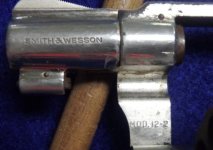
Just got a hold of a couple really rough stainless steel pieces. A rusty 1 7/8” model 34 (with surface rust and a little pitting) and a tremendously rusty 3” model 65 (with heavy surface rust and deep pitting). Not sure how stainless guns got so rusty, but there you have it. I was told that they were left in a shed, in a cardboard box wrapped in a rag (probably damp in the humidity).
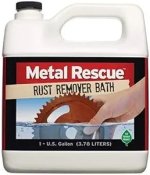
I’m actually excited for the project. I soaked them in WD-40 and Kroil for a bit to remove a layer of rust and get the cylinders open, but now I want to get a little more aggressive. I was thinking about some kind of bath in a large ultrasonic cleaner and then maybe go ham with a dremel. Obviously, I don’t want to beat the heck out of it, but I also don’t mind being aggressive.

Any advice?
 

Attachments

  • IMG_8348.jpg
    IMG_8348.jpg
    81.7 KB · Views: 318
  • IMG_8350.jpg
    IMG_8350.jpg
    88 KB · Views: 238
  • IMG_8351.jpg
    IMG_8351.jpg
    99.4 KB · Views: 243
  • IMG_8352.jpg
    IMG_8352.jpg
    96.1 KB · Views: 203
  • IMG_8353.jpg
    IMG_8353.jpg
    88.4 KB · Views: 187
Register to hide this ad
I would have loved to find that 34. should be blue not stainless.
time will be your friend, disassemble as much as you can, flat files, blocked sandpaper, just takes time.. if parts aren't coming out to your satisfaction , there's always the "bay" place to order parts.
I've seen some real stinkers brought back to respectable appearances.
and it looks like it's going to be a couple of fun projects..
please keep us updated..
 
You can get rid of every bit of rust (and all the bluing) by getting a gallon of Metal Rescue and giving the gun a bath for a few days. Some brushing and picking will speed up the process. Won't fix the pits but it will remove all corrosion if you give it time.
 

Attachments

  • 51Y7V0tlVfL.__AC_SX300_SY300_QL70_FMwebp_.jpg
    51Y7V0tlVfL.__AC_SX300_SY300_QL70_FMwebp_.jpg
    27.8 KB · Views: 49
I would have loved to find that 34. should be blue not stainless.
time will be your friend, disassemble as much as you can, flat files, blocked sandpaper, just takes time.. if parts aren't coming out to your satisfaction , there's always the "bay" place to order parts.
I've seen some real stinkers brought back to respectable appearances.
and it looks like it's going to be a couple of fun projects..
please keep us updated..

I imagine the innards of those pistols are ruined too. 34's are blue and nickel.....63's are stainless.
 

Attachments

  • 100_0777.jpg
    100_0777.jpg
    80.9 KB · Views: 38
I imagine the innards of those pistols are ruined too. 34's are blue and nickel.....63's are stainless.

I think you’re correct. This 34 (34-1 to be exact) is definitely nickel. The finish is so banged up that I didn’t really pay attention. That makes much more sense. Thanks!
 
Samandglove1; I happened to acquire a model 10 with pitting like that. While bead blasting didn't remove the pits it did allow them to be disguised such that you have to look really hard to see them.

Of course, any value as a collectable or to a collector is erased but I don't buy or refinish guns in the hopes of making money off them. If they do increase in value, it's because they are wanted for other reasons, i.e., a pre 1950 Winchester model 70.

Back to my model 10, since the bead blasting and cold bluing it now has exactly the finish I want for my hunting guns. A soft matt finish which does not reflect light. And I don't have to be too carefull with it, because if the finish gets worn or "polished" from holster wear, well I can just go back to the bead blaster and a bottle of cold blue. My model 70 is one of my hunting guns and still has it's original finish, which is much like the finish on my model 10. And I like it for that reason. Some other reasons too.

Llance
 
I also concur with the bead blast. The nickel on the 34 can’t be recovered so blast it off and refinish. Both would be good candidates for ceracote or another finish which might fill in the pits somewhat maybe ? Let’s hope internals ok.
My only experience in this area was an old police model 10 which was very finish challenged but no pitting. The bead blast gave the reblue a matte finish like a model 28. Came out great I think.
 

Attachments

  • IMG_7993.jpg
    IMG_7993.jpg
    107.6 KB · Views: 51
  • IMG_5598.jpg
    IMG_5598.jpg
    82.9 KB · Views: 47
You just have to get rid of the rust.
 
Some grades(alloys) of stainless steel are subject to rust and pitting from chlorine/salt soln's and compounds.
Others not nearly as much.

Hydrochloric acid is another that can pit some alloys of stainless steel quite severely.
Found as common Muriatic Acid in pool supply and Home Depot type stores for masonery clean up and other uses.
It can easily find it's way on to cloths and other things around the shop that then eventually might end up as long term storage wrap as well.
It doesn't take alot of the stuff,,just contact and time.

Any of these will easily get through nickel plating with contact exposure and time and then aggressivly attack the carbon steel base metal.
Most nickel plating has some voids in the plate surface somewhere even if only microscopic. That's enough for chemicals to migrate underneath and do damage to the base metal as well as lift the plating at the same time.

Strip them down, I'd do a boil out with something to neutralize any *** acid in tthe pits and on the surface. A strong base like washing soda. (Sodium Carbonate (not Bi-Carbonate).
Then bead blast .
Leave the surfaces dry and see if any agressive re-rusting appears.
Some flash rust may appear on the 34 as it is carbon steel.

After a week or so if the guns are free of what would appear to be any rusting from a chemical,,then I'd rust blue the 34 right over another quick bead blasting once again.
The stainless revolver should be good to go as it is.
You can doll the stainless rev up anytime w/a bead blast or even a swipe of the parts over a wire wheel.
Oil the parts first and the surfaces will blend much better than using a dry wire wheel. But it really doesn't matter much in this case.

Pits will always be there unless you want to get into some very serious polishing. Some may be so deep that they need filling by welding to bring them back up so they can be leveled with the rest of the surfaces.

Not a job for a Dremel. A belt grinder is very helpful to keep things flat and sharp but on a revolver a lot of the work ends up getting done by hand.
A good couple of project guns to learn polishing / restoration on.

Just don't watch the clock while learning how to do this stuff.
 
Saw one similar a while back...hard pass

Saw a Model 12-2 in a pawn shop that had pretty severe erosion some years ago. Guy wanted $550 which would have been a stretch even if it had been in decent shape. I offered $50 basically for the grips which looked interesting. Of course I was turned down and the gun wasn't worth anymore to me so left. It sat there for more than 2 years then disappeared so somebody either bought it or used it in a police turn-in for a $100 Visa card.

The OP's guns actually look worse than this Model 12-2 but after reading what causes this and how you guys go about "fixing" I'm thinking whatever price is paid for the guns in that condition needs to be so low as to probably be insulting to the owner, so I'll probably just keep moving on.

A true challenge for sure!:D
 

Attachments

  • Mod 12-2 a.jpg
    Mod 12-2 a.jpg
    70.2 KB · Views: 42
  • Mod 12-2 b.jpg
    Mod 12-2 b.jpg
    49.5 KB · Views: 38
  • Mod 12-2 c.jpg
    Mod 12-2 c.jpg
    51 KB · Views: 41
  • Mod 12-2 d.jpg
    Mod 12-2 d.jpg
    49.1 KB · Views: 38
Back
Top