GunarSailors
US Veteran
Red Ramp Insert Replacement & Installation
This thread is supposed to be a guide on how to replace a factory insert that has fallen out, is faded, damaged, or loose. Or if you would just like to install one in your plain Baughman or ramp style front sight that is too hard to see. I hope its okay that I share my experiences in this thread, and my apologies to anyone else who may have another thread already covering this topic.
You should probably watch this video first...
[ame]https://www.youtube.com/watch?v=8RZvGFHZxeE[/ame]
If your front sight doesn't have an insert...
Buy a small set of jewelers files, make sure one of them is triangular shaped. The smaller, the better. I got a set at ACE Hardware for less than $10. Actually starting this process will make you feel like God himself might strike you down with a bolt of lightning, and if you are doing this to anything other than a shooter, God might really be considering it. I would only take a file to a shooter that I have no intention of getting rid of. Go slowly, go evenly and check both sides often. It is very important you only file a dovetail that fills up the rear sight. No more (in my opinion). I have seen some home made inserts that are way too long and it doesn't even look close to being factory. Not to mention how much easier it is to tell that your sights are lined up with a insert that only fills up the rear sight. Don't make your dovetail so deep that the bottom of the dovetail touches the barrel rib but deep enough to have a decent piece of acrylic to work with. That is how I would do it...
Here is some great advice.
Me not using a triangular shaped file with a safe side is why the model 15 below has a dovetail that is really cut a little too deep.


Dimpling with a punch or drilling 2 small holes...
Once you have cut the dovetail in your front ramp like Larry Potterfield illustrates in the video, don't forget to dimple inside the dovetail with a centerpunch. I prefer a centerpunch because it causes a little metal to "roll" up into the space where the largest part of the insert is. It really helps keep the insert secure and in place. The factory however drills two very small holes down.

The Fences...
You will need two brass fences that will squeeze each side of your front ramp. I used pieces from a thick brass hinge. I like the fences to be thick enough so that when I pinch down on them with the vice grips, and the front ramp in between, the teeth of the vice grips only touch the brass fences. You do still have to watch out for the barrel, but find fences that stick out on each side past the width of the rib. Make sure they are flat and clean. I laid the fences on a file and flattened the sides of the fences that would be facing the resin. Clean them off and spray the Castin Craft Releasing Agent (don't forget to shake the bottle). Let the fences dry and clamp them on your front sight.

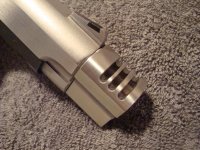
My most recent brass fences that I made, the shape helps to make sure the liquid gets inside the dovetail and not all over the fences.

Method #1 Castin' Craft (polyester casting resin)
You will need some Castin Craft Resin, hardener, opaque red and yellow pigments, some mold releasing agent, some plastic cups, stir sticks for mixing. You will also need some brass fences, some vice grips, a small centerpunch, a hammer and some blue painters tape to protect the area around the front sight. I got all the material for the Castin' Craft insert at Hobby Lobby (except the files, the brass fences, the hammer, centerpunch and vice grips).


This picture is of an insert that is too orange to be from my first attempt, but you get the idea.

Cure Times and trimming...
You have plenty of time to work, so you don't have to hurry. Using this method takes an extremely long time to cure compared to the Brownells kit, even in a warm environment. But I would make sure you have everything ready to go before you put your drops of hardener in the resin. Make sure the dovetail is level when you drip the resin in between the fences, so it doesn't pour out the front of the sight. Make sure you stick around and watch it for a couple of hours so that if it starts to dip in the middle of the insert from leakage or air bubbles escaping, you can apply another drop or two. Once you have a good insert in there, leave it be for 3 or 4 days. It needs to be at room temp for it to harden properly so don't do it outside (fair warning - it stinks pretty bad). After 4 or 5 days remove the vice grips, remove the fences, clean the insert off with rubbing alcohol. The insert might still seem somewhat soft on the top, even after 4 or 5 days, just wipe it down with alcohol and it will be much easier to work with. Carefully start to trim the excess with a small jewelers file or razor blade. Larry Potterfield shows trimming it initially with a razor blade. I feel that when the casting resin is fully cured it is too hard to evenly cut with a razor blade, and you are pushing on the insert with quite a bit of pressure causing it to possibly have some movement in it when you're done. I use a small file with nice gentle swipes across the top pf the insert with minimal pressure, lets the file slide off the insert taking material with it evenly every time without causing extra movement. I think its okay to use a razor blade in the beginning as long as the insert is fully hard. I usually finish the top of the plastic insert with a very narrow piece of 800 grit sandpaper (a little more narrow than the insert itself. I put the sandpaper in between the insert and a narrow sanding block (I used one of the files). Think of playing a violin... the gun is the violin the insert is the strings of the violin, the file is the bow, and the thin piece of sandpaper is the horsehairs on the bow. Be extremely careful to only sand on the insert. Removing all of the excess with a file is okay too but it can leave deeper grooves than fine sandpaper. The last thing you should do is square everything up, so don't remove too much with your razor blade. If your fences sealed up good enough, and were squeezed tight enough, you shouldn't have to trim anything off the sides, just the top.
1st attempt with Polyester Casting Resin... Didn't bother finish making it look pretty, I knew it was too dark.

Method #2 - Brownells Front Sight Insert Kit (liquid acrylic)
Last year I scored a Brownells front sight insert kit from a forum member here (thanks JR). It works different than casting resin, first off it sets up VERY quickly but fencing the sides and shaping it are the same. The best part is that it takes about an hour to an hour and a half from start to finish with the Brownells acrylic. I PREFER THE BROWNELLS FRONT SIGHT INSERT KIT!!! Getting the mix perfect is not very critical with this kit, super easy to use. I put about half of the eye dropper of liquid acrylic in the little white cups they sell. Then I put the yellow powdered pigment in the acrylic and mix it really well. it takes the powder a little longer to fully mix in with the acrylic. Then I just put as little red into the mix as possible. This will probably take several times of trying to get enough red in without making it too red. Have patience and make sure you mix it well before you add more red in it. Don't be afraid to load it up with plenty of yellow powdered pigment. Did I mention mixing it well?
I put about 3 -5 times the amount of the powdered hardener compared to the amount of acrylic. in other words if you looked at the puddle of acrylic, vs the pile of powdered hardener... the Powdered hardner pile would be 3 - 5 times bigger. As soon as you put the powdered hardener in with the liquid acrylic, it turns to liquid. So its going to seem like you are putting a wole lot of hardener in there compared to the few drops when using the casting resin. Even if you put 10 times too much hardner in there, it will still mix fine, you will just need to work fast. I put enough in there and then mix it really good and when it starts to get thick, then is when I put the acrylic down in between the fences. Poke it to make sure the air bubble get out and that the acrylic goes down in the factory holes.

This compares the Brownells insert color of my model 15-2 with the factory insert in my model 66 before I replaced it. This picture was taken before I finished trimming the top. It was only to show the color comparison.

The model 15-2 and the model 28-2 below did not come with inserts, I cut a
dovetail in both front sights and used the Brownells kit to make the new ones.


These are factory dovetails with inserts done from the Brownells kit.


This thread is supposed to be a guide on how to replace a factory insert that has fallen out, is faded, damaged, or loose. Or if you would just like to install one in your plain Baughman or ramp style front sight that is too hard to see. I hope its okay that I share my experiences in this thread, and my apologies to anyone else who may have another thread already covering this topic.
You should probably watch this video first...
[ame]https://www.youtube.com/watch?v=8RZvGFHZxeE[/ame]
If your front sight doesn't have an insert...
Buy a small set of jewelers files, make sure one of them is triangular shaped. The smaller, the better. I got a set at ACE Hardware for less than $10. Actually starting this process will make you feel like God himself might strike you down with a bolt of lightning, and if you are doing this to anything other than a shooter, God might really be considering it. I would only take a file to a shooter that I have no intention of getting rid of. Go slowly, go evenly and check both sides often. It is very important you only file a dovetail that fills up the rear sight. No more (in my opinion). I have seen some home made inserts that are way too long and it doesn't even look close to being factory. Not to mention how much easier it is to tell that your sights are lined up with a insert that only fills up the rear sight. Don't make your dovetail so deep that the bottom of the dovetail touches the barrel rib but deep enough to have a decent piece of acrylic to work with. That is how I would do it...
Here is some great advice.
Another useful tool for doing these inserts is an additional small triangle file with one "safe" side. (cutting teeth removed) This safe sided file allows you to have more control, and open the angle cuts at each end without removing material from the bottom of the dovetail....or work on the bottom cut without cutting the end angle.
The file also makes it much easier to cut the corners/angles at each end to a very sharp point.
Me not using a triangular shaped file with a safe side is why the model 15 below has a dovetail that is really cut a little too deep.
Dimpling with a punch or drilling 2 small holes...
Once you have cut the dovetail in your front ramp like Larry Potterfield illustrates in the video, don't forget to dimple inside the dovetail with a centerpunch. I prefer a centerpunch because it causes a little metal to "roll" up into the space where the largest part of the insert is. It really helps keep the insert secure and in place. The factory however drills two very small holes down.
The Fences...
You will need two brass fences that will squeeze each side of your front ramp. I used pieces from a thick brass hinge. I like the fences to be thick enough so that when I pinch down on them with the vice grips, and the front ramp in between, the teeth of the vice grips only touch the brass fences. You do still have to watch out for the barrel, but find fences that stick out on each side past the width of the rib. Make sure they are flat and clean. I laid the fences on a file and flattened the sides of the fences that would be facing the resin. Clean them off and spray the Castin Craft Releasing Agent (don't forget to shake the bottle). Let the fences dry and clamp them on your front sight.
My most recent brass fences that I made, the shape helps to make sure the liquid gets inside the dovetail and not all over the fences.
Method #1 Castin' Craft (polyester casting resin)
You will need some Castin Craft Resin, hardener, opaque red and yellow pigments, some mold releasing agent, some plastic cups, stir sticks for mixing. You will also need some brass fences, some vice grips, a small centerpunch, a hammer and some blue painters tape to protect the area around the front sight. I got all the material for the Castin' Craft insert at Hobby Lobby (except the files, the brass fences, the hammer, centerpunch and vice grips).
This picture is of an insert that is too orange to be from my first attempt, but you get the idea.
Cure Times and trimming...
You have plenty of time to work, so you don't have to hurry. Using this method takes an extremely long time to cure compared to the Brownells kit, even in a warm environment. But I would make sure you have everything ready to go before you put your drops of hardener in the resin. Make sure the dovetail is level when you drip the resin in between the fences, so it doesn't pour out the front of the sight. Make sure you stick around and watch it for a couple of hours so that if it starts to dip in the middle of the insert from leakage or air bubbles escaping, you can apply another drop or two. Once you have a good insert in there, leave it be for 3 or 4 days. It needs to be at room temp for it to harden properly so don't do it outside (fair warning - it stinks pretty bad). After 4 or 5 days remove the vice grips, remove the fences, clean the insert off with rubbing alcohol. The insert might still seem somewhat soft on the top, even after 4 or 5 days, just wipe it down with alcohol and it will be much easier to work with. Carefully start to trim the excess with a small jewelers file or razor blade. Larry Potterfield shows trimming it initially with a razor blade. I feel that when the casting resin is fully cured it is too hard to evenly cut with a razor blade, and you are pushing on the insert with quite a bit of pressure causing it to possibly have some movement in it when you're done. I use a small file with nice gentle swipes across the top pf the insert with minimal pressure, lets the file slide off the insert taking material with it evenly every time without causing extra movement. I think its okay to use a razor blade in the beginning as long as the insert is fully hard. I usually finish the top of the plastic insert with a very narrow piece of 800 grit sandpaper (a little more narrow than the insert itself. I put the sandpaper in between the insert and a narrow sanding block (I used one of the files). Think of playing a violin... the gun is the violin the insert is the strings of the violin, the file is the bow, and the thin piece of sandpaper is the horsehairs on the bow. Be extremely careful to only sand on the insert. Removing all of the excess with a file is okay too but it can leave deeper grooves than fine sandpaper. The last thing you should do is square everything up, so don't remove too much with your razor blade. If your fences sealed up good enough, and were squeezed tight enough, you shouldn't have to trim anything off the sides, just the top.
1st attempt with Polyester Casting Resin... Didn't bother finish making it look pretty, I knew it was too dark.
Method #2 - Brownells Front Sight Insert Kit (liquid acrylic)
Last year I scored a Brownells front sight insert kit from a forum member here (thanks JR). It works different than casting resin, first off it sets up VERY quickly but fencing the sides and shaping it are the same. The best part is that it takes about an hour to an hour and a half from start to finish with the Brownells acrylic. I PREFER THE BROWNELLS FRONT SIGHT INSERT KIT!!! Getting the mix perfect is not very critical with this kit, super easy to use. I put about half of the eye dropper of liquid acrylic in the little white cups they sell. Then I put the yellow powdered pigment in the acrylic and mix it really well. it takes the powder a little longer to fully mix in with the acrylic. Then I just put as little red into the mix as possible. This will probably take several times of trying to get enough red in without making it too red. Have patience and make sure you mix it well before you add more red in it. Don't be afraid to load it up with plenty of yellow powdered pigment. Did I mention mixing it well?
I put about 3 -5 times the amount of the powdered hardener compared to the amount of acrylic. in other words if you looked at the puddle of acrylic, vs the pile of powdered hardener... the Powdered hardner pile would be 3 - 5 times bigger. As soon as you put the powdered hardener in with the liquid acrylic, it turns to liquid. So its going to seem like you are putting a wole lot of hardener in there compared to the few drops when using the casting resin. Even if you put 10 times too much hardner in there, it will still mix fine, you will just need to work fast. I put enough in there and then mix it really good and when it starts to get thick, then is when I put the acrylic down in between the fences. Poke it to make sure the air bubble get out and that the acrylic goes down in the factory holes.
This compares the Brownells insert color of my model 15-2 with the factory insert in my model 66 before I replaced it. This picture was taken before I finished trimming the top. It was only to show the color comparison.
The model 15-2 and the model 28-2 below did not come with inserts, I cut a
dovetail in both front sights and used the Brownells kit to make the new ones.
These are factory dovetails with inserts done from the Brownells kit.
Last edited:
")
")