• Update – 12:30 PM EST
    Attachments are now working, and all members can once again upload files.
    We are currently testing URL redirects and other miscellaneous features across the site.
    Thank you for your continued patience and support during this migration.

    Prefer a darker look? You can switch between light and dark modes in your account settings:
    smith-wessonforum.com/account/preferences

How tough to loosen "tamper resistant" safety screw on Mossberg 500

bushmaster1313

Well-known member
Joined
Feb 1, 2011
Messages
6,851
Reaction score
17,155
Location
PRNJ
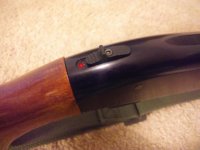
The safety button on a Mossberg 500 is made of plastic, known to be sticky, and is often replaced with one made from aluminum. But the factory button is held on with a one-way "tamper resistant" screw:

p_631000014_1.jpg


How hard to get this off?
What tool?
 
Last edited:
Try a thick rubber band over your screwdriver blade then insert the blade into the slot in the screw head.
 
It's easier than you think. I put a bit of painters tape on the head of the screw and chose a sharp screwdriver bit that fit well. Thus prepared for battle it came right out, easily.
YMMV
 
If you use a hacksaw blade to cut a groove into the screw head you can then use a regular screwdriver to remove it. Then replace with a regular screw afterwards.
 
I ran into this a few years ago hanging security storm doors. I took a flat wood bit the fit the length of the slot in the head (in this case probably 3/16-1/4) and ground the point off, making the complete bit flat. Chuck it up in your screw gun and screw or unscrew away, at low speed of course.
 
I have more issue with the ball bearing they use to index the safety plate below the safety; mine kept slipping out of alignment and jamming the safety solid. I finally replaced it with the guide rod from a Garand extractor assembly- worked like a charm.
 
Grind a screwdriver blade to a decent sharp blade edge like a wood chisel.
Look at the screw head as the one way tamper proof 'ramps' as your new slot.
Place the blade of the screw driver on those ramped edges and tap it down into the metal. The chisel edge will dig into the screw head.
Then turn the screw out as normal.
 
The plastic bits and pieces are one reason I have no use for Mossberg shotguns.

The screw isn’t a problem: after the plastic safety breaks, the screw is accessible with pliers and can be easily removed.
 
Drill a small hole and use an ez out extractor

or

sell it and get a 590A1
 
Last edited:
You answered my question!

I replaced the safety on my Shockwave (590), and didn't have to deal with that silliness. Wondered if this was just a 500 thing. Thanks.

I know that the 590A1 has a metal trigger assembly and safety. I did not know that the regular 590 receiver did away with the one way screw, good thing for you. Both the 500 and 590 have plastic safeties.

Also, for those who care, you can use 835 barrels on 6 shot (5+1) 590A1 and 590 so if you want a solid HD gun but also want to hunt birds or clays, you can.
 
Last edited:
Second update

The metal safety button came in the mail, along with a hex head screw and a poorly fitting hex wrench. Got the factory installed "tamper resistant" screw out with no problem using a tight-fitting flat end screw driver. The screw had a tiny bit of white factory installed thread lock, but the gun is not new and the thread lock was old and brittle. I knew from a video to have the action fully open, to keep my finger on the safety button when releasing the screw and to take care not to lose the ball bearing detent. Of course, the ball bearing dutifully fell into the action :eek: :o

Was able to get the ball bearing out of the action by turning the gun upside down. Of course, I then had to crawl around on the floor to find it :)

Finally got the safety button installed -- but of course, it's still very stiff. I plan to keep it in the "fire" position at all times, except for periodic manipulation to make sure it does not freeze.
 
Last edited:
Second update
Was able to get the ball bearing out of the action by turning the gun upside down. Of course, I then had to crawl around on the floor to find it :)

One of the best tool investments I ever made was for a 3 inch diameter magnet on a 3 foot stick. Over the years it's "found" more fasteners and small parts than I care to remember.
 
Last edited:
Installed NDZ button and a little dab of grease on the detent. Was lucky the tamper proof screw had already been replaced.
 

Attachments

  • 1221191536.jpg
    1221191536.jpg
    54.3 KB · Views: 23
I see that you were able to replace it. My safety broke in half on about the 5th 3" mag I was using to sight it in. I used a needle nosed vise grip to unscrew it and replaced it with a metal one. I don't know why they used a plastic one when the Ward western Field that I bought used for my son came with a metal one ( 60's vintage)
 
  • Like
Reactions: Rpg
On rare occasions the ONLY choice for assembling replaceable inserts it a forming tool is to use a hex socket flat head screw. In one particular application that screw is a #6. Flat head screws have a tendency to sieze in the seat if left in place for an extended screw and those hex sockets are tiny and strip easily. The simple solution for me is to use what I call a prick punch and hammer. Note make the prick punch by getting out an obsolete die hole punch and grinding the tip to a needle sharp point. Note, these hole punches are typpically M2 tool steel which is both very hard and very tough and resistant to chipping. Take that needle punch and out near the outer rim of the screw use a hammer to put in a nice deep prick mark (a sharper version of a center punch). Then angle your prick punch and hammer it in the loosen direction. One you have it loose you can usually spin the screw out by walking the prick punch in a circle in the dimple.
 
Back
Top