HomeSmith Trainwreck: Squibly

Joined
Jul 25, 2017
Messages
1,228
Reaction score
7,327
Location
Arizona
About 6 months ago I purchased a horribly abused .32-20 frame, barrel and sideplate. Mike Priwer identified it as a 1905 1st Change based on the .32-20 serial number. This is probably the worst trainwreck I've gotten into yet, so let's jump in.

Project Name: Squibly
 

Attachments

  • pix297847959.jpg
    pix297847959.jpg
    166.4 KB · Views: 158
  • pix341949773.jpg
    pix341949773.jpg
    263.9 KB · Views: 125
Register to hide this ad
Other than the fact that huge chunks of him were missing, Squibly's main problem was that there were several bullets stuck in his barrel.

Using the extremely scientific method of running my fingers along the barrel, I counted FIVE distinct bulges.

There was no yoke, no cylinder.....hang on. It's faster to list what was there: we have a frame, a sideplate, a barrel full of bullets, a bolt and thumbpiece, and a cylinder stop. That's it.
 

Attachments

  • pix149195477.jpg
    pix149195477.jpg
    102.3 KB · Views: 77
  • pix708578202.jpg
    pix708578202.jpg
    147 KB · Views: 77
  • IMG_1124.jpg
    IMG_1124.jpg
    76.4 KB · Views: 80
  • IMG_1126.jpg
    IMG_1126.jpg
    72.6 KB · Views: 84
  • IMG_1125.jpg
    IMG_1125.jpg
    63.5 KB · Views: 75
Squibly sat in the back of the safe for a few months while I tried to figure out what to do with him, then last month during the Muffin Top / Wonder Twins 'smithing extravaganza I removed Squibly's barrel while I had the tools out.

I was really hoping to make a snubby out of Squibly, but those hopes came crashing down when I tried a test fit on the only barrel candidate I had.

The barrel was for a much later frame style. It wasn't threaded all the way like Squibly's barrel was and the front sight blade was much too wide for Squibly's itty bitty rear sight.

Yeah, I could thread the barrel the rest of the way and use the Bridgeport to thin the front sight blade, but I decided that I was just way too lazy for that at the moment.
 

Attachments

  • IMG_2506.jpg
    IMG_2506.jpg
    106.5 KB · Views: 87
  • IMG_2514.jpg
    IMG_2514.jpg
    146.3 KB · Views: 90
  • IMG_2515.jpg
    IMG_2515.jpg
    54.6 KB · Views: 90
  • IMG_2528.jpg
    IMG_2528.jpg
    81.3 KB · Views: 85
  • IMG_2529.jpg
    IMG_2529.jpg
    76.7 KB · Views: 86
Rummaging around in the pile revealed a second parts kit of what looked to be the correct era. This one was a 4" barrel.

Would it fit? Was the front sight the right size for the frame? Would it even come close to indexing properly?

With fingers crossed and the emotional support llama on standby, the 4" barrel was gently threaded into place......and we found out how Squibly was destined to be reborn.
 

Attachments

  • IMG_2533.jpg
    IMG_2533.jpg
    144.8 KB · Views: 104
  • IMG_2537.jpg
    IMG_2537.jpg
    145.2 KB · Views: 86
Last edited:
There's more to life than just a barrel though.....what about the rest of the pieces?

The yoke fit well enough to allow a rear gauge test on the cylinder. The .060" gauge was a tight fit but it went in. The .068" no-go gauge had no entry. Good so far.

The rest of the grungy, nasty parts from the kit were test assembled into Squibly's frame for the next big hurdle: timing.

I continue to be amazed at the talent of the people who built these things. The parts from a random kit purchased over the internet dropped right in to a frame that they were never intended for...and timed correctly.

Yes, the clearances were at an absolute minimum and it had a bad case of sear click, but it worked. Every chamber carried up properly. :D

It was time to take it all apart again and drink about what should be done with Squibly's finish.
 

Attachments

  • IMG_2535.jpg
    IMG_2535.jpg
    85.3 KB · Views: 75
  • IMG_2935.jpg
    IMG_2935.jpg
    72.2 KB · Views: 70
  • IMG_2934.jpg
    IMG_2934.jpg
    53.2 KB · Views: 69
  • IMG_2937.jpg
    IMG_2937.jpg
    134.5 KB · Views: 78
  • IMG_2940.jpg
    IMG_2940.jpg
    83.6 KB · Views: 69
For all the abuse that he has taken, Squibly's metal is really in pretty good shape. There are not rust pits at all that I could find and a hundred years of handling had worn the outside surfaces extremely smooth. There was a definite patina, but oddly it was a shiny patina.

The fact that the finish wear on the barrel and cylinder matched the wear on the frame decided it for me: Squibly's finish would simply be conserved, not restored.

All of the various pieces that had been installed for the test fit were removed, the cylinder assembly was taken apart (a quick shout out to the folks at Power Custom for making the screws on their handy-dandy ejector rod loosener/tightener long enough for the tool to open wide enough to fit over the LERK), and the yoke, cylinder, barrel, and frame were boiled for 45 minutes and allowed to air dry.

My biggest worry about the boiling was the itty bitty spring underneath the plunger in the yoke. The plunger came out without any issue, but the spring just wouldn't come. After 20 minutes of trying to get the spring out with every tool I could think if, it finally occurred to me that if I couldn't dig it out using a dental pick it probably wouldn't fall out during the boil. :rolleyes:

After a quick trip to the carding wheel, all of the pieces were placed in plastic bags in a bath of Rocket Chemical Company's 40th attempt at creating a water displacement solution. I figured that if it was good enough for the Atlas rocket, it was good enough for Squibly.
 

Attachments

  • IMG_2943.jpg
    IMG_2943.jpg
    139.1 KB · Views: 80
  • IMG_2967.jpg
    IMG_2967.jpg
    83.2 KB · Views: 82
  • IMG_2969.jpg
    IMG_2969.jpg
    91.1 KB · Views: 77
  • IMG_2971.jpg
    IMG_2971.jpg
    112.8 KB · Views: 93
Last edited:
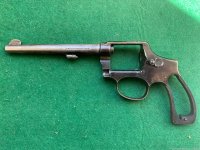
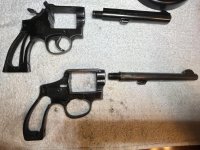
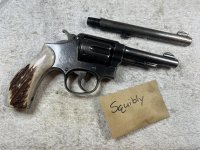
Up next was a deep, deep clean on all the crusty parts from the kit and installing the barrel.

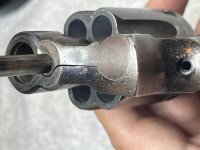
The barrel snugged up nicely...and then gave me the first of what turned out to be many, many little things that had to be fixed. The pin wouldn't go in.

I could see light through the hole and a #52 drill bit slipped through easily but the pin just wouldn't go. It turned out that the pin notch in the barrel was just enough out of place in Squibly's frame that it needed a gentle swipe with a #51 bit to widen the channel enough for the pin.

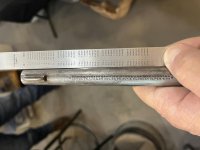
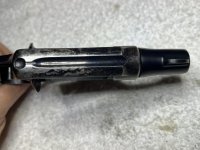
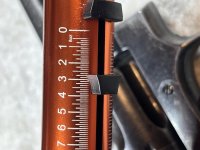
With the barrel in place I was able to measure the cylinder gap and endshake. We had a gap of .007" and no endshake at all. That would become important in a few minutes....

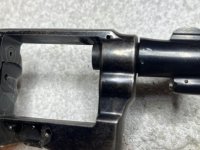
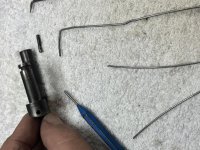
The yoke fit the frame but needed some adjustments to make it align properly. The yoke barrel needed to move inward, so the gauge was left in the barrel as a support and a soft lead babbitt bar was used to thump the yoke barrel enough to make it align.

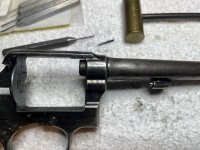
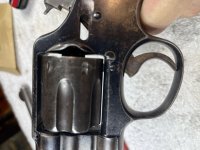
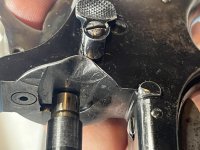
All of my previous measurements of the cylinder-to-frame fit had been with the barrel off. Now that the barrel was in place I had started having difficulty opening and closing the cylinder. The rear face of the cylinder was rubbing against the frame stop when the cylinder was open. I used a yoke barrel squaring tool to reduce the length of the yoke barrel by .001" and tried it again. That gave me enough clearance that the cylinder would open and close without binding on the frame stop. Adding another thousandth of endshake is on my list of things to do, but I want to shoot Squibly a bit and see how everything else shakes out before I do that.

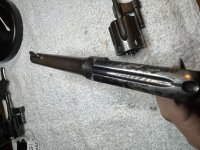
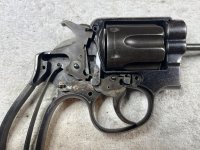
Next on the list was the sear click. I didn't want to mess with the angle on the end of the double action sear, so I began by stoning the adjustment foot to let the sear out a bit more. Eleventy-seven cycles of test-disassemble-stone-reassemble-test got me exactly nowhere. The trigger bevel was hitting the double action sear straight on and it appeared that I would have to take a truly significant amount off of the sear adjustment foot to move the sear out enough to stop the click.

As I was trying to figure out how to set up my sear jig to attack the bottom of the double action sear without totally screwing up the angles, my eye fell on the parts kits that had supplied Squibly's internals. Hey....the other kit has a different style of hammer with a double action sear that is shaped much differently. What would happen if......

Yep. Swapping the hammers completely fixed the sear click. Now that I think about it, I'm pretty sure that I had been trying to put a post-war transitional hammer into a pre-war action. I had incorrectly assumed that because the parts arrived together they should stay together. Nope. :o
 

Attachments

  • IMG_2974.jpg
    IMG_2974.jpg
    159.9 KB · Views: 78
  • IMG_2976.jpg
    IMG_2976.jpg
    104 KB · Views: 78
  • IMG_2977.jpg
    IMG_2977.jpg
    112.5 KB · Views: 78
  • IMG_2937a.jpg
    IMG_2937a.jpg
    86.6 KB · Views: 83
  • IMG_2996a.jpg
    IMG_2996a.jpg
    108.5 KB · Views: 78
Last edited:
Ok....the barrel is on, the cylinder opens and closes, our cylinder gap and rear gauge are good, and the sear click is fixed. What's next? The strain screw.

Somewhere over the last century-and-a-quarter Smith & Wesson apparently changed the thread of the strain screws. The kits had strain screws of the correct thread but they were both for square butt frames and were miles too long for Squibly's cute little round butt. I had been doing all of my testing so far with one of these square butt strain screws tightened about halfway when the sideplate was on. My one attempt to actually tighten it all the way resulted in a hammer spring that was so deformed and out of place that it hit the stock screw and wouldn't let the action cycle.

I had tried every round butt screw that I had and they all had the same issue: they would thread about half way through the frame and then come to a dead stop. Conversely, the old style square butt screws would slip about half way through the frame before they started to thread and then would be ok. Examining the frame threads under magnification showed me that the back half of the threads were sharp and clean but the front half were somewhat mangled. The emotional support llama suggested that it was time to break out the tap and die set.

The new round butt screws were 8-32, so an 8-32 tap was lubed up with Viper Venom and threaded into the frame. Just like the screws, it threaded half way in and then started to cut. I'm not sure if I fixed the frame or finished converting the frame, but either way the new style round butt strain screws now fit and work properly.

With the correct length strain screw installed, Squibly had 48 ounces of hammer tension and the stock screw doesn't interfere with the spring.

I remember my Dad saving for a long time to be able to buy this Craftsman tap and die set back when Craftsman actually had a good name. I hope he knows that it's still being used....
 

Attachments

  • IMG_2994.jpg
    IMG_2994.jpg
    138.4 KB · Views: 46
  • IMG_2995.jpg
    IMG_2995.jpg
    135.2 KB · Views: 67
  • IMG_2993.jpg
    IMG_2993.jpg
    123.1 KB · Views: 63
With springs of unknown origin and only the slightest stoning of the internals to remove a century of gack, Squibly came out with a 2 3/4 lb single action pull and just over 8 1/2 lbs on the double action pull.

A set of Ken Driskill's retirement project stocks has been sitting on my shelf for a few months and Squibly seems to be a good home for them.

I have other commitments tomorrow and won't be able to go to the range, but I should be able to get a range report up next weekend. If I have time between now and then I'll section the original barrel and find out how many bullets are actually in there....
 

Attachments

  • IMG_2998.jpg
    IMG_2998.jpg
    81.7 KB · Views: 64
  • IMG_3001.jpg
    IMG_3001.jpg
    81.8 KB · Views: 59
  • IMG_3002.jpg
    IMG_3002.jpg
    174.9 KB · Views: 91
  • IMG_3003.jpg
    IMG_3003.jpg
    175.5 KB · Views: 91
Place your bets on how many are in there...

V88D3Ft.jpg


1MASj0T.jpg


qUtghIz.jpg


HdPhgh8.jpg


qmmr0zP.jpg


C7IIJPg.jpg
 
I'd love to hear everyone's theories as to how this happened. The top two from the folks in the shop when the barrel was opened are:

- Absolutely clueless shooter who reloaded 3 times and didn't stop pulling the trigger until the cylinder stopped turning

- One squib round with an unsuccessful attempt to pound it out using a cleaning rod (check the deformation of the bullet visible from the muzzle end) followed by another shot to try and shoot out the obstruction....followed by "Hey Cletus, let's see how many it will take before it blows up"
 
Holy Cannoli Batman............ I'm amazed! Not only did the barrel not blow up, but you deserve the patience award of the year for this one!

Well, guys always say a revolver only has 5 or 6 shots onboard - now you can earn some beer money on that bet! LOL!! :D :D
 
I've done a little restoration, but nothing of this extent. My hat's off to you, fantastic job. It does show off the strength of a S&W revolve. But how anyone could put that many rounds in one blows my mind.


I did witness a local "police officer" in a bullseye match (Rapid fire string) put 5 rounds of light HBWC's in a barrel. He thought it acted funny on that string.
 

Latest posts

Back
Top