Touching up 3rd Gen Anodized Aluminum Frames

TTSH

Guest
Joined
Dec 16, 2013
Messages
7,707
Reaction score
9,472
Location
MA
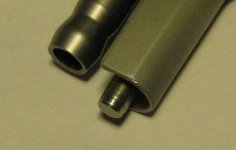
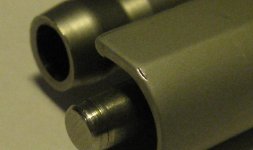
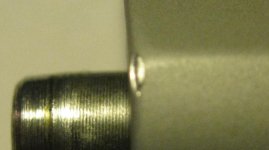
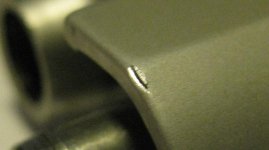
As posted in another thread, I just picked up a pristine, beautiful 6906 on Saturday (damn near "as-new")... but with one one very minor flaw at the very front of the frame. Can't even imagine how it was done, but something must have hit the frame (flying brass?) and there is a tiny but very sharp burr on the leading edge under the muzzle. Wouldn't even care a hoot about it except that it's sharp enough to snag clothing or even cut a finger. :eek:

I'll find a tiny jeweler's file to carefully remove the burr, but I'm just wondering if anyone has any suggestions to restore the flat white/silver look of the frame where I'll do the filing? :confused: Or should I just wait until it oxidizes a bit and the flat, dull look returns naturally. :confused:

More importantly, has anyone found a good way to touch up more apparent flaws on the anodized aluminum frames? I have passed up a lot of pretty nice 3rd Gens for the sake of an aluminum frame flaw or two that would be too costly to have professionally refinished. :o Are there any "gunsmith's secrets" in this regard that I'm just not aware of yet? ;)
 
Register to hide this ad
Like you I have passed on several guns in past years because of flaws , I like my guns to looks new , but to answer your question there is nothing to touch up the flaws in the finish of the 3rd Gen. that I know of , you can Dura coat or send back to S&W for a refinish , but that cost money.
 
If it is just a really small, inconspicious area, I'd consider taping the gun up and finding someone with a glass bead blast cabinet and just doing that one small area. Harbor Fright has some el cheapos, too. Seems like most of the work is tearing down and reassembling everything. If you can tape things up enough you may not have to.

Several people have posted in this forum about their luck with a small hammer and sandpaper.

Perhaps the key is to minimize the amount of damage done taking the burr off.

Good luck.
 
Rather than filing it, would it be possible to lightly tap it down with a mallet? If it's really small it shouldn't even be noticed.
 
Last edited:
Rather than filing it, would it be possible to lighting tap it down with a mallet? If it's really small it shouldn't even be noticed.

Try tapping with a brass punch not steel.
 
Aluminum alloys exposed to the air, in other words places where the anodized layer has been compromised, will oxidize and form a thin layer of protective oxide on their own. That protective layer will stop the alloy from corroding, but it is not as hard as the anodized layer provided by the factory.

Redoing the anodized finish may not be feasible as some of the alloy is converted to aluminum oxide to form the hard surface, and the original finish would need to be stripped to once again anodize it. This may result in a weakened (thinner) frame, which is why many finishers will not redo anodized frames.

The best thing to do is remove the burr and nothing else. The area should not be load bearing nor will it cause corrosion if left to its own devices. Bead blasting it will just remove more oxide and aluminum alloy, further weakening the frame.
 
I had a small area on my 3913, I touched it up with scotchbrite pad. Find an inside space on the frame to practice on, and to select the coarseness of the pad. Maybe start out with white, if you can find it.
 
Grainger has a good selection of Scotch Brite pads. You can get the sponges with green pads at many stores.


I had a small area on my 3913, I touched it up with scotchbrite pad. Find an inside space on the frame to practice on, and to select the coarseness of the pad. Maybe start out with white, if you can find it.
 
Anodizing is an acid conversion coating and does not appreciably remove or weaken the metal. For instance most aircraft are anodized before painting to provide tooth for the primer coating. There are a number of different colors (including clear) of anodizing. If you can find the right color, just slop it on. However, finding the right color to match is tough and you might find it easier to blend in the bead blasted area. Bead blasting will remove metal so don't get carried away, but you would have to work at it to cause any structural damage.

What it comes down to is restoring the surface condition after you file off the burr (if that is actually necessary). After the surface matches the surrounding area, you can worry about the anodized color, but you'll probably find that it isn't necessary.

Photos would help so we could see this burr and where it is at.
 
Thanks everyone! :) I appreciate the input! :) I'll try to address as many of the above points as possible in one post... but I'll try to address the specific problem first and then the more general issue of aluminum frame cosmetic repair separately.

The burr itself is too small to see very well without a magnifying glass, but it is still sharp as heck. I thought filing it down would be best but the idea of just tapping it down with a small gunsmith's hammer (nylon or brass side?) could be just as effective and a lot safer. Visually, it is not even worth mentioning unless my filing (or tapping) makes the tiny damaged spot much larger. That's what I want to avoid at all cost but I want to be prepared if some sort of touch-up becomes necessary. Pray for me that I don't screw it all up! :D

Again, there is no cosmetic or structural problem now... just that pesky sharp burr. The question was what to do after the burr is removed... and it sounds like "nothing" may be the best answer of all (unless I really manage to screw it up!). :cool:

I had kinda hoped there was something like a flat gray cerakote touch-up pen on the market, but no such luck. :p Looks like if I want to experiment with cerakote, it is going to cost me some pretty good money. :eek: Not worth it for this little nuisance repair but possibly a solution for something very rare in MA that I really want? :confused: The reason I got the idea is that I came across a 3rd Gen the other day that looked like the aluminum frame had been cerakoted. :confused: Didn't look half bad but it also didn't look like a factory-fresh 3rd Gen either. :o

I especially appreciate the facts & thoughts about the anodizing process itself. I have talked to one local gunsmith who insists that bead-blasting an anodized aluminum frame is feasible and can remove or help tone down some frame cosmetic flaws. While he says that, I'm not at all sure that I'd ever want to risk going that route. So then the question becomes: Is full-blown refinishing of a 3rd Gen anodized aluminum frame ever worthwhile? :confused: Has any member ever had it done before? Have the results ever been posted? :confused:

I'm thinking it is not a very popular (or inexpensive) process. :rolleyes:
 
Last edited:
Hi, TTSH!

If it were mine, I would use a small brass hammer or punch and lightly drive that tiny sliver of aluminum back into the slot it was chiseled from.

Then I would probably leave it alone.

John
 
I think the safest thing to do is gently peen that burr flush then leave it be. You'll want the preserve as much of the anodized coating as possible so no use of any abrasives or files. I recommend a small steel hammer with hardened and polished faces. You want a mirror finish on the face of that hammer so as to not emboss any imperfections into the aluminum.

I has several varieties of these little German Picard hammers I use however these require polishing.
Ball, Cross and Straight Pein hammers from The Hammer Source
Lots of other useful stuff at that guys site too:cool:

Brownells carries some nice light chasing hammers too
http://www.brownells.com/gunsmith-tools-supplies/general-gunsmith-tools/engraving-tools-supplies/chasers-hammers/chasers-hammers-prod5750.aspx

I would not recommend using any hammer made of copper or any alloy of copper. Copper is aluminum aggressive and given the right conditions will eat away aluminum. You don't want to risk embedding even a miniscule particle of copper in the aluminum.

Post a pic when you get a chance and let us know how it turns out.

Cheers
Bill
 
Thanks John and Bill. :) Between your votes, and the votes of everyone else, peening it is! I'm thinking that it's not going to take much effort to go that route and "collateral damage" should be nil if I do it right. :D

I'll try to take before and after photos, but there really isn't much to see... unless, of course, I manage to really mess it up! :eek: :p :D
 
Use a light touch and I'm sure you'll do fine.

John
Hmmm. I guess using my grandfather's 64 ounce blacksmith's hammer would not be a very good move. :D

Seriously, I'm not sure I've got a delicate enough hammer to do the job at this point. Went shopping for one today, but couldn't find anything really appropriate. :o I'll try again tomorrow. :)

Funny but I passed on a $5.00 gunsmith's hammer at the last show. :rolleyes: Dang! :mad:
 
Well, I got impatient last night and made do with the tools on hand. :o The "right" tools will have to be ordered in. They are not available locally. :rolleyes:

Peening, by itself, didn't do much of anything. That is gosh-darn hard aluminum! :eek: So I started using the best small file I had on hand... and I went at it as slow as molasses in January.

Turned out that alternately filing and peening had the best effect. The original nasty sharpness is now 90% gone, but the visual aspect of the flaw remains. In fact, the gouge itself is even more evident with the raised burr mostly out of the way. Not much I can do about that right now.

I should probably quit while I'm ahead, but I'm going to order a set of jeweler's diamond files and a real gunsmith's hammer or two. I should have them on hand anyway. :o
 

Attachments

  • 1.jpg
    1.jpg
    62.5 KB · Views: 58
  • 2.jpg
    2.jpg
    63 KB · Views: 55
  • 3.jpg
    3.jpg
    52.6 KB · Views: 57
  • 4.jpg
    4.jpg
    53.2 KB · Views: 52
Last edited:
I should probably quit while I'm ahead, but I'm going to order a set of jeweler's diamond files and a real gunsmith's hammer or two. I should have them on hand anyway. :o

I suppose that now is not a good time to mention that I found two Dillon Precision gunsmith hammers at a yard sale last spring.

8 & 16 ounce hammers. I think I paid $10.00 for both of them. Woman selling some of her ex husbands left behind stuff.
 
I suppose that now is not a good time to mention that I found two Dillon Precision gunsmith hammers at a yard sale last spring.

8 & 16 ounce hammers. I think I paid $10.00 for both of them. Woman selling some of her ex husbands left behind stuff.
I *do* take donations you know! :D Help a poor old man survive his out-of-control 3rd Gen addiction! ;)
 
Back
Top