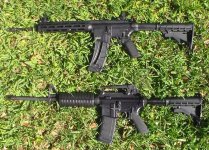
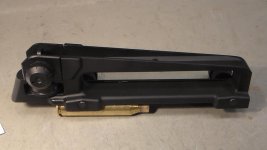
Here is how I converted my new 15-22 to M4 appearance.
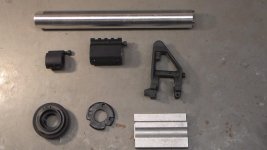
1. You will first need the conversion kit from tacticool22.com. There are two conversions, one for free-float handguard, and one for two-piece handguard. You need the one for the two-piece handguard. (When I ordered mine, the website sold me the A2 sight base, the railed gas block, and the small gas block for under the handguard. You only need one. Tacticool said they'd take back the other two.) The parts and tools from Tacticool will cost about $100. The parts you need to get in the kit are:
a. Barrel nut / slip ring.
b. A2 style front sight base
c. Handguard end cap
With the parts you also need to order:
e. Barrel nut wrench
f. Barrel vise jaws.
These two tools are utterly essential. If you do not use the barrel vise jaws you will damage the upper receiver.
2. You will need additional parts not sold by Tacticool. They are:
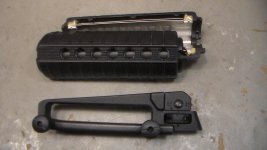
a. Handguards. You can use either the skinny CAR-15 type, or the oval M4 type. I used the latter, to match my Colt 6920. I got them as new takeoffs on ebay for $20 shipped.
b. Front sight parts. You will need the front sight post, spring and detent, and the sling swivel and its rivet. Available from Midway for $20.
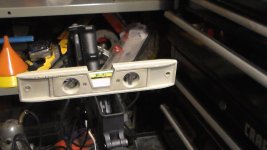
c. A3 carry handle. Avoid the foreign airsoft grade junk. I got a new one from Standard Manufacturing. Made in USA and is a quality item. $40 plus $10 shipping. I'd put it on a real AR without hesitation.
3. You will need additional tools:
a. Bench vise.
b. Spanner wrench to tighten the new barrel nut (I didn't have one and got away with it, but you really need a spanner wrench).
c. Hammer and punch with angled tip.
d. Adjustable wrench.
e. Hacksaw and file.
f. Small level.
g. Allen wrenches.
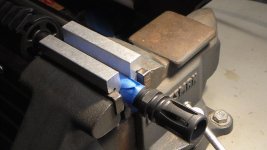
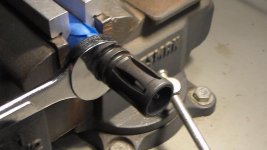
4. To start, chuck the barrel up in the vise jaws, and use the wrench to remove the flash suppressor. It is standard left-to-loosen threads. (Note: Whenever I did not need the flash suppressor off, I screwed it back on loosely, to protect the threads during the procedure).
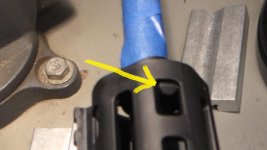
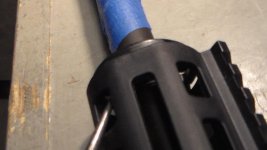
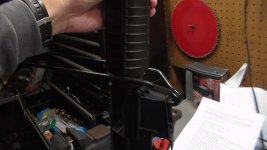
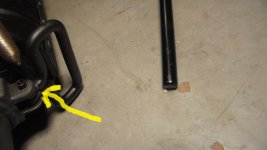
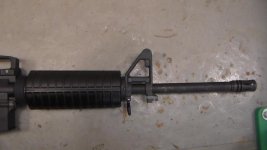
5. Remove the tabs holding the front cap of the handguard, by pushing in on them with something like a small screwdriver (see photo). Slip the cap over the end of the barrel.
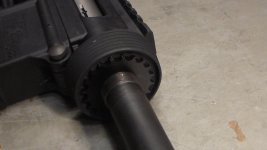
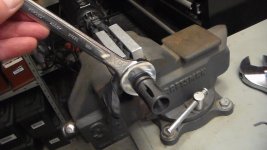
6. Now slip the barrel nut wrench over the barrel, down inside the handguard. Chuck the barrel back up in the vise jaws and use a wrench to remove the barrel nut. Ensure that the teeth of the barrel nut wrench mesh properly with the barrel nut. It didn't take much force to loosen the barrel nut, but it takes forever to unscrew it.
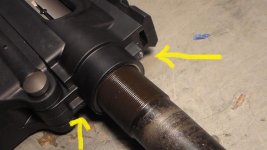
7. With the handguard and the barrel nut off, you can now see the two plastic tabs on the end of the receiver. Those need to be cut back for proper fitment of the new barrel nut. This is the only modification you need to make in the whole conversion. Take a hacksaw and cut the bottom one all the way back, and cut the top one about halfway back. File the ends smooth.
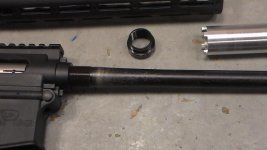
8. Now screw the new barrel nut / slip ring assembly onto the barrel. If you cut and filed the tabs correctly, it should fit smoothly up against the front of the receiver.
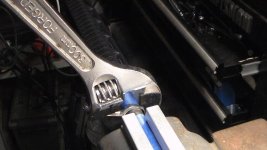
9. The barrel nut must be tightened. I did not have the proper spanner wrench to do that, so I used a large pair of channel-lock pliers to do so. Channel-lock pliers have no place when working on firearms, I know. I got away with it, but I strongly recommend a spanner wrench. You are supposed to use a torque wrench and torque it to a proper specification. I didn't have either the torque wrench or the specification. It didn't take much to loosen the old barrel nut, so I didn't overtighten the new one.
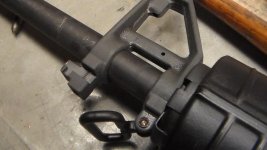
10. Now it's time for the front sight base. Assemble the front sight post, spring and detent into the front sight base. The front sight base comes with a bolt; bolt the handguard end cap on. A real AR-15 A2 front sight base is also the gas block, and is held on by taper pins. This one is a fake and is held on by included allen-head screws. Using the handguards as a measure, slide the front sight base back to the proper location. Tighten the allen screws just barely tight.
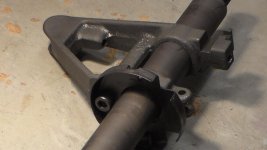
11. Install the handguards. It helps to have the installation tool shown, to hold back the slip ring.
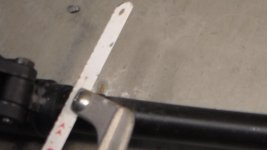
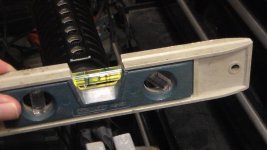
12. Chuck the barrel in the vise jaws. At the magazine well, measure with the level to make sure the magazine well is level with the ground.
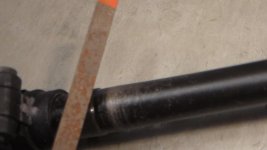
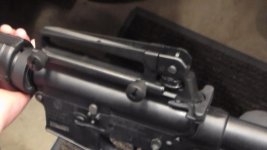
13. Now measure the bayonet lug on the front sight base and adjust until it is level. When it is, tighten the allen screws.
14. Look and see if the handguard is straight. It's indexed to the sprocket-shaped barrel nut. If not, loosen or tighten the barrel nut a bit, to make the handguards line up properly.
15. Now tighten the flash suppressor. It is an A1 type and need not be indexed.
16. It is now necessary to install the front sling swivel. Push the rivet through, and buck it from behind with a piece of metal. I used the little anvil part of the bench vise. A helper was necessary to hold the rifle while I used the angled punch to spread the end of the rivet (see photo).
17. The installed sling swivel should look like the next photo.
18. The carry handle is then installed on the 1913 rail.
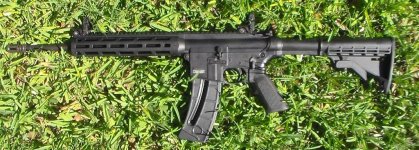
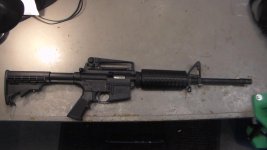
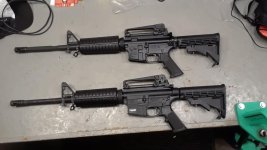
19. The finished product will look very like a M4 / 6920.
1. You will first need the conversion kit from tacticool22.com. There are two conversions, one for free-float handguard, and one for two-piece handguard. You need the one for the two-piece handguard. (When I ordered mine, the website sold me the A2 sight base, the railed gas block, and the small gas block for under the handguard. You only need one. Tacticool said they'd take back the other two.) The parts and tools from Tacticool will cost about $100. The parts you need to get in the kit are:
a. Barrel nut / slip ring.
b. A2 style front sight base
c. Handguard end cap
With the parts you also need to order:
e. Barrel nut wrench
f. Barrel vise jaws.
These two tools are utterly essential. If you do not use the barrel vise jaws you will damage the upper receiver.
2. You will need additional parts not sold by Tacticool. They are:
a. Handguards. You can use either the skinny CAR-15 type, or the oval M4 type. I used the latter, to match my Colt 6920. I got them as new takeoffs on ebay for $20 shipped.
b. Front sight parts. You will need the front sight post, spring and detent, and the sling swivel and its rivet. Available from Midway for $20.
c. A3 carry handle. Avoid the foreign airsoft grade junk. I got a new one from Standard Manufacturing. Made in USA and is a quality item. $40 plus $10 shipping. I'd put it on a real AR without hesitation.
3. You will need additional tools:
a. Bench vise.
b. Spanner wrench to tighten the new barrel nut (I didn't have one and got away with it, but you really need a spanner wrench).
c. Hammer and punch with angled tip.
d. Adjustable wrench.
e. Hacksaw and file.
f. Small level.
g. Allen wrenches.
4. To start, chuck the barrel up in the vise jaws, and use the wrench to remove the flash suppressor. It is standard left-to-loosen threads. (Note: Whenever I did not need the flash suppressor off, I screwed it back on loosely, to protect the threads during the procedure).
5. Remove the tabs holding the front cap of the handguard, by pushing in on them with something like a small screwdriver (see photo). Slip the cap over the end of the barrel.
6. Now slip the barrel nut wrench over the barrel, down inside the handguard. Chuck the barrel back up in the vise jaws and use a wrench to remove the barrel nut. Ensure that the teeth of the barrel nut wrench mesh properly with the barrel nut. It didn't take much force to loosen the barrel nut, but it takes forever to unscrew it.
7. With the handguard and the barrel nut off, you can now see the two plastic tabs on the end of the receiver. Those need to be cut back for proper fitment of the new barrel nut. This is the only modification you need to make in the whole conversion. Take a hacksaw and cut the bottom one all the way back, and cut the top one about halfway back. File the ends smooth.
8. Now screw the new barrel nut / slip ring assembly onto the barrel. If you cut and filed the tabs correctly, it should fit smoothly up against the front of the receiver.
9. The barrel nut must be tightened. I did not have the proper spanner wrench to do that, so I used a large pair of channel-lock pliers to do so. Channel-lock pliers have no place when working on firearms, I know. I got away with it, but I strongly recommend a spanner wrench. You are supposed to use a torque wrench and torque it to a proper specification. I didn't have either the torque wrench or the specification. It didn't take much to loosen the old barrel nut, so I didn't overtighten the new one.
10. Now it's time for the front sight base. Assemble the front sight post, spring and detent into the front sight base. The front sight base comes with a bolt; bolt the handguard end cap on. A real AR-15 A2 front sight base is also the gas block, and is held on by taper pins. This one is a fake and is held on by included allen-head screws. Using the handguards as a measure, slide the front sight base back to the proper location. Tighten the allen screws just barely tight.
11. Install the handguards. It helps to have the installation tool shown, to hold back the slip ring.
12. Chuck the barrel in the vise jaws. At the magazine well, measure with the level to make sure the magazine well is level with the ground.
13. Now measure the bayonet lug on the front sight base and adjust until it is level. When it is, tighten the allen screws.
14. Look and see if the handguard is straight. It's indexed to the sprocket-shaped barrel nut. If not, loosen or tighten the barrel nut a bit, to make the handguards line up properly.
15. Now tighten the flash suppressor. It is an A1 type and need not be indexed.
16. It is now necessary to install the front sling swivel. Push the rivet through, and buck it from behind with a piece of metal. I used the little anvil part of the bench vise. A helper was necessary to hold the rifle while I used the angled punch to spread the end of the rivet (see photo).
17. The installed sling swivel should look like the next photo.
18. The carry handle is then installed on the 1913 rail.
19. The finished product will look very like a M4 / 6920.
Attachments
-
 SAM_0038.jpg229.5 KB · Views: 235
 -
 SAM_0039.jpg123.8 KB · Views: 125
 -
 SAM_0044.jpg54.7 KB · Views: 117
 -
 SAM_0040.jpg62.4 KB · Views: 111
 -
 SAM_0048.jpg46.7 KB · Views: 106
 -
 SAM_0049.jpg68.1 KB · Views: 105
 -
 SAM_0050.jpg61.1 KB · Views: 99
 -
 SAM_0051a.jpg49.6 KB · Views: 99
 -
 SAM_0052.jpg51.6 KB · Views: 96
 -
 SAM_0053.jpg68.7 KB · Views: 94
 -
 SAM_0054.jpg63.8 KB · Views: 95
 -
 SAM_0055a.jpg66.1 KB · Views: 90
 -
 SAM_0056.jpg35.2 KB · Views: 99
 -
 SAM_0057.jpg43.4 KB · Views: 96
 -
 SAM_0058.jpg51 KB · Views: 97
 -
 SAM_0059.jpg55.6 KB · Views: 94
 -
 SAM_0060.jpg60 KB · Views: 93
 -
 SAM_0061.jpg59.5 KB · Views: 92
 -
 SAM_0062.jpg68.5 KB · Views: 91
 -
 SAM_0063.jpg66.4 KB · Views: 90
 -
 SAM_0064a.jpg48.9 KB · Views: 93
 -
 SAM_0065.jpg67.4 KB · Views: 99
 -
 SAM_0066.jpg40.8 KB · Views: 97
 -
 SAM_0067.jpg47.5 KB · Views: 133
 -
 SAM_0068.jpg49.3 KB · Views: 107
 -
 20190420_224547.jpg66.9 KB · Views: 161
Last edited by a moderator:


