A DIY Stocks Procedure for Improved Fit.

fleabus101

SWCA Member, Absent Comrade
Joined
Dec 25, 2018
Messages
849
Reaction score
1,712
Location
S W GA
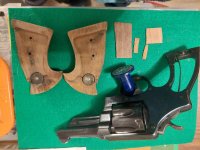
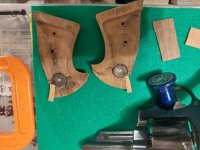
I have had a pet pieve about Stocks/ Grips fit , esp
at the top rear horn area, and down the top rear backstrap areas.
I'm gonna " endeavor to persevere " on a procedure
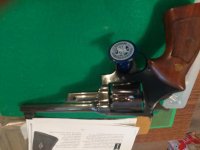
I use to "enhance" the appearance and fit regarding this area. This is just my attempt for my obsessive
compulsion to fix this fitment issue.
This procedure can be useful and beneficial regarding rifle and shotgun stock wood appearance also.
So, bear w me as I add to this post to share my info
and procedure to accomplish this task.
Its not rocket science stuff, just a way to help this
problem of mine on "putting wood back on" that's missing , worn away, or been lost on the stocks.
I hope you find it helpful/ informative, or at least something to read , on our S&W collecting passion.
I'll ad to this post as I continue taking a few pics
and putting some materials used to do this "Thang"
daily..
Best, Randy !!
 
Last edited:
Register to hide this ad
Acknowledgements Due

Before I do another post, I'd like to acknowledge the
Really great work of the Artisans in Wood we have on our board. The current work of Curtis Harlow and the recent work of Keith Brown. They are truly Masters of Creativity in Wood. I think about the tremendous amount of time and effort to take a sold block of wood, then the pattern layout, the hrs of tedious shaping , crafting the borders , the hand
Checkering work and hrs of fine sanding to shape the work. It's truly a bargain when you think of what all went into these wood creations.
I wanted to give all the credit these guys are due !!
Just marvelous members wexare blessed to have in our midst.
My next post sometime today will deal with materials I've used on my help on stocks fit and shape along the areas I've mentioned. Hopefully to follow on it later today w a few pics regarding the materials. Best, Randy..
 
I’m in the process of making a Mannlicher forend for a Martini Cadet 12/15 with a barrel cut to 20” from 29”. Finally found someone to run a 1” groove down the center of a walnut blank and sanded the channel to fit the tapered barrel. They also drilled the screw hole. Took it to the body shop I retired from and used an air grinder to partially shape it. Should have used the table saw again to thin the sides rather than grinding. Learned something there.

On to the subject of this post, “started admiring the skills by some people to make stocks, grips etc”. Walnut is very hard to sand and watching Utube videos to see how they reduce the size to the final shape. Rasping, filing and sanding and making it flat with hand tools is amazing. I would be afraid of ruining an expensive piece of wood.

Doing body work and making a panel ripple free with body putty from being damaged is a little different from working with wood and shaping it into a stock. Even making handgun grips would be a challenge. Interesting thread, Larry

Larry,

When I was making muzzleloaders from blanks (and the one bolt rifle I stocked), I got a lot of use out of a drawknife, spokeshave and a #1 and #2 hand plane. The #3 and #4 were just a bit too large for the majority of what I was doing but were usable to some extent. A four in hand wood rasp was also a blessing. Once it was shaped the way I wanted it, out came the scrapers. I do not think I used sandpaper at all once I got the hang of scrapers and shaves.

There are a couple of books on the subject that are fun reading.

Good luck,

Kevin
 
Well Larry,
I'm not gonna get very in depth on making the small repairs on grip Stocks. This is just a method I use to
help little damage areas.
I will say I call on Curt Harlow frequently for his checkering and excellent restoration work.
His marvelous skillful talents are amazing to me !!
I'm a novice piker beginner compared to Curt.
The materials I use consist of thin wood veneer material found with wood suppliers on ebay.
The walnut (or other woods) come in thin sheets.
They are available w various degrees of figure, either plain or all manor of figuring to replicate areas you may work with.
I use the 1/42 or 1/32 inch thickness to bolster or attach by bonding to the affected areas.
These thicknesses can be bonded and blended over
a wood gouge or chip, then tediously fine shaped w 320 to 400 to 600 grip gray sand paper.
The bonding agent used is primarily liquid or gel
superglue agents. Now a real Warning..A hazard regarding any bonding agent or chemical is they can be degraded badly by acetone or other stripper chemical agents, so be wary and careful with your restored wood items. These have been the most useful and lasting strong bonders and lend itself to shaping and coloring back to a blending result. The tints I use are regular light and dark old English polish liquid.
Also helpful are oil based artist colors such as raw sienna and burnt umber. Other tints can be used for blended mixes.
I find that a batch of disposeable plastic small cups
are handy bought in 50-100 qty.
Another tool I use is a good set of exacto knife blades and blade holder. This is used to remove minor amounts of the veneer material.
Minwax stain pens in a couple colors are helpful, too.
The biggest thing doing this repair work is having good patience while the work dries over a day or 2
to allow sufficient stain or bonding agents hardening
set up. Getting in a hurry often makes for reworking
stuff over. I'm preaching to me most besides yall.
These diamond magna stocks have had the backstraps and horns enhanced a bit to cover the tip rear frame areas.
A lot of times the stocks you aquire are somewhat OK in this area , but all it takes to make them better
is some tedious work fitting a bit of veneer bonded and blended to the appropriate fit and shape.
Some time consuming color match work after the shape suits you. Then I usually use Tru-Oil for the sealing top coat. It's easily worked to give flat oil looks to satin sheen to a bit glossy appearance.
That along with shorter drying times , a day or less,
to resume work.
I don't have a current project stocj set to work, But I will pull out a surplus stock side and show in some pics how I do the small procedure I use on the afore mentioned horn and rear frame areas.
I said this isn't rocket science I do. Mainly it's to open up the info to you on the material available now and having the time and real patience to experiment to achieve a result you like on the Stocks for a favorite S&W Revolver.
I hope I don't disappoint w this hopefully helpful info.
My sincere attention is to direct you on better minor stock looks and fitting.
Doing appointments this week so back again soon.
Best, Randy.
Apologies on pic orientation mess up. I have trouble pictures..
 

Attachments

  • 20231031_214058.jpg
    20231031_214058.jpg
    130.8 KB · Views: 67
  • 20231031_213440.jpg
    20231031_213440.jpg
    125.7 KB · Views: 57
  • 20231031_213548.jpg
    20231031_213548.jpg
    100.2 KB · Views: 57
  • 20231031_213701.jpg
    20231031_213701.jpg
    129.4 KB · Views: 62
Recently someone posted a picture of a set of factory target stocks his father had modified to incorporate finger grooves. When finished they reminded me strongly of the old Fuzzy Farrant style. A nice thing about factory target stocks is the large amount of wood available for reshaping. :D
Froggie
 
My Apologies for not posting some more this week. Lotta family stuff going
on kept my attention else where. I've added some pictures of some stocks
and material placement at the horn basckstrap area. I hope the pics lead you to set up on the stocks and where to bond the material to the rear stock area and horn area. The extra material at the horn tip area is reduced to a
close fit, leaving a bit of wood veneer to bond on the rear and sloping front side to set up to dry for 1-2 days to harden solid. Then is slowly w 320-400
gray sand paper shaped carefully to a bit oversize needed. I then use stain and oil tinted wood mix of stain, oil tint sienna , and tru-oil mix to color the
now shaped added area. I then let this dry well 1-2 days and finish the closer
grip fit on my revolver, constantly cking not to take too much material off as it pleases your eye on looks and fit.
Main thing is to not rush your effort and let work set up drying til hard.
Check the added pics. I will add another post showing the material in use on a spare N target set, and some of the fit and coloring in the next day or 2.
Thanks For checking this out. My goal is to show what you can do to
help your Stocks looks and appearance on your nice S&W Revlover.
Best, Randy !!
 

Attachments

  • 20231105_060425.jpg
    20231105_060425.jpg
    110.7 KB · Views: 30
  • 20231105_060506.jpg
    20231105_060506.jpg
    107.5 KB · Views: 30
  • 20231105_060614.jpg
    20231105_060614.jpg
    92.8 KB · Views: 28
  • 20231105_061008.jpg
    20231105_061008.jpg
    56.1 KB · Views: 29
Last edited:
Here's a few pictures of some Stocks with the horn and backstrap areas
done to better please the look and fit on an N Frame Revolver.
When the grips are carefully done and blending the work well,
It's not hard to have rear and front of the work look very close to a factory
appearance. My apology for the pictures orientation, it's late for me.
Best , Randy !
 

Attachments

  • 20231105_062023.jpg
    20231105_062023.jpg
    109.3 KB · Views: 35
  • 20231105_062025.jpg
    20231105_062025.jpg
    113.6 KB · Views: 26
  • 20231105_135417.jpg
    20231105_135417.jpg
    108.1 KB · Views: 28
  • 20231105_135428.jpg
    20231105_135428.jpg
    108.8 KB · Views: 29
  • 20231105_135552.jpg
    20231105_135552.jpg
    53.1 KB · Views: 25
Back
Top