Barrel Indexing Problem

Joined
Mar 10, 2012
Messages
2,465
Reaction score
6,147
Location
Upstate, SC
Hi,
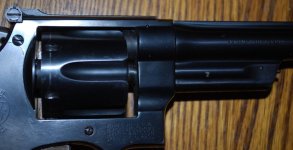
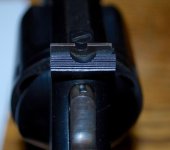
I just picked up this nice 1950 Target, and noticed that the rear sight needed to be adjusted far left to get it zeroed. (see pic #1)
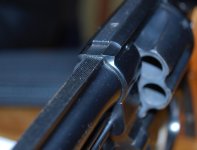
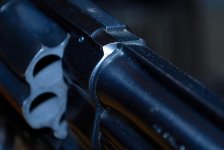
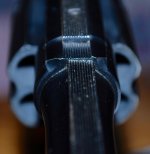
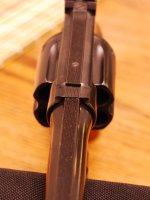
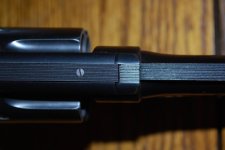
Later, I noticed that the reason for this is that the barrel is indexed past the 12 O'Clock position. (see pic #2) The barrel rib can be clearly seen as not being aligned with the topstrap. To go along with this, the front sight is slightly canted off center. Also the ejector doesn't quite fit with the locking stud in the barrel shroud.

So, what's the fix? Can the barrel be backed off slightly (given that the work would be done by a competent person having the right tools), or does the barrel need to be completely reset?

Kuhnhausen and a couple others suggest the latter.

I suppose if it's the latter case, it's the whole ball of wax: resetting the shoulder, possibly cutting one more turn of thread, facing off the barrel breech, and recutting the forcing cone.....?

Thanks for any advice,
Jim

PS: See post #14 for update
 

Attachments

  • DSC_1438.jpg
    DSC_1438.jpg
    45.6 KB · Views: 181
  • DSC_1437.jpg
    DSC_1437.jpg
    54.5 KB · Views: 204
Last edited:
Register to hide this ad
I am not a smith but the gun has a pin in the barrel. I would have someone with the proper tools move it a little maybe without removing the pin and test. That is much more than a thread index. The surface looks good. I would like to see the rest of the gun. Does it target bench shoot good with the sight adjusted? It looks like a one owner from the top.
 
Last edited:
Hi,

Thanks for the reply. I've attached a few more pics.
Yes, it's a pinned barrel. And, the pin looks totally unmolested. So, I doubt it has ever been removed for any reason.

I count 10 grooves in the barrel rib and top strap. It looks like the misalignment is about the distance value of one or two grooves?

There's no sign anywhere that this revolver has been worked on inappropriately; all screws slots are clean, no tool marks or scratches.
Serial # S 85xxx so, about 1952. Could it have been shipped this way?

It is my understanding that the torque on the pinned barrels was a bit less than the later unpinned barrels. (IE: fitted so it hand tightens to 1/8th turn less than 12 o'clock, then use a barrel wrench/fixture for the final 1/8th turn.) So, I wonder if backing the barrel out slightly would still be within an acceptable amount of torque?

Jim

PS: It shot right, even with the rear sight blade adjusted that far left. So, I really believe given the height of the front sight (Patridge) the getting the barrel aligned properly will fix things.
 

Attachments

  • DSC_1439.jpg
    DSC_1439.jpg
    59.5 KB · Views: 127
  • DSC_1440.jpg
    DSC_1440.jpg
    48.3 KB · Views: 133
  • DSC_1441.jpg
    DSC_1441.jpg
    46.8 KB · Views: 132
  • DSC_1442.jpg
    DSC_1442.jpg
    39.5 KB · Views: 136
Last edited:
I have never had to "tweek" the barrel on a pinned S&W, so I cant say how that would effect things.

I have done so to several fixed sighted SA revolvers with excellent results. Both required at least as much of a turn as yours appears to need to get things hitting POA. The cylinder gap change was minimal, having no negative effect.

I am not a gunsmith, but I believe the small amount of correction your barrel needs should not be enough to have to worry about the barrel shooting loose. I would try it, and worse case situation, the barrel starts to loosen upon use, or the retaining pin wont properly fit, and you have to go thru the effort of having the barrel shoulder turned down, and the barrel re-fit.

Nice looking 1950 Target, by the way.

Larry
 
A few years back I bought a 25-2 that looked beautiful, but after I got it home I noticed the barrel was over tightened. I took it to the local S&W guru and he moved it back. He said sometimes they don't go back all the way, but mine came out nice.
The Handgunner Shop.. Topton Pa.
Randy has changed barrels for me, and recently "tightened" a barrel on a 929. Those rear sights were the opposite of yours, and are now centered.
 
If the pic of the rear sight indicates how far left you had to set it to achieve desired zero, and the gun shoots and functions correctly and to your liking, I wouldn't change a thing; that rear blade isn't very far left at all...

Otherwise, is a qualified revolversmith near you to have a look and make a suggestion? It seems a gentle "touch" a few degrees over in the proper equipment might correct, but you're right, if the barrel has to be pulled I'd guess the full treatment will be required.

The latter might be worth it if, say, you already have excessive barrel-cylinder gap, but otherwise I'd suggest avoiding "the works" and living with the slight cant if everything else is in order.

Again, I've seen the rear sight blade torqued a lot farther over to get zero on otherwise good revolvers.
 
I believe with proper tools the barrel could be turned back without removing the pin. The groove in the barrel shank is actually a bit generous and will allow several degrees of movement without anything bending. If it returns to the slightly canted position there is anothe fix before setting the barrel back. Remove barrel and use a small punch to make say 8 spaced small punch marks around the shoulder that mates to the frame. This will displace a small amount of metal around each punch and that metal will contact the frame earlier than the shoulder did before and increase the torque required to align it. I doubt it will ever move again. Did it to my 18-4 years ago. It is still straight after thousands of rounds.

Barrel cylinder gap. One complete turn is .027777----. There are 360 degrees in a turn so each degree only gives you .000077. so 3 or 4 degrees won't change much. It takes 13 degrees to get .001
 
Last edited:
What steelslaver posted has always worked for me. I followed the methods in old gun smithing manuals. It's usually not required to dimple with a punch, but if so, I dimple the mating surface on the frame, not the barrel shoulder.

The barrel will not return to being canted to the left. If the barrel is not tight enough after straightening it, when shooting the gun the barrel tends to turn to the right due to the rifling twist. If that happens, then resort to dimple the frame mating surface to the barrel. But I doubt it will be necessary.
 
To All Who Responded,

I am very grateful for your informed responses, and the time you took to answer. There is a lot of knowledge on this great forum.
A number of you guys have consistently, over the years, provided fantastic insights and experiences that has always been appreciated.

The seller, also a forum member, has been extremely helpful and generous.
This is a very nice revolver and deserves to be properly adjusted.
So, I plan to see if just tweaking the fit by backing out the barrel a degree or two solves the problem. My hope all along was that might just work. If it works, great. If not, then there's other options.

I'll follow up with the details, and more pictures.

Thanks again, and I'll be sure to revisit this thread...
Jim
 
I agree with Steelslaver - a Smith with experience might be able to move the barrel just a smidgeon without removing the pin. Sometmes the pin and the flat on the barrel have some play and will allow it to move a little. Yours is not off all that much.
 
Having fitted quite a few barrels I've got a slightly different take than some posters.

Real briefly, the best way to evaluate the issue is to pull the barrel pin and loosen the barrel about 90 degrees. Turn the barrel in hand tight. If the (from the rear) left hand side of the barrel rib lines up with the right hand side of the frame rib, you can just turn the barrel in to proper alignment and you'll have correct torque.

If the barrel comes up short, if it's very slightly slightly short pull it and lightly apply some grease to the barrel shoulder. Be very careful in moving it to index point. Anything significant, you'll need to lightly face the barrel shoulder.This is a skill of the craft thing evaluating what you can muscle without cracking the frame.

If the barrel turns past that alignment point with hand pressure, you'll pretty much have to do the barrel set back. Kinda depends on how far past. That doesn't involve cutting any new threads, just moving the shoulder-don't forget to trim any under lug if the ejector rod is enclosed.
 
Last edited:
I did the punch dimples on a 25-2 that was indexed too far. It worked out fine. Quite often, if you have to loosen the barrel to get the correct index, even a little, it will be loose, and you will need to either do the punch marks to raise some metal, before retightening, or locktite the threads. I have heard of some putting a thin shim up against the barrel shoulder, to get the same effect. Recutting the shoulder would be a last resort.
 
Problem seems to be fixed

Hi,

Well, I decided to just do the work myself. Fitting a set of oak blocks for the frame and barrel was straightforward. I used a pin block vise I made for working on grand piano pin blocks as a bench-mounted barrel vise. I used a large Jorgensen #2 handscrew as the wrench. After set-up, the adjustment was fairly easy, just took a number of raps on the handscrew with a wooden mallet. It was very controllable. It moved very minutely bit by bit.

(As a related experience, before having a bad accident a few years ago, I did a lot of cycling and bike work. I often worked on vintage Italian bikes, with removal and adjustment of the headset or bottom bracket being common. The issues involved seem similar to barrel indexing.)
I took it to the range yesterday and put 100 rds through it to see if it was OK. All cast bullet loads from 200 gr target loads to stiff 250 gr loads. Before and after pics confirm it was unchanged.

At the same time, I did some accuracy work at 25 and 50 yds. Got one very lucky 5 shot group at 50 yds (with the stiff 250 gr RNFP load). No question, it's a great shooter!

There's a few pictures here to show some of the highlights.

Mostly, I want to thank everyone for their great help.

Sincerely,
Jim
 

Attachments

  • DSC_1458.jpg
    DSC_1458.jpg
    41.6 KB · Views: 86
  • DSC_1449.jpg
    DSC_1449.jpg
    62.3 KB · Views: 84
  • DSC_1454.jpg
    DSC_1454.jpg
    86.3 KB · Views: 85
Rather than rely on punch marks which may or may not be the same height, I peen the mating shoulder on the barrel for the full 360 degrees with a small, polished face hammer. (See the previous thread about planishing). Several trips around the barrel shoulder will push up enough metal, evenly, to allow the proper torque when reassembling. Using light taps with a smooth hammer, the job can be done with no marks showing. By the way, I lay the barrel on a piece of lead while topping on to prevent any damage to the under side.
 
Rather than rely on punch marks which may or may not be the same height, I peen the mating shoulder on the barrel for the full 360 degrees with a small, polished face hammer. (See the previous thread about planishing). Several trips around the barrel shoulder will push up enough metal, evenly, to allow the proper torque when reassembling. Using light taps with a smooth hammer, the job can be done with no marks showing. By the way, I lay the barrel on a piece of lead while topping on to prevent any damage to the under side.

Can you post a photo of a barrel that you've peened/fitted that way?
 
Peening does work also. It does give a little more metal contact to but up against the frame. Hopefully in the OP's case he may only need a few thousandths, and a few moderate taps around the shoulder may get what he needs without leaving peen marks.
 
Rather than rely on punch marks which may or may not be the same height, I peen the mating shoulder on the barrel for the full 360 degrees with a small, polished face hammer. (See the previous thread about planishing). Several trips around the barrel shoulder will push up enough metal, evenly, to allow the proper torque when reassembling. Using light taps with a smooth hammer, the job can be done with no marks showing. By the way, I lay the barrel on a piece of lead while topping on to prevent any damage to the under side.

Usually more than one good way to skin a cat. Never thought of that. Hard to do anything about right at the rib or an ejector shroud on barrels with those, But a little on each side of those should be sufficient. It is all about moving the metal in the direction you desire. I don't think that the "crater" areas around the punch marks need to be completely uniform. Only trying to create enough for it to tighten up. Some of the metal around the crater mouth will be flattened by the turning motion as barrel tightens evening everything out. But for just a few degrees either method works well. Like Hondo doing his metal movement on the frame and me doing it on barrel. Easier to get straight uniform punches on the frame shoulder. I just try to stay away from messing with the frame if I can. But, I confess if a barrel doesn't go all the way into time it is easier to remove a tiny bit from the frame face than barrel shoulder. 1 degree needs just .000077 of metal. 5 degrees .000385. A couple of smooth flat passes with a good file will get you a few degrees and everything stays flat and square.

I read your thread on planishing and have to agree. Itt works. Best done before any sanding or filing. You want the mental in the high spots for moving into the low ones.

Most people never stop to really think about something like a dent. Yes there is a low spot, but the metal didn't disappear, it got moved. It is sometimes possible to move it back.
 
Last edited:
Back
Top