Dave Nash
Member
- Joined
- Mar 7, 2009
- Messages
- 110
- Reaction score
- 475
Part One of Two
Please note that this piece is being included to merely show you something that was done experimentally back at Smith in the late 1980's; shortly after the 5906 was first introduced. It is not intended as a do-it-yourself tutorial for the modification of your own or someone else's firearm. I am in no way recommending anything like what you see here be done to anyone's gun; a 5906 or not. Work of any type on any firearm should not be attempted by anyone but a competent gunsmith familiar with the particular weapon involved and it is best that such a person be both certified and authorized by the manufacturer for such efforts. In fact, it is recommended that any work be done only by the factory itself or by someone (or some entity) that the factory itself directly authorizes and recommends. This would include both repairs and modifications.
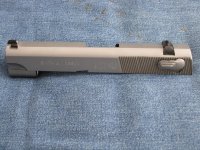
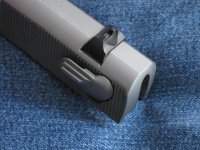
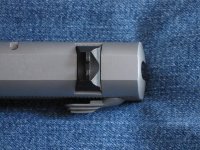
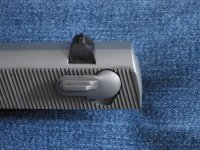
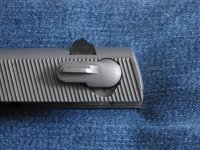
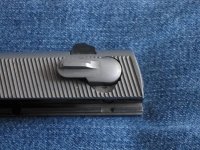
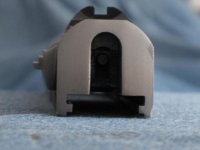
First pictured in late September within a thread inside a different Board on this site (Mystery Gun Musings) and then shown again and mentioned in passing about a month ago on this Board (Factory Experimental 5906 Slide) when I discussed for the first time, the how and why behind the extended serrations on the 5906 slide to which it is attached, was the radically altered, single sided, combination manual safety/decocking lever that is detailed in the attached images below (and in the following, second half of this two-part outline as well).
Like some of the things that I disclosed in the "Mystery Gun" and the "Experimental Slide" postings, I am talking about this at the urging of a friend and because of the potential interest to many of those of you who read and participate in this Forum.
In fact, this time, I think that there might be a lot more interest for repeatedly throughout this site, I see people discuss the merits and the actual value of the conventional, 3rd Generation dual-sided (ambidextrous) lever, its profile and its configuration. Many of these threads deal with what is seen as adding an additional and perhaps unnecessary width to an otherwise "thin" gun and some of them talk about the shape of the lever itself and how that affects its usefulness; especially under certain conditions. The purpose of my posting these materials here is to show you that some of us were at least thinking about such things ourselves some 20-24 years ago when the guns were first introduced and put into service.
First, note that this is a single-sided lever and not an ambidextrous version. While I certainly see the advantages to the "ambi" configuration (that was included on most, but not all, of the 3rd Gen Traditional Double Action guns) for marketing, fielding and actual employment reasons, even back then (in the late 1980's and early 1990's), I wasn't totally convinced that it was necessary on all guns for all applications.
At the time, the ambi-lever was a good selling point (marketing of the gun) and it allowed departments to teach the same techniques to right-and-left-handers while issuing them the exact same weapon (fielding of the gun). Furthermore, it fit in with what at the time might have been the true beginnings of (and in looking back, maybe even an over-emphasis on) certain "weak-hand" techniques (employment of the gun) by the everyday user of such firearms. But in the late 1980's and early 90's, I was already seriously involved in Concealed Carry methodology and equipment (something that was not yet a mainstream topic like it is today), and I had my doubts about it. For I saw a real advantage to a flatter outer surface (for right-handers) as well as one less way of snagging something while wearing or producing the gun in such a manner regardless of which hand was used.
So while this experimental lever (and the previously described slide to which it was attached: Factory Experimental 5906 Slide) was installed on what was intended for use as a full size, duty (and generally not a concealment) pistol, in viewing that gun as testbed for a number of things, I found that I could not only study the effects of the flatter profile when it was carried concealed but I could also collect a lot of other data in regard to its everyday use in classes where non-dominant (support) hand operation was taught to both right-and-left-handed students and see if the lack of the dual-sided (ambi) lever was a hindrance or a handicap.
Again, I must admit to having something of a bias in this matter. Even back then, I felt that the lack of an ambi-lever wasn't the huge issue it was (then) being made into. Granted, as a right-hander having shot a 1911 for the preceding decade in matches where one was often forced to do things with the "off" hand, I could see how some might think it was necessary but "off" the range and in real life, I wasn't so sure. However, that is a discussion for another day in a separate Thread on a different Board on this site. But if you are interested about it, I have just touched on it recently here on the Smith & Wesson Forum in this Post that I made the other morning in a different Thread entirely: About The Also-Mentioned 1911 Issues
That said, I should make it clear that I believe the main and most important change here isn't the lack of a right side (left hand) operating surface or paddle. It is the modifications to the engagement surfaces of the left side (right hand) lever itself.
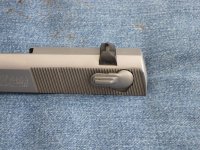
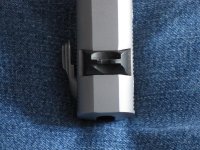
The standard factory, combination manual safety/decocking lever configuration (either single or double-sided/ambidextrous) has a series of fine (shallow) horseshoe-like steps leading up to a small plateau that establishes the shape and the maximum thickness of its user engagement paddle(s). While these proportional ledges look nice, I always thought they left a lot to be desired if one was wearing gloves, if one's thumb was of a larger diameter than "average" (making for less thumb-to-paddle/line-to-line contact) or if one's thumb was either "fleshy", or conversely, "calloused" or composed of dead or inflexible skin. For when thumbing the lever down (to decock the gun and/or put it on "Safe"), it was not uncommon for some people to have that portion of their thumb slip off the lever unless they focused on maintaining an inward, as well as a downward, pressure. Something that is asking a lot of somebody (physiologically) who is attempting to lower the hammer on a gun that might have just been fired in defense of their life or the life of another.
To me, however, this thumb-construction-to-lever-profile relationship seemed even more problematic in terms of pushing the lever upward into the "Off" or "Fire" position. For in that direction, all of those physical and biological conditions I just mentioned can contribute greatly to the tendency for the tip, top or side of the thumb to merely roll off, slide past or skip over the lever (paddle) rather than to solidly (or positively) move it completely into the position necessary for the gun to be fired; especially when in a hurry or under stress as one might be in the face of a life-threatening situation (even when considering the spring-loaded detent-like functioning of the lever itself) .
So if you look closely at the lever in the picture, you'll see that without negatively affecting the overall thickness of this left side (right hand only) version, I recut the upper and lower halves of it in different ways that I believe were directly applicable to these two separate (and different) movements and the issues unique to each one.
That reshaping and the reasoning behind it, is discussed in Part 2 (the concluding portion of this 2-Part report) that follows immediately. That half of this paper should be read in its entirely as well.
Please note that this piece is being included to merely show you something that was done experimentally back at Smith in the late 1980's; shortly after the 5906 was first introduced. It is not intended as a do-it-yourself tutorial for the modification of your own or someone else's firearm. I am in no way recommending anything like what you see here be done to anyone's gun; a 5906 or not. Work of any type on any firearm should not be attempted by anyone but a competent gunsmith familiar with the particular weapon involved and it is best that such a person be both certified and authorized by the manufacturer for such efforts. In fact, it is recommended that any work be done only by the factory itself or by someone (or some entity) that the factory itself directly authorizes and recommends. This would include both repairs and modifications.
End Part One of Two
Please note that this piece is being included to merely show you something that was done experimentally back at Smith in the late 1980's; shortly after the 5906 was first introduced. It is not intended as a do-it-yourself tutorial for the modification of your own or someone else's firearm. I am in no way recommending anything like what you see here be done to anyone's gun; a 5906 or not. Work of any type on any firearm should not be attempted by anyone but a competent gunsmith familiar with the particular weapon involved and it is best that such a person be both certified and authorized by the manufacturer for such efforts. In fact, it is recommended that any work be done only by the factory itself or by someone (or some entity) that the factory itself directly authorizes and recommends. This would include both repairs and modifications.
First pictured in late September within a thread inside a different Board on this site (Mystery Gun Musings) and then shown again and mentioned in passing about a month ago on this Board (Factory Experimental 5906 Slide) when I discussed for the first time, the how and why behind the extended serrations on the 5906 slide to which it is attached, was the radically altered, single sided, combination manual safety/decocking lever that is detailed in the attached images below (and in the following, second half of this two-part outline as well).
Like some of the things that I disclosed in the "Mystery Gun" and the "Experimental Slide" postings, I am talking about this at the urging of a friend and because of the potential interest to many of those of you who read and participate in this Forum.
In fact, this time, I think that there might be a lot more interest for repeatedly throughout this site, I see people discuss the merits and the actual value of the conventional, 3rd Generation dual-sided (ambidextrous) lever, its profile and its configuration. Many of these threads deal with what is seen as adding an additional and perhaps unnecessary width to an otherwise "thin" gun and some of them talk about the shape of the lever itself and how that affects its usefulness; especially under certain conditions. The purpose of my posting these materials here is to show you that some of us were at least thinking about such things ourselves some 20-24 years ago when the guns were first introduced and put into service.
First, note that this is a single-sided lever and not an ambidextrous version. While I certainly see the advantages to the "ambi" configuration (that was included on most, but not all, of the 3rd Gen Traditional Double Action guns) for marketing, fielding and actual employment reasons, even back then (in the late 1980's and early 1990's), I wasn't totally convinced that it was necessary on all guns for all applications.
At the time, the ambi-lever was a good selling point (marketing of the gun) and it allowed departments to teach the same techniques to right-and-left-handers while issuing them the exact same weapon (fielding of the gun). Furthermore, it fit in with what at the time might have been the true beginnings of (and in looking back, maybe even an over-emphasis on) certain "weak-hand" techniques (employment of the gun) by the everyday user of such firearms. But in the late 1980's and early 90's, I was already seriously involved in Concealed Carry methodology and equipment (something that was not yet a mainstream topic like it is today), and I had my doubts about it. For I saw a real advantage to a flatter outer surface (for right-handers) as well as one less way of snagging something while wearing or producing the gun in such a manner regardless of which hand was used.
So while this experimental lever (and the previously described slide to which it was attached: Factory Experimental 5906 Slide) was installed on what was intended for use as a full size, duty (and generally not a concealment) pistol, in viewing that gun as testbed for a number of things, I found that I could not only study the effects of the flatter profile when it was carried concealed but I could also collect a lot of other data in regard to its everyday use in classes where non-dominant (support) hand operation was taught to both right-and-left-handed students and see if the lack of the dual-sided (ambi) lever was a hindrance or a handicap.
Again, I must admit to having something of a bias in this matter. Even back then, I felt that the lack of an ambi-lever wasn't the huge issue it was (then) being made into. Granted, as a right-hander having shot a 1911 for the preceding decade in matches where one was often forced to do things with the "off" hand, I could see how some might think it was necessary but "off" the range and in real life, I wasn't so sure. However, that is a discussion for another day in a separate Thread on a different Board on this site. But if you are interested about it, I have just touched on it recently here on the Smith & Wesson Forum in this Post that I made the other morning in a different Thread entirely: About The Also-Mentioned 1911 Issues
That said, I should make it clear that I believe the main and most important change here isn't the lack of a right side (left hand) operating surface or paddle. It is the modifications to the engagement surfaces of the left side (right hand) lever itself.
The standard factory, combination manual safety/decocking lever configuration (either single or double-sided/ambidextrous) has a series of fine (shallow) horseshoe-like steps leading up to a small plateau that establishes the shape and the maximum thickness of its user engagement paddle(s). While these proportional ledges look nice, I always thought they left a lot to be desired if one was wearing gloves, if one's thumb was of a larger diameter than "average" (making for less thumb-to-paddle/line-to-line contact) or if one's thumb was either "fleshy", or conversely, "calloused" or composed of dead or inflexible skin. For when thumbing the lever down (to decock the gun and/or put it on "Safe"), it was not uncommon for some people to have that portion of their thumb slip off the lever unless they focused on maintaining an inward, as well as a downward, pressure. Something that is asking a lot of somebody (physiologically) who is attempting to lower the hammer on a gun that might have just been fired in defense of their life or the life of another.
To me, however, this thumb-construction-to-lever-profile relationship seemed even more problematic in terms of pushing the lever upward into the "Off" or "Fire" position. For in that direction, all of those physical and biological conditions I just mentioned can contribute greatly to the tendency for the tip, top or side of the thumb to merely roll off, slide past or skip over the lever (paddle) rather than to solidly (or positively) move it completely into the position necessary for the gun to be fired; especially when in a hurry or under stress as one might be in the face of a life-threatening situation (even when considering the spring-loaded detent-like functioning of the lever itself) .
So if you look closely at the lever in the picture, you'll see that without negatively affecting the overall thickness of this left side (right hand only) version, I recut the upper and lower halves of it in different ways that I believe were directly applicable to these two separate (and different) movements and the issues unique to each one.
That reshaping and the reasoning behind it, is discussed in Part 2 (the concluding portion of this 2-Part report) that follows immediately. That half of this paper should be read in its entirely as well.
Please note that this piece is being included to merely show you something that was done experimentally back at Smith in the late 1980's; shortly after the 5906 was first introduced. It is not intended as a do-it-yourself tutorial for the modification of your own or someone else's firearm. I am in no way recommending anything like what you see here be done to anyone's gun; a 5906 or not. Work of any type on any firearm should not be attempted by anyone but a competent gunsmith familiar with the particular weapon involved and it is best that such a person be both certified and authorized by the manufacturer for such efforts. In fact, it is recommended that any work be done only by the factory itself or by someone (or some entity) that the factory itself directly authorizes and recommends. This would include both repairs and modifications.
End Part One of Two
Attachments
Last edited by a moderator:

")
") Best regards, 18DAI
Best regards, 18DAI