Forth Model .32 DA Project

sweatyk

Member
Joined
May 25, 2025
Messages
12
Reaction score
3
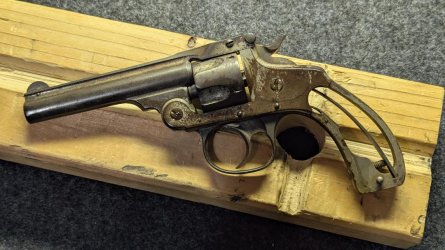
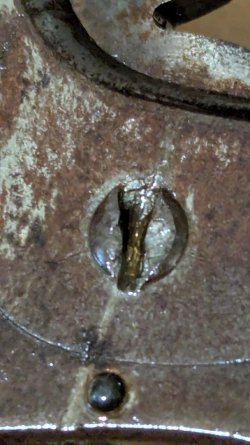
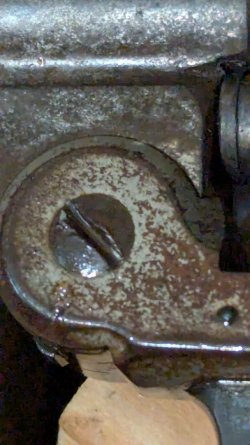
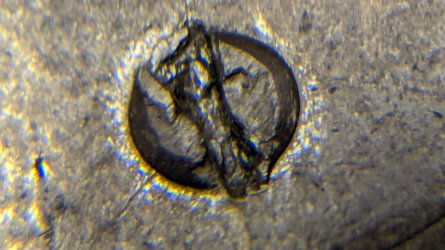
Not sure if this would be the correct section for this thread, if not please let me know where to post it. This revolver has been in my family for over 7 decades. Up until the mid 1990's it would function. Suddenly the hammer would release with the slightest bump, also the trigger would not fully reset without assistance. That's when I put it up until recently. I want to try my luck and getting functional once again and redo the toasted nickel finish. Someone before it came into my family attempted to remove the side plate screw and the pivot screw. The side plate screw is severely damaged and I'm taking my time trying to remove it the best I can. I've hit them both with P B Blaster for the last 2 days hoping it gets in there and helps break the threads free. Due to the amount of damage I'm sure I'll be searching for a replacement. I do not think there is enough value in this to take it to a seasoned gunsmith. I want to learn so it is my test subject. Any recommendations on getting this screw out? One of my initial thoughts is to use a very tiny grinding bit in my dremel to establish a solid groove for the straight slot bit to grab without doing what has already been done. I don't have easy outs (at least not yet) but trying to work with what I already have if it seems logical.

The serial number is 61115
 

Attachments

  • thumbnail (7).jpg
    thumbnail (7).jpg
    129.8 KB · Views: 1
  • thumbnail (5).jpg
    thumbnail (5).jpg
    185.3 KB · Views: 2
  • thumbnail (4).jpg
    thumbnail (4).jpg
    182.8 KB · Views: 1
Register to hide this ad
Upon a closer look, that screw has a lot more damage than the picture shows. Definitely going to need an extractor to get it out.
 
I'll try to get you started in the right direction. First off, that 'screw' is a cap nut. An Easy Out is not going to work. Keep soaking the nut with PB Blaster or other penetrating oil. Try moving the upset metal of the screwdriver slot back into place. Try heating the nut with a soldering iron and immediately drench the nut with penetrating oil. Put a screwdriver in the slot and tap the handle a few times. Turn the screwdriver to tighten the nut and then the other direction. All of the above is used to break the bond between the nut and the hammer stud threads.

With stubborn screws that haven't moved in 70 years or more, I have had to hold the frame in a padded vice, lean on the screwdriver handle and use Vice grips on the handle to get enough torque to break the screw loose.

A few more thoughts: The threads are S&W Proprietary threads. They don't stock them at the hardware store. Do not pry the side plate off. We can guide you through the proper removal if needed. Wash out the mechanism with carb or brake cleaner and check the operation again. Chances are that the "rear sear" is damaged and will need replacing. DO NOT file on anything especially the hammer. Rear sears can be purchased at Jack First Gun Parts or Poppert's and Gun Parts Corporation.
 
Thanks.... being my first time tearing into a revolver, that is what I needed to hear. I did find an exploded diagram view and saw that it wasn't a screw that went all the way through. I'll try to get a good picture of the carnage that someone did to this. It's going to take a lot of patience and finesse to get this off. Thanks for the guidance. It is much appreciated.
 
Hopefully this picture is better.....
 

Attachments

  • PXL_20250526_003102363.jpg
    PXL_20250526_003102363.jpg
    543 KB · Views: 0
Hi There,

Technically, that is not a screw. It is a Nut. I have a drawing
of this nut. My drawing says "For .38 S&W" but the 32 uses
the same nut.

Cheers!
Webb
 

Attachments

  • Side Plate Nut.jpg
    Side Plate Nut.jpg
    655.3 KB · Views: 1
It's a good thing you have patience. Keep soaking. The trigger reset may be as simple as a good washing with carb cleaner. If the trigger spring is broken, then try Jack First or the other sources. The pivot screw is available too. Beware that the head of the screw is huge and the threads are wimpy small. Don't go Rambo on the screw as it can snap easily.
 
Thank you for that illustration wlw. Very very helpful to know that.

And mmaher....I guess I've been blessed with having incredible patience. Not sure why but has served me well on many things. Thank you guys for your knowledge with this. I will slowly continue to move forward until it is either restored or wall art.
 
Would it be a bad idea to put this in an ultrasonic to try to get these threads to release?
 
I've never used an ultrasonic cleaner other than cleaning Rapidograph ink pen nibs in the graphics department. I would be willing to try it. What bath solution?

I mix up a batch of Ed's Red and soak the stubborn screws/revolver in a tightly sealed, new, one-gallon paint can for a month. Sans grips of course. Wash out the mechanism and Ed's Red with brake or carb cleaner and try to remove the screws. Wash, rinse, repeat.
 
I don't own one but was curious if anyone here has used that process on old guns with difficult screws and such
 
If you have access to a drill press, chuck the screwdriver bit in the chuck, lower and lock the spindle to hold the blade in the screw slot. Turn the chuck by hand. Make sure the press is unplugged.
 
I saw that process on a YouTube video. I also have an old school impact screw driver. Looking now for a decent clamp on bench vise to hold it steady.
 

Attachments

  • PXL_20250526_141005136.jpg
    PXL_20250526_141005136.jpg
    494.7 KB · Views: 0
Hi There,

I have used both of those methods and they work well
but it is imperative to hold the gun very securely. If it
moves during the process, it could ruin the results.

Unless you have an old fashion Fractile vise, you will need
to make a jig or some kind of fixture to hold the gun securely
before you try those methods.

Cheers!
Webb
Agreed....... that's what I'm pondering today. How to secure it. Thought about notching out a piece of 2 x 4 for it to rest in and clamp it down. I don't have a lot of space or a good place to work on things. I just try to adjust and do the best I can. I'll get it eventually.
 
Hi There,

Taking a section of 2X4 with a cross cut for the recoil shield
to sit in and then clamped down is a good start.

Cheers!
Webb
 
Got my impact ready. Working on a jig to lock it down so it will not move. Also getting more penetrant in there to the threads.
 

Attachments

  • PXL_20250527_225322737.MP.jpg
    PXL_20250527_225322737.MP.jpg
    439.4 KB · Views: 0
Hi There,

Make sure the bit fits the slot as perfectly as possible. Otherwise,
you run the risk the bit will jump out of the slot when using an
impact driver. Regrind the tip to get that perfect fit if necessary.

The hinge joint screw would be the first of the screws I would try
to remove. The slot is in better condition.

I hope you have been doing your due diligence and soaking the beast
in penetrating oil. I've had good luck using Kroil®. Be sure to tap the
screws using a hammer and a screwdriver in the slot every once and
awhile. the tapping will help the penetrating oil to work its way into
the rust bond between the parts.

But, you already knew all this stuff. Right?

Cheers!
Webb
 

Latest posts

Back
Top