
Screw Removal Problem

Joined
Nov 13, 2012
Messages
625
Reaction score
1,102
City & State/Province
Muskego, WI
A friend came to me with a problem and I could use some helpful opinions on the best course of action. He installed a Trijicon RMR red dot sight on his CZ Shadow slide. As a precaution to notice if the hold down screws were coming loose, he marked them with a very small "line" of paint from a paint pen. He thinks it is an oil based paint. Sounded like a good idea so far, but now he wants to remove the screws and they won't budge at all so he asked me to look at it. Looking at the screws under my magnifying glass lamp it appears the paint that he used migrated around the screw heads and between the sight base screw holes effectively locking the screws in place.

The screws use a #8 torx bit. This problem is compounded by the fact the electronics for the RMR to function is around these screws and I would image some type of a printed circuit board under the outer case for the sight. My first thought was to try and heat up the screws with a soldering gun by holding the tip against the screw head and waiting for a heat transfer to take place. This transfer didn't take place and I broke a Torx bit attempting this.

Unless someone has a better idea, my next best guess is to use a chemical to soften the bond between the screws and dried paint in a very small amount. The question is what would be the best chemical to use for this application? Mineral spirits, turpentine, acetone, denatured alcohol? I was thinking of using a couple drops of Kroil, but I don't know if Kroil would have any effect on the paint. I think the chemical would have to be in a liquid form and not a gel so it penetrates around the screw heads. This problem is compounded by the fact the screws are Lock-Tighted in place with medium strength Lock-Tite.

Any constructive opinions on this would be appreciated and I greatly appreciate any help in this matter. As a last ditch method I could put the slide and sight in my somewhat inexpensive milling machine and try to remove the screw heads, but I am not sure I want to go this route due to the relative small size of the screws. Thanks for reading this.

Rick H.
 
The sight is supposed to be water tight to a given depth, check the manual. Acetone on a Q tip?

Possibly if that fails, or caution triumphs, sending the slide assembly to Trijicon is an option.
 
We can talk about everything your buddy did wrong… but that does not fix your problem. I would think if the heat transfer did not break the bond perhaps something like goo gone which will soften paint and putting the slide in a vice type fixture and tapping on the end of your bit to create vibration which may break seal. I have used a wrench from Chapman which will hold the bit and works like a socket for install and removal. Kroil is a very thin lubricant and a good soak may help.
 
I’ve had luck alternating heat with cold, using aerosol “air blaster” cans (used for cleaning computers and other electronices) for the cold.
The alternation causes the metal to expand and contract, and will free up seized parts.

Hint: for real cold, spray the canister upside down! The coolant will come out and instantly evaporate.
 
You say you broke a Torx bit, did the screw strip?
A couple of days ago I was removing the side plate on a Kimber revolver and one of the three screws was tight enough to strip with a 3/32" Allen bit. Fortunately, I had on hand a 'micro' easy-out set, like this: [ame]https://www.amazon.com/Alden-4507P-Grabit-Broken-Extractor/dp/B000Q60UOO?source=ps-sl-shoppingads-lpcontext&ref_=fplfs&psc=1&smid=A10A31WBNSKD15[/ame]

One of the four bits kit fit in the 3/32" 'hole' without having to drill. Grabbed the flats on the bit with a vice grips and backed out the screw. Once removed, I saw 'red' under the side plate around the screw holes, indicated Kimber used red Locktite when factory assembled. Might want to give that a try before 'wrecking' something with heat or chemicals.
 
OP here, I tried some brand new acetone on the screws and it hardly touched the exposed paint. Really didn't have much else except for my old standby Kroil. Put some Kroil on the screw heads and it took the exposed paint off within seconds, but the screws won't move yet. I think I will let this item sit for a day or two while replenishing the Kroil around the screw heads. Kroil generally works at its best after sitting for a day or so.

Crookedcreek: no stripping out of the screw heads yet. The Torx head openings are still intact in the screws. I don't want them to strip out yet and eliminate any chance of the screws coming out with the normal bit (#8). I may buy the Alden screw remover kit you referenced on Amazon. It looks like a pretty decent repair package. I appreciate you telling me about that kit as I have never seen or used one that small.

Rick H.
 
Last edited:
No Minconrevo, The screws only go into a plate mounted on top of the slide. Unfortunately, the only way to get the mounting plate off is to take the optic off first.

Rick H.
 
This reminds me of trying to remove a scope mount from a rifle. There was one screw I finally used a milling machine to remove the head. The body came out using only fingers.

I have a sneaking suspicion your buddy used the guttentight method of tightening the screws in question along with copious amounts of Loc-Tite. If and when you get the screws out, I'd suggest the following:

McMaster-Carr stocks torque rated drivers for torx fittings. The proper torque for the screws in question is 13-15 inch pounds. I've chickened out before I get to 15, but that's me. Incorrect data removed. BTW, there's Torx and Torx plus. You can use a standard Torx driver on the plus, but the correct bit is better.

Loc-Tite is a wonderful product, but it's to be used SPARINGLY.
 
Last edited:
Mineral spirits or worst case scenario, Acetone would do the trick. Be careful with Acetone as sometimes it does not play well with wood, paint or rubber.
 
One additional thought. Try applying your heat as you did previously then apply your Kroil. As the screw/threads naturally cool, the Kroil will be drawn down into the junction. It has worked for me on larger parts.
 
OP here, I tried some brand new acetone on the screws and it hardly touched the exposed paint. Really didn't have much else except for my old standby Kroil. Put some Kroil on the screw heads and it took the exposed paint off within seconds, but the screws won't move yet. I think I will let this item sit for a day or two while replenishing the Kroil around the screw heads. Kroil generally works at its best after sitting for a day or so.

Crookedcreek: no stripping out of the screw heads yet. The Torx head openings are still intact in the screws. I don't want them to strip out yet and eliminate any chance of the screws coming out with the normal bit (#8). I may buy the Alden screw remover kit you referenced on Amazon. It looks like a pretty decent repair package. I appreciate you telling me about that kit as I have never seen or used one that small.

Rick H.

Makes sense Rick, don't break what ain't broke! I bought my set about five years ago to remove a 'head broke off' soft bolt in my Honda Pioneer UTV. Had to drill the stub with the one end of the bit, then turn it around, reverse the drill and out it came like a charm. The bits are well made of strong steel, and it won't slip when it 'bites in'. I put some pretty good 'umph' on the Kimber screw with that Vice Grip plier, and when it broke loose I had to take several 'hard turns' before things eased up a bit. It's a good tool to have on hand, even if you do solve your current problem by other means! Good luck!
 
Whatever you use for a solvent, you may also want to consider using a drill press for a "screwdriver". Set up the slide in a drill press vise with the screw head upwards, and chuck your torx bit in the drill chuck. Lower the bit into the screwhead and hold it in firm contact by pressure on the DP handle. Keeping the torx bit under downward pressure with one hand, turn the drill chuck with the other (you may find that a strap wrench on the drill chuck is helpful). This can reduce the liklihood of stripping the torx.

DO NOT TURN ON THRE DRILL PRESS MOTOR!! DAMHIKT
 
Last edited:
Suspect the heat method will need more than a soldering iron can deliver.
Maybe wrap the sight with plastic and a damp rag. Then take a heat gun to the slide.
 
As suggested I’d try acetone and instead of a torx bit a good screwdriver. I know it seems like the same as a bit but it’s not. Even if you had to get a small set or single from a snap on truck it would help.
 
One additional thought. Try applying your heat as you did previously then apply your Kroil. As the screw/threads naturally cool, the Kroil will be drawn down into the junction. It has worked for me on larger parts.

I'd try this and then follow it up by putting the gun in a padded vise, put the torx bit in a holder and lock onto the bit holder with a set of vice grip pliers.

Apply a moderate amount of torque to the screw with the vice grips & torx bit assembly, and then tap the end of the bit holder with a small hammer. Basically using it like an impact-driver.

I've "jarred" more than one stuck screw loose with this type of technique.
 
Choose wisely...blue Locktite is YOUR friend, red Locktite is the friend of the assembly!

Used in large amounts on properly prepped material, blue loc-tite can be really, really close to red.

BTW, color isn't necessarily a true indicator of properties. The loc-tite product number is.
 
Heat for loctite, all good suggestions have been mentioned. I have one point that is results of a working career as an electrical and instrument mechanic, buy quality tools and quality tools are not cheap and pistols and optical sights are not cheap, soooo.
 
I'd try this and then follow it up by putting the gun in a padded vise, put the torx bit in a holder and lock onto the bit holder with a set of vice grip pliers.

Apply a moderate amount of torque to the screw with the vice grips & torx bit assembly, and then tap the end of the bit holder with a small hammer. Basically using it like an impact-driver.

I've "jarred" more than one stuck screw loose with this type of technique.

I had a faucet cartridge that had welded itself into the faucet. No amount of torque resulted in anything more than rounding off the flats. I asked a retired machinist friend to try to save it for me with the only alternative being replacing both matching faucets in the bathroom.

A couple days later, he handed the two parts back to me and said he used this exact technique of lightly tapping as he turned.
 
Used in large amounts on properly prepped material, blue loc-tite can be really, really close to red.

BTW, color isn't necessarily a true indicator of properties. The loc-tite product number is.

I can't say I really agree with these statements.

In my experience, blue loc-tite never really gets fully hard. It stays kind of "gummy" - but red loc-tite fully hardens. Comparing the two is kind of like comparing a flexible silicon adhesive to super glue.

I guess if you slather enough blue loc-tite on a fastener you can make it about as hard to remove as one that had the appropriate small amount of red loc-tite applied to it. But if you use both appropriately the difference in how hard the screw will be to remove is very significant. Blue is for securing a fastener from backing out due to vibration, red is for permanently securing a fastener.

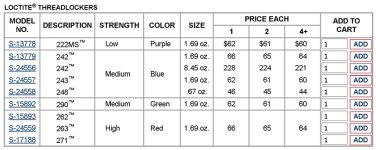
As for color vs product number, a quick look at their website shows that there are 4 different strength ranges that correspond to colors.

These different color "families" designate the product's relative bond strength - purple is a low-strength bond (1 product number), blue (3 product numbers) and green (1 product number) are medium bond strength, and red (3 product numbers) are high bonding strength.

The different products - with individual product numbers - within the color-range families are similar to each other, just slightly different in their relative bond strength and viscosity - for slightly different specific applications.

So, color does indicate relative strength, but there are different levels of bonding strength, viscosity, and application within a couple of the different color families.

See the chart below.
 

Attachments

  • Loc-tite-Chart.jpg
    Loc-tite-Chart.jpg
    93 KB
Last edited:
Q-tip dipped in acetone, just be careful, stuff is potent. Use a quality Torx head some of the cheap ones break sitting just in the package.
 
Rick:
There are several different smaller impact tools that would probably work very well for removing the torx head screw. That would be my first choice for your dilemma. Check on line. Endevor to persevere.
 
Last edited:
Quick update, I took the slide into a gunsmith and asked him if he could remove the screws and he thought he could. He latched onto one of his best Torx drivers if proper size and gave the first screw a good hard twist. I was shocked when it came out after a good loud snap sound. He wasn't so lucky on the second screw and his Torx bit snapped in two. I had to leave the slide with him so he could come up with a plan "B" for getting the screw out. I looked at the screw he got out and there was no paint on it anywhere so obvisously the Kroil took care of the paint. The screw had a blue locking agent on it and it also had a whitish looking substance on it that looked like dried Rocksette. So at least at the outset these screws may have had 3 substances on them, an oil based paint, a blue thread locker buried in the screw threads and quite possibly Rocksette. All of this is a recipe for disaster, but it did hold the optic on that's for sure. I will be interested on how the gunsmith I took the slide to removes the last screw. More to follow at some point.

Thanks again for all the replies.

Rick H.
 

Latest posts

Back
Top