HomeSmith Trainwreck: The Rustbucket

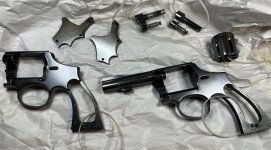
Rustbucket made a range trip today with Project 10-3 Fifty Seven and another Model 15 that is a project to be named later.

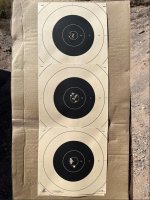
I fired 6 shots from each gun standing at 50 feet and then seriously thought about just packing up and going home....the 3 targets are below. :cool:

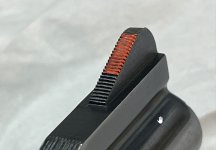
Rustbucket chugged along with no issues, just bang bang bang with every shot in the 10 ring or better. My SWAG rear sight setting turned out to be pretty good.

I'm really torn now about what to do with Rustbucket. I've wanted to build a faux pinto on a Model 15 frame with a Model 67 barrel and cylinder, but I keep running into things that shoot well and I have a hard time tearing them apart. Pretty is as pretty does.

Speaking of pretty does, the project-to-be-named-later did pretty well too. More of that same conundrum.

I suppose it's a good problem to have. :rolleyes:

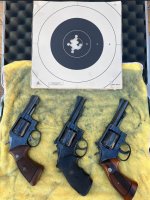
To finish out the day I put 6 shots from each gun into the same target at 10 yards, all double action. It was a good day. :D
 

Attachments

  • IMG_5003a.jpg
    IMG_5003a.jpg
    174.6 KB · Views: 136
  • IMG_5005a.jpg
    IMG_5005a.jpg
    75.7 KB · Views: 139
  • IMG_5008.jpg
    IMG_5008.jpg
    121.4 KB · Views: 132
  • IMG_5015.jpg
    IMG_5015.jpg
    118.8 KB · Views: 127
  • IMG_5017a.jpg
    IMG_5017a.jpg
    84.6 KB · Views: 123
Thank you Chief. This project was quick, fun, and had good results. I want to do a bit more work such as painting the front sight and smoothing out the really aggressive trigger serrations but I think that will be about it.

Working guns have their place and Rustbucket seems like a great choice for that.
 
When painting front sights, it's very beneficial to use thin coats and let them dry thoroughly between coats. I have had the best results by using a white first coat, then florescent orange. Then a top coat of clear nail polish. The white undercoat makes the top coat a lot brighter than if it were applied over the black color of the sight. Back in the day, (before florescent paints), light blue was a popular color in my area.

The clear top coat makes the color stay like new for a long time. Without it, the smoke and dirt from shooting will get embedded in the paint and make it darker and darker over time. The clear top coat allows you to just wipe off the dirt with a soft cloth and be like new again.

Once everything is completely dry, shave off the sides and top with a single edge razor blade or Exacto knife to get fine definition of the sight picture and best accuracy.
 
Last edited:
Rustbucket has taken over duty as my "truck gun" and has been shot every week at the range. He continues to be exceptionally accurate and functions flawlessly.......but he looks like hammered dog poop.

I can't take it anymore.

It rained all day Friday and it's going to rain every other day next week, so I wanted to take advantage of the high (for AZ:rolleyes:) humidity and work on a different restoration project. I decided to bring Rustbucket along for the ride and get him some new clothes.

As always, the first step was to move all the insides to the outside and put everything into a labeled container.
 

Attachments

  • IMG_5329.jpg
    IMG_5329.jpg
    121.1 KB · Views: 63
  • IMG_5330.jpg
    IMG_5330.jpg
    124.5 KB · Views: 53
  • IMG_5349.jpg
    IMG_5349.jpg
    128.6 KB · Views: 53
  • IMG_5350.jpg
    IMG_5350.jpg
    103 KB · Views: 48
  • IMG_5351.jpg
    IMG_5351.jpg
    128.4 KB · Views: 54
Three flat topped screws were used to attach the sideplate so that everything could be sanded as a unit.

The adventure began by sanding with 180 grit sandpaper just to see how deep the pits really were, but it quickly became apparent that both Rustbucket and his companion would need draw filing to get rid of the big pits.

Out came the file and the chalk, I put on some music and settled in for a few hours of making that weeky-weeky noise that my wife loves so much. :rolleyes:

Both guns had pits deep enough that drawfiling was going to take approximately 3 days longer than forever, so I gave up and just started "regular" filing on both as if I was trying to make them into a pair of Model 12's. That technique actually worked out rather well and I learned just how deep the logo really is. The guns that we all see with the logo completely washed out must have had Mongo leaning his full body weight onto a grinding wheel.

By naptime both guns were looking much more presentable.
 

Attachments

  • IMG_5356.jpg
    IMG_5356.jpg
    183.3 KB · Views: 117
  • IMG_5364.jpg
    IMG_5364.jpg
    171.5 KB · Views: 120
  • IMG_5369.jpg
    IMG_5369.jpg
    124.9 KB · Views: 110
After the shop assistant and I had our nap, it was time to fix the directionality of the file cuts with some 120 grit sandpaper on a block, and then work through 180, 240, 320, 400, 600, 800, and 1200 grip sandpaper smoothing things out.

It took a solid two hours to get out of the 180-240 stage on both guns. It seemed like every time I thought I was done, I'd find another scratch that was too deep for the grit I was working with and I'd have to go back.

The 240-320 transition took about 45 minutes, then 400 through 1200 only took roughly 20 minutes.

Using the diluted rust-encouraging solution worked so well on Project 10-3 Five Seven that I decided to run an experiment on these two guns. Instead of starting with a double application of full strength solution, I started with a single, light application of 25% solution. The working theory is that using the diluted solution from the start will result in less etching of the metal surfaces and produce a better shine...albeit with quite a bit more time invested for the rust/boil/card cycles.

The bathtub was filled with hot water, and both frames, both yokes, and Rustbucket's cylinder were hung up for a nice rustfull relaxation session in the closed-up bathroom while I had dinner and watched an old episode of Top Chef.

Two hours later, all the pieces were boiled in distilled water for 20 minutes and some quality time was spent with the carding wheel. The result was less than I expected but definitely a step in the right direction. The full-strength method always puts a strong coat of blue down with the first rust....this time everything turned a very light greyish blue. I think I would call it a "shiny patina". The "shiny" part is what I was looking for. :D

Based on the results of the first cycle, I'm going to estimate that it will take about two weeks to complete everything at a rate of of one cycle per day after work. For now, all the pieces are untreated and hanging in the high-humidity bathroom until tomorrow so that some natural oxidation can help things along.

Stay tuned...this may be a long one.
 

Attachments

  • IMG_5373.jpg
    IMG_5373.jpg
    146.2 KB · Views: 133
  • IMG_5375.jpg
    IMG_5375.jpg
    52.5 KB · Views: 109
  • IMG_5385.jpg
    IMG_5385.jpg
    76.8 KB · Views: 112
Hi Shotguncoach. I thoroughly enjoy reading your restoration threads.

I do have a question though. Was there a reason you didn't remove the trigger stop?

Thanks again for your posts.
 
Our second rust is rusting (including the trigger stops 'cuz I still forgot about the darn things) and this time the reaction is different. Both frames and both yokes hazed over almost immediately after applying the 25% solution. Rustbucket's cylinder still looks mostly shiny, but it is slowly turning grey.

My working theory right now is that I got the metal too smooth and the first application had to etch the surface so that the second application could work....

More to come in a couple of hours.
 

Attachments

  • IMG_5392.jpg
    IMG_5392.jpg
    59.6 KB · Views: 86
I like the way this is working so far. It appears that the first application was indeed a sort of "primer" coat that prepared the metal for coloring. This second go-round worked much better.

We're still in the splotchy stage and I don't expect the finishes to really start smoothing out until we get to the 4th or 5th cycle. By the time we hit 10 or 12 they should look pretty nice.

.......and there's a special picture just for Dave. :D
 

Attachments

  • IMG_5393.jpg
    IMG_5393.jpg
    93.3 KB · Views: 103
  • IMG_5396.jpg
    IMG_5396.jpg
    97 KB · Views: 83
Well, we have a slight setback. I found an area on Rustbucket's frame that wasn't cleaned up as well as I thought it was......there are some 180 grit scratches in the area just under and slightly in front of the thumbpiece hole that show up when the light is angled just right. Fixing those will remove all the new finish from that area, so there will be a delay of several days while the frame catches up to the rest of the parts.

Better to find it now than when it was done.....
 
I gave myself some advice in an earlier thread: "Don't go directly from metal prep to bluing. Let it sit overnight and look at it again the next day with fresh eyes. You'll find more work to do."

I didn't do that.

The fine for mopery and dopery at the workbench was 2 1/2 hours of work, going all the way back to 180 grit on the frame and both sideplates. I really don't know how I missed cleaning up this section of Rustbucket's frame other than perhaps I was just on autopilot.

We're back on track now and happily rusting in the bathroom.
 

Attachments

  • IMG_5418.jpg
    IMG_5418.jpg
    108.9 KB · Views: 76
  • IMG_5419.jpg
    IMG_5419.jpg
    97.4 KB · Views: 75
Sounds similar to writing papers in grad school (MPA) and briefs as a lawyer. They make perfect sense and one's brain fills in the stuff that is less than perfect. If you don't have someone else to proofread, letting it sit for a sleep cycle or two is a real good idea. Heck, some of my posts here had to be fixed later.
 
Here's how Rustbucket and his yet-to-be-named companion look at the moment. 3 rust cycles on the sideplates and Rustbuckets left side, 6 cycles on everything else. There will be a couple of catch-up days on the sideplates required.

And, if you've ever had doubts about the toughness of Testor's enamel paint here is a shot of Rustbuckets front sight after 6 rust/boil/card cycles.

Rust number 7 (or 4 :rolleyes:) is happening now...
 

Attachments

  • IMG_5427a.jpg
    IMG_5427a.jpg
    90.4 KB · Views: 78
  • IMG_5429a.jpg
    IMG_5429a.jpg
    291.1 KB · Views: 76
Back
Top