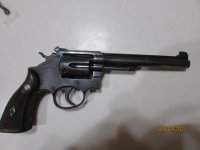
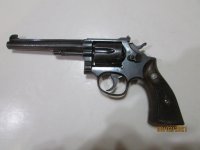
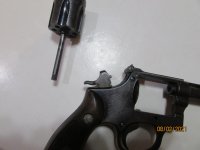
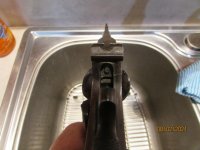
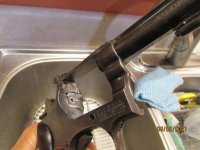
I have a K frame 22lr converted to 22 Hornet and it is locking up on two adjacent chambers. How can you id a bent center pin or a warped yoke. The cylinder is a tight fit with no play side to side or end shake. Loaded rounds hang up even more so on the two chambers. There are no drag marks on the face of the cylinder against the forcing cone. Chambered ammo is tight on one of the chambers and all chambers are recessed. Ejector does stick. Ammo sits recessed. One chamber notch was boogered but I peened it flat. Need help in IDing this problem. Your help is appreciated.
You are using an out of date browser. It may not display this or other websites correctly.
You should upgrade or use an alternative browser.
You should upgrade or use an alternative browser.
Locking Up on 2 Chambers?
- Thread starter delta-419
- Start date
Register to hide this ad
I'll assume by "locking up" you mean that when you pull the trigger on the offending chambers, the gun will not cycle/trigger is locked. Is this a "new" malfunction?
If it's dry firing normally on all chambers when unloaded, try to confirm that the trigger returns fully forward on all chambers when using snap caps or unloaded brass. Make sure the cylinder stop operates as it should on all chambers. (timing)
You could also confirm that the rear gauge (headspace) is correct by measuring with a feeler gauge. If it's a recessed cylinder, the rear gauge should be .012" - .014". (measured between the rear of the cylinder and the breechface, just under the top strap) Be sure to measure after cleaning thoroughly.
If there is little or no end shake, the cylinder may be binding on the yoke barrel.
Also check that the yoke screw in that position is the correct screw. Check for dirt and shooting debris behind the extractor, clean with toothbrush. (not the one you use on your teeth)
Check for bent or missing extractor alignment pins if it has them.
Yoke alignment can be confirmed with a yoke alignment gauge/tool.
There are many other possibilities, but these are the ones that come to my mind at around 9:00pm. (I'm old)
Last edited:
OP
Armorer951, thank you for your input. I disassembled the Smith and completely cleaned it but, it was dry as a bone. I took a feeler gauge and the gap between the cylinder and the recoil shield is .010 and that is one problem. I think that whoever machined this "wildcat" fitted it too close. four chambers with dummy cartridges clearly rotate in the cylinder, an additional two with six in the chambers do not. I did notice that there is a slight bevel around the rim of the rear of the cylinder (factory?). What is the fix? I checked out the yoke barrel and can not see a problem. I disassembled the ejector/cylinder assembly and the center pin and ejector rod don't have any issues that I can ID. I did notice that the head of the ejector rod had been filed down, perhaps a hint that the previous owner had the same problem. At this time it remains a 4 shooter. I'm beginning to think that this "gun show find" should have remained lost. Some body did a lot of work on this old shooter. Open to suggestions as to how to proceed, I would like to put this old shooter back on the line. Thanks guys.
I'm assuming you are experiencing the resistance to cylinder rotation with all 6 chambers loaded even when trying to rotate the cylinder by hand? That is, rotating by hand while the cylinder stop is dropped down. To check, you can put a business card or piece of paper between the cylinder and the frame over the cyl stop to render the stop inoperable, then try to turn the cylinder. If there is resistance when turning the cylinder by hand when it is closed, this would rule out some sort of problem with the hand ratchet interface.
Also, try removing the yoke, degreasing the bearing surface at the end (back) of the yoke barrel, apply a coating of Dykem or "Sharpie" marker to the bearing surface.....then re-install the cylinder/yoke in the gun and dry fire the gun several times with snap caps in the four chambers that are ok, leaving the offending chambers empty. After dry firing, remove the yoke and look at the previously applied coating on the yoke bearing surface (end) with a magnifier. Is the applied coating rubbed off all the way around the end of the bearing surface, or is there a shiny spot? A shiny spot on the surface with coating remaining elsewhere would indicate a "high spot" that may be affecting the normal rotation of the cylinder.
If you have binding on the yoke determined above.....check your front gauge with the cylinder closed and the cylinder assy pushed forward. If you have room in the front gauge....over .004", you can remove a small amount of material from the "high spot" on the yoke bearing area at the end of the yoke barrel. The idea here would be to make the bearing surface at the end of the yoke barrel 90° to the bearing surface inside the cylinder. You will have to re-test and remove material by hand (stone) unless you have a yoke facing cutter. Remember, you will only need to remove a small amount of material to eliminate the high spot found....if there is one. (probably .001" or thereabouts, no more)
Creating a bit more necessary gauge or space in the cylinder assy may free up your rotation issue. Basically, you are adding in just a bit of necessary "end shake" into that system. It won't work (rotate, open/close) properly without this space. Lubricant on that yoke is also essential. A small amount of light oil on the yoke barrel is all that is needed.
Yoke alignment to the center pin hole in the frame is also a consideration here, as is severe runout on the extractor rod. Make sure the center pin is in tact and straight.....and that the yoke is aligned with the fame. Yoke alignment tools and gauges are available. Make sure the extractor rod is straight, with as little runout as possible. Runout here can cause interference by the front locking bolt.
POWER CUSTOM EXTRACTOR ROD & YOKE ALIGNMENT TOOL | Brownells
Last edited:
OP
Two Sit High
Armorer951, I tried the loaded (unprimed cases) cylinder rotation test and discovered that the two offending chambers were not chambered to the proper depth to seat the cartridge case. They are at least .001-.002 high, causing the drag/lockup against the recoil shield. The tolerance is so close in chambering this pre-model 17 with the short cylinder that it requires absolute attention to detail to make it work. My old eyes missed it first time! My next part of this adventure is to obtain a finish reamer for the 22 hornet and complete the project of the previous owner. I think this gun will work if I can bring all of its anomalies to a moment of truth! I re-read your input with my first cup of coffee in the morning. Thank you!
Armorer951, I tried the loaded (unprimed cases) cylinder rotation test and discovered that the two offending chambers were not chambered to the proper depth to seat the cartridge case. They are at least .001-.002 high, causing the drag/lockup against the recoil shield. The tolerance is so close in chambering this pre-model 17 with the short cylinder that it requires absolute attention to detail to make it work. My old eyes missed it first time! My next part of this adventure is to obtain a finish reamer for the 22 hornet and complete the project of the previous owner. I think this gun will work if I can bring all of its anomalies to a moment of truth! I re-read your input with my first cup of coffee in the morning. Thank you!
Great observation. Completing the reaming process to the proper depth will most likely solve the issue without any further intervention in terms of the mechanics of the action itself. This is good news.
If you want to take on this repair yourself, and you don't have access to the proper reamer, they can be rented at various places on the internet for a reasonable fee. Here's an example:
The best chamber reamer rentals and gunsmithing tools from 4D rentals
Perhaps you could comment on the .22 Hornet refit to a model 17. I'm so inexperienced in these conversions that I don't understand how a centerfire rifle cartridge of this overall length could be made to function in a dedicated rimfire frame. Some photos would be great. Thanks
Last edited:
Horseapple
Member
- Joined
- Jun 23, 2019
- Messages
- 29
- Reaction score
- 53
I am impressed with the knowledge of some forum members.
OP
Protocall_Design
Vendor
I am impressed with the knowledge of some forum members.
Armorer951 is one of the top few revolver guys out there. Not many left, now.
OP
More Photos
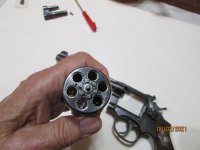
A lot of work was put into this project a long time ago by persons unknown. I hope that these photos will provide you with the clues as to how a K frame was converted into a center fire, firing a rifle cartridge through the barrel of a 22lr. Note: the short cylinder requires that the projectile be seated so as to insure the clearance of the cylinder/barrel gap or it will bind the cylinder rotation. Again the tolerances are very close and any deviation from them and it will not work. This limits your choice of bullets to a few in the 40gr arena. Pictured are cast lead with gas seal. Loads with velocities of over 2000fps are reported, however I could not find data for a 6" barrel. Barrels of 14"-16" are well documented.
A lot of work was put into this project a long time ago by persons unknown. I hope that these photos will provide you with the clues as to how a K frame was converted into a center fire, firing a rifle cartridge through the barrel of a 22lr. Note: the short cylinder requires that the projectile be seated so as to insure the clearance of the cylinder/barrel gap or it will bind the cylinder rotation. Again the tolerances are very close and any deviation from them and it will not work. This limits your choice of bullets to a few in the 40gr arena. Pictured are cast lead with gas seal. Loads with velocities of over 2000fps are reported, however I could not find data for a 6" barrel. Barrels of 14"-16" are well documented.
Attachments
Looking at the pics of the rear face of the cylinder and thinking you only need a couple .000 depth to make 2 of the chambers 'work', I'd lap the case rim(s) in instead of using a chambering reamer.
Using a fired case, the two offending rim recesses can be cleaned up and deepened that tiny amt in very little time.
I'd actually do all 6 of the rim recesses to clean them up. They look a bit chatter marked from the orig work.
Using a reamer on the chattered surface will usually result in the same chattered effect. Lapping will smooth that out as it cuts it down.
There's also a raised burr around the outside edge of each chamber from the chambering work. A few minutes with a stone or diamond lap would take care of that.
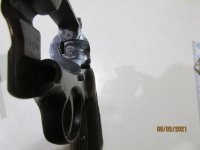
Also on the recoil face of the frame, there looks like a couple burrs turned up right close to the center pin. Maybe it's just scratches and not any turned up metal. But again I'd stone that down to smooth it out as well as a few swipes across the face of the firing pin flat as well..
Neat revolver. Probably a LoudundBoomer to shoot!
OP
2152hg, good idea and I will try a go at the lapping compound on the burrs around recessed cartridge seats. I can see the chatter areas clearly and was looking for an idea on how to smooth them out. The cartridge seats are burred all the way round. I use the old fingernail trick of running a nail across the burr to ID a burr from a scratch. I think a Dremel with a soft wheel could get into the tight places to apply the lapping compound and starting with a 600 grit and going to an 800. I know that Brownells has a chamber lapping tool as well. I get a little bit closer each day towards a range day for this old warhorse. Appreciate the input. I do like the chamber finish reamer as a fall back position.
If the case mouth shoulder in the chamber is not deep enough, then neither is the rim recess, and vica versa. The reamer cuts both together.
I also see a drag mark in the recoil shield right side where the cyl ratchet teeth appear to be dragging.
I also see a drag mark in the recoil shield right side where the cyl ratchet teeth appear to be dragging.
Last edited:
If the case mouth shoulder in the chamber is not deep enough, then neither is the rim recess, and visa versa. The reamer cuts both together.
I also see a drag mark in the recoil shield right side where the cyl ratchet teeth appear to be dragging.
True, but in this instance where the needed depth is only .002 or possibly less, I'd try to lap in the rim recess first on the offending chambers first.
It may only be the upset chatter marks on the bottom of the rim recess from the orig cut that's doing it.
Secondly is that the chamber cut is a few .ooo larger than the sized brass by design so the cases do drop into the chamber freely. Some dimensions are closer than others,, chamber reamer vs sizer die reamer.
I think lapping the rim recess is worth a try.
Poking a new .22H reamer into just 2 of the chambers might leave you with those 2 slightly different than the other 4.
You never know when & what was used to chamber the cylinder originally. They can be labeled the same but chamber reamers are not always the same.
Also make sure that particular finger of the ratchet Star isn't bent backward a couple .000. That would have the same effect as the chamber rim recess not being deep enough for the 2 side-by side chambers.
Last edited:
OP
Sticky Ejection
The two chambers in question have sticky if not hard ejection. I have to hit the ejector rod with the palm of my hand to release them. The other 4 cartridges just fall out. They definately need some work.
The two chambers in question have sticky if not hard ejection. I have to hit the ejector rod with the palm of my hand to release them. The other 4 cartridges just fall out. They definately need some work.
Green Frog
Member
With all the discussion, I'm leaning toward those two chambers being reamed to less than full depth.
As for the possibility of a bent ejector rod, I'll take mine out and roll it on a known flat surface... you can see the bend if it's there.
Froggie
As for the possibility of a bent ejector rod, I'll take mine out and roll it on a known flat surface... you can see the bend if it's there.
Froggie
The two chambers in question have sticky if not hard ejection. I have to hit the ejector rod with the palm of my hand to release them. The other 4 cartridges just fall out. They definately need some work.
Because the shoulders in those two chamber are too short, most likely the case mouths are jamming in the short shoulders, hence hard extraction.
This is not likely with that cartridge in such a thick walled cyl, but also look for a little bump in the sides of the cases that align with the cyl lock notches: if they've had over pressure loads the notches may have been dimpled outward. Hard to extract cases when that happens.
Is this a true 22 hornet or something else like the Harvey Kay Chuck. If it is a true 22 Hornet 4D Reamer Rental in Kalispell, MT will rent you a reamer if you need one.
OP
Chamber Casting
Steelslaver, I only made one casting and don't remember which chamber, maybe its time to revisit this idea and cast the offending chambers. The casting I made shows that it is a true .22 Hornet, albeit, very limiting on the length of available bullets due to the short cylinder length. I'm stuck with 30-40gr bullets such as the Speer Jacked HP at 33grs or cast with gas check.
Steelslaver, I only made one casting and don't remember which chamber, maybe its time to revisit this idea and cast the offending chambers. The casting I made shows that it is a true .22 Hornet, albeit, very limiting on the length of available bullets due to the short cylinder length. I'm stuck with 30-40gr bullets such as the Speer Jacked HP at 33grs or cast with gas check.
Similar threads
- Replies
- 7
- Views
- 2K
- Replies
- 22
- Views
- 1K

