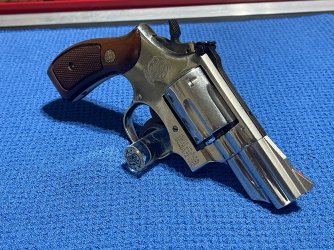
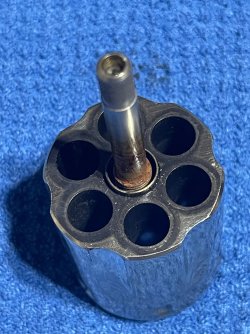
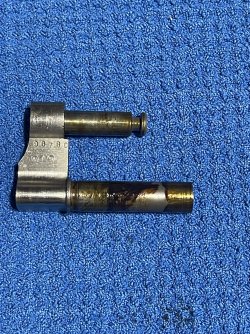
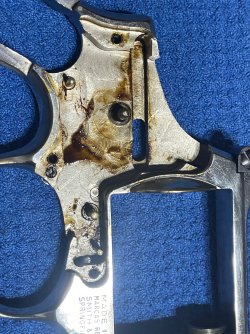
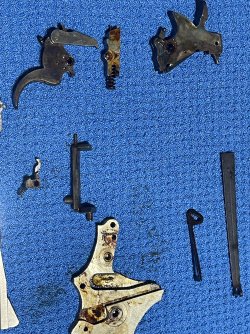
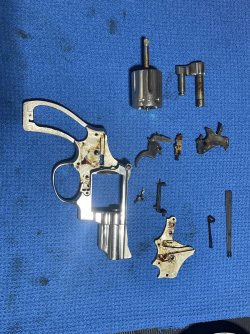
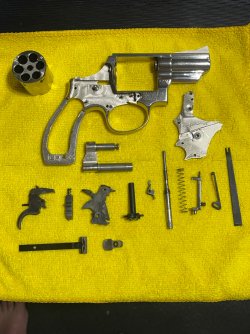
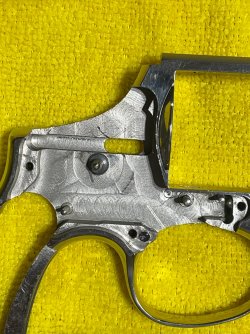
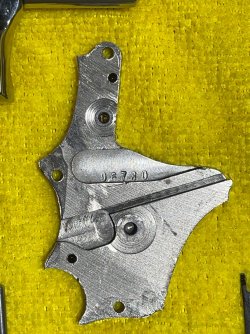
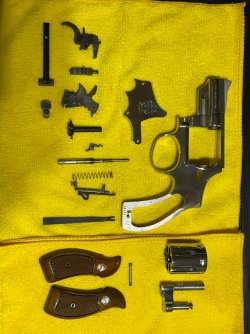
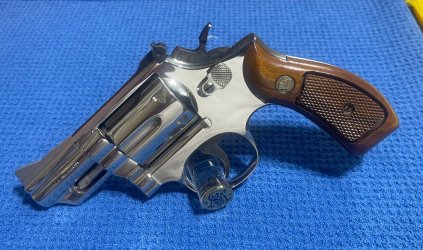
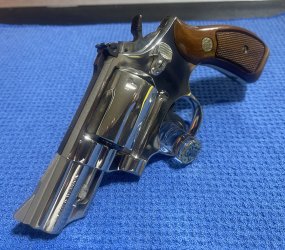
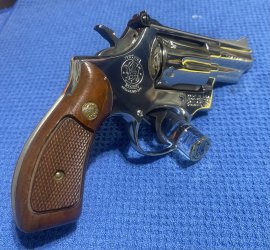
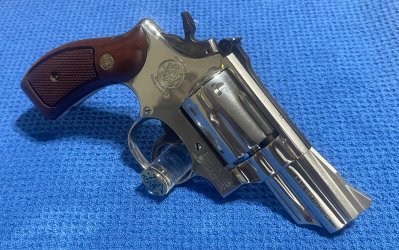
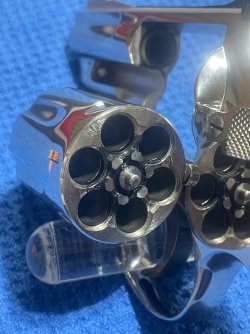
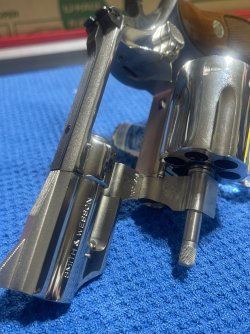
Nickel 19-3

Joined
Feb 26, 2013
Messages
1,563
Reaction score
1,930
Location
Oklahoma City, OK
Couldn’t walk away from this one because I felt I could polish it up nicely and easily. Initially could not get the cylinder open. Not a good sign. There were others: crud around the hammer and trigger shoe. This is what I found once I opened up the patient. Yuck!
What’s the best cleaner I can use to clean up this rusty brown greasy goo?
Who treats their guns like this ?
 

Attachments

  • IMG_2259.jpeg
    IMG_2259.jpeg
    2.9 MB · Views: 6
  • IMG_2262.jpeg
    IMG_2262.jpeg
    1.3 MB · Views: 1
  • IMG_2261.jpeg
    IMG_2261.jpeg
    3.4 MB · Views: 0
  • IMG_2263.jpeg
    IMG_2263.jpeg
    2.1 MB · Views: 5
  • IMG_2266.jpeg
    IMG_2266.jpeg
    2.2 MB · Views: 3
  • IMG_2265.jpeg
    IMG_2265.jpeg
    3.4 MB · Views: 1
  • IMG_2264.jpeg
    IMG_2264.jpeg
    3.5 MB · Views: 2
Register to hide this ad
Ballistol is great. Lucas cleaner is good. Spray it and leave it 15 mins and scrub with a toothbrush. Get in all the tight spots.
I’d remove the hammer, rebound slide and trigger if you’ve done that before?
Get a rebound slide tool.
Worth it for that little angle..
 
Ballistol is great. Lucas cleaner is good. Spray it and leave it 15 mins and scrub with a toothbrush. Get in all the tight spots.
I’d remove the hammer, rebound slide and trigger if you’ve done that before?
Get a rebound slide tool.
Worth it for that little angle..
Pics not loading for you? I got it in as many pieces as possible. Yeah, I agree, the rebound slide tool is well worth the money.
 
Soak, brush and repeat. Don't forget a dental tool in all the sharp corners and radius's like the extractor etc., you will get crude the brush won't. Bottom of the top strap needs extra attention, again clean and repeat until clean. Try to get the rear sight off if you have a correct screw driver and goes easy. Often rust underneath it. As long as there is no rust hidden, those dirty often sluggish working guns clean up fine and keep the price down.
 
I think you made the right decision in picking up your nickel Model 19-3 snubby, as long as the price was right. Cleaning up a neglected revolver can be a challenge, but it's one that I really enjoy. It should clean up very nicely with a little TLC. Looks like the cylinder was perhaps slightly rusted in place, and there's obviously a lot of old grease and gunk to remove, but the stocks look to be in nice condition. I was fortunate when I bought my nickel 19-4 snubby a few years ago...it was in mint condition and almost unfired. I was almost a little disappointed that I didn't have anything to clean! LOL! Please post some pics after your done with the clean up. Good luck, and enjoy!
 
Day 2 pics. Used Hoppes Elite Foaming Cleaner (no ammonia). Let it soak for a while and went to work with a cadre of tools including stiff nylon brushes, dental pick, Q tips, CLP. Got the rear sight off as well, little nasty hiding under it. Overall it cleaned up very well. Once clean I hit the nickle parts with Mothers Mag Polish. There’s still light frosting in a couple areas but I had to remind myself this is a shooter project. It was never going to be flawless. Stocks got a treatment of Ren Wax. Ready for reassembly tomorrow. First revolver I’ve ever taken completely apart. I really enjoy working on them. I have a strong feeling this won’t be my last project gun.
 

Attachments

  • IMG_2277.jpeg
    IMG_2277.jpeg
    2.1 MB · Views: 5
  • IMG_2278.jpeg
    IMG_2278.jpeg
    2 MB · Views: 2
  • IMG_2279.jpeg
    IMG_2279.jpeg
    2.3 MB · Views: 3
  • IMG_2280.jpeg
    IMG_2280.jpeg
    2.2 MB · Views: 2
  • IMG_2282.jpeg
    IMG_2282.jpeg
    2.2 MB · Views: 3
Last edited:
Turned out great and most of that rusty colored stuff was likely dirty and hardened WD-40. What you have now is a revolver that is cleaner than it was when it left the factory. Reassembly and a proper lubrication and it will be ready for the range. Let us know how it performs.
 
OP:

I don't know your knowledge level so when you put the extractor rod / cylinder assembly back together put some spent shells in the chambers and have the yoke installed in the cylinder when tightening the rod. You can snug it up pretty tight without over tightening if doing it by hand. You can use a drill chuck to hold the rod, preventing damage. You don't want to bend the rod or extractor. Don't force the side plate. The hammer block often pops up and the rebound slide stud can get bent preventing the plate from going on smoothly. Tighten the main spring fully after the side plate is installed.
 
^^That is the tricky part, putting it all back together...........so that it works!! :eek: :ROFLMAO:

Congrats also on a great snubbie. Mine is a 19-5 also nickel and I bought some Altamount rosewood grips for it. Keep it loaded with 38 Spl +P 125 grain JHP's. It even went on vacation to Florida with me!

IMG_20250130_163929824_HDR_AE.jpg
 
Last edited:
OP:

I don't know your knowledge level so when you put the extractor rod / cylinder assembly back together put some spent shells in the chambers and have the yoke installed in the cylinder when tightening the rod. You can snug it up pretty tight without over tightening if doing it by hand. You can use a drill chuck to hold the rod, preventing damage. You don't want to bend the rod or extractor. Don't force the side plate. The hammer block often pops up and the rebound slide stud can get bent preventing the plate from going on smoothly. Tighten the main spring fully after the side plate is installed.
Thanks for the tips on reassembly. I used 3 spent cases and a drill chuck to loosen the extractor rod, will do sane to reinstall. I wish I took a few more pics as I took it apart but I found a very good video online of disassembly. I pushed play and stop a dozen times while taking it apart. I hope the same content creator did a similar video on reassembly!!!!!
 
Now you need to do the exterior with some Flitz & a soft, cotton rag.
I polished it up with Mothers Mag Wheel polish, it’s even less abrasive than flitz. It looks good in person. I don’t want to polish thru the nickel. I may try 1-2 applications of glitz lightly to see if I can clear up the little bit of frosting that exists on the left side.
 
Pics not loading for you? I got it in as many pieces as possible. Yeah, I agree, the rebound slide tool is well worth the money.

A slender pocketknife blade or a Phillips head screwdriver work just as well.

Reassemble with the revolver inside of a large plastic bag if you're afraid of losing parts, springs, etc.
 
Day 3 Reassembly. What a PITNeck getting the side plate back on. Special thanks to Vtgw938 for some great help when I ready to reach for a Big Friggin Hammer! I got it back together and its very smooth. of course my oily hands trying to get the side plate back on necessitated another good cleaning of the freshly polished nickel. All in all, I'm happy how it turned out and I learned alot doing the work myself. Looking forward to the next project.

I sincerely appreciate all the feedback, suggestions and encouragement from those in this thread.
 

Attachments

  • IMG_2289.jpeg
    IMG_2289.jpeg
    1.8 MB · Views: 4
  • IMG_2290.jpeg
    IMG_2290.jpeg
    2.9 MB · Views: 3
  • IMG_2291.jpeg
    IMG_2291.jpeg
    2.8 MB · Views: 3
  • IMG_2292.jpeg
    IMG_2292.jpeg
    2.1 MB · Views: 3
  • IMG_2293.jpeg
    IMG_2293.jpeg
    1.4 MB · Views: 3
  • IMG_2294.jpeg
    IMG_2294.jpeg
    1.9 MB · Views: 2
Last edited:
I had a nickel 19 two and half inch with RR/WO. I bought it from another cop in the locker room. A few months later a Detective wanted it and I made a quick $100 profit.

Looking forward to a Range Report and thank you for sharing.
 
Back
Top