I mix the epoxy then add just enough paint to get the desired color. It takes
very little paint. I usually use one toothpick to mix the epoxy and another to add the paint.
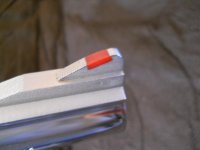
I've found that pieces cut from plastic milk jugs make great partitions. They peel off of the epoxy clean after it has cured. I don't worry about using too much. Excess can be trimmed with a razor blade after it has cured. The important points are to make sure that the epoxy gets all of the way to the bottom of the notch and that you give it plenty of time to cure before trimming.