Repairing the Extractor and Installing New Pin

Joined
Dec 1, 2022
Messages
866
Reaction score
1,405
Hi There,

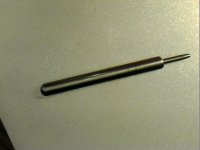
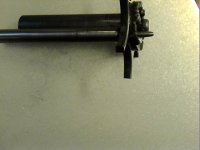
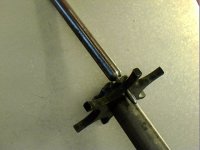
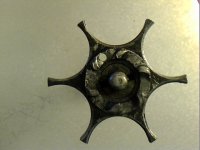
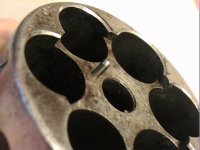
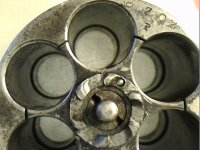
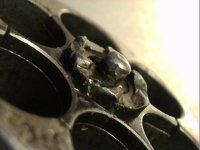
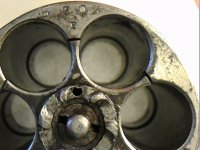
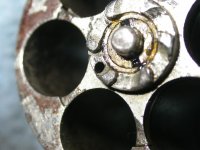
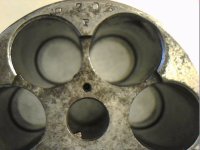
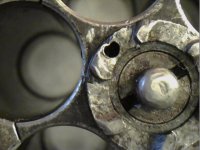
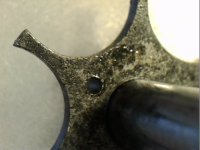
Here is a small job I had to do on my Schofield 2nd issue. The
alignment pin for the extractor was missing and the hole in the
extractor was damaged. See Pics. I was lucky in that I thought
the pin was broken off in the cylinder but after cleaning in the
ultrasonic cleaner, I found the hole was just filled with crud and
was easy to clear with a drill bit turned between my fingers in
the hole.

Cheers!
Webb
 

Attachments

  • 1333714288822.jpg
    1333714288822.jpg
    78 KB · Views: 60
  • 1333714371877.jpg
    1333714371877.jpg
    88.1 KB · Views: 58
  • 1333714276005.jpg
    1333714276005.jpg
    84.4 KB · Views: 56
  • 1333714300547.jpg
    1333714300547.jpg
    71 KB · Views: 58
Last edited:
Register to hide this ad
Hi There,

I made a special punch to form the hole in the extractor back to
round. I drove the punch in from the back first (where the hole
was still round) and then from the other side. See Pics.

Cheers!
Webb
 

Attachments

  • 1333715878054.jpg
    1333715878054.jpg
    76.1 KB · Views: 42
  • 1333715890066.jpg
    1333715890066.jpg
    67.4 KB · Views: 38
  • 1333715895582.jpg
    1333715895582.jpg
    68.1 KB · Views: 38
  • 1333715900074.jpg
    1333715900074.jpg
    76.1 KB · Views: 39
  • 1333715902877.jpg
    1333715902877.jpg
    69.1 KB · Views: 38
Hi There,

The next step was to make a pin and install it into the cylinder.
Now the extractor looks better and has the alignment pin. See
pics.

Cheers!
Webb
 

Attachments

  • 1333715906020.jpg
    1333715906020.jpg
    92.7 KB · Views: 47
  • 1333715908838.jpg
    1333715908838.jpg
    71.3 KB · Views: 50
  • 1333715916955.jpg
    1333715916955.jpg
    97.4 KB · Views: 48
  • 1333715922651.jpg
    1333715922651.jpg
    69 KB · Views: 44
Thanks for posting Webb, it's interesting and educational to see how your restoration project is progressing.
Did you polish the cylinder chambers? They look to be in great shape.
 
Hi There,

Thanks for the complements. The chambers are in good condition.
One thing I noticed is that the cylinder of this Schofield has
chamfers around the chambers. I have another 2nd issue Schofield
and there isn't any chamfers around the chambers. So, I am won-
dering if this was a change to late model 2nd issue or some one
modified them at some later period. Has anyone noticed this
before?

Cheers!
Webb
 

Attachments

  • DSC_0625_01.jpg
    DSC_0625_01.jpg
    62 KB · Views: 25
  • 1333714291187.jpg
    1333714291187.jpg
    88.4 KB · Views: 27
Last edited:
My 2nd Schofield s/n 4176 does not have any chamfer at the chambers, however, I did notice something else wrong I hadn't seen before.....it's missing the extractor pin! Sooooo......could you please list the pin dimensions for the one you made??? I need all the help I can git these days! Thank you in advance.

The Kid
 
Hi There,

I wanted the measure the diameter of the pin on my exc. condition
Schofield and to get a real accurate measurement, I wanted to use
a micrometer instead of a dial caliper (dial calipers are nice but when
one has to make measurements demanding less than .001", a
micrometer is the way to go).

The funny thing is, when I closed the micrometer on the pin and
locked the spindle (in preparation to sliding the mic off the pin),
The pin came out! This is good in that I could take actual mea-
surements of an original pin! This is what I come up with:

Diameter: 0.0634" to .0637" (a 52 gauge drill is .0635")

Length: 0.265" (the one I made was .260" but that was before
I had the original to measure from)

I also noticed that I made the end too round (like half a ball).
it should be just rounded a little. So, I will make another one.

I made mine from some W1 (water hardening tool steel) because
it is the only round stock I can get in wire gauge sizes plus, it is
pretty cheap (the shortest length I can get is 3 ft. and that costs
$3.13 plus shipping). I don't think it is necessary to harden the
pin under the circumstances.

Cheers!
Webb
 
WLW-19958-

Thanks so much for all that information, I didn't really know where to start otherwise. So if I understand this, the original pin you removed (with your caliper) was not pressed in to the cylinder at all, just a slightly snug fit, correct? It makes me think that this pin, with enough use, could possibly be partly removed during extraction and then fall out before the extractor snapped back over it? I know the clearance hole for the the pin in the extractor is slightly larger than the pin hole in the cylinder because the pin punch I have that fits thru the hole in the extractor won't fit into the cylinder hole. It was a 1/16" pin which pretty closely agrees with your diameter measurements. I had thought this pin might be a slight interference fit to the cylinder, but apparently not. When I come up with a correct diameter for my cylinder pin hole, I think I'll add a drop of Loctite stud or bearing retainer to it for a bit more piece of mind. One other sidenote I observed, the serial number stamping on both our cylinders lines up with the cylinder extractor pin hole, or is this just common knowledge I didn't know about? Does this occur on your exc. condition Schofield also? Again, thanks for your help on this, I would not have noticed this at all but for checking for a chamfer on the chambers from your post. Very informative stuff here!

The Kid
 
Last edited:
Hi There,

"So if I understand this, the original pin you removed (with your caliper) was not pressed in to the cylinder at all, just a slightly snug fit, correct?"

I think it is better to describe it as a moderate to heavy push fit.
This is a type of interference fit but one that can be overcome
with the pressure one can exert with their thumbs.

The grip the micrometer had on the pin was enough to pull it out
but it needed a couple of taps with a plastic tool (my screwdriver
handle) to push it back in. I don't think the extractor will pull it
out unless it got stuck in the guide pin hole. Using some Loctite®
won't hurt except if you have to remove it. I would stay with its
natural "fit" unless the pin isn't held securely. Of course, the
Loctite® bond will break down if the parts get hotter than 300°F.
Then, it will let go.

To check your existing hole, try the shanks of a couple of drill bits.
The shank is usually about 1/2 thousandth smaller in diameter
than the cutting end of the drill. A 1/16" drill will fit somewhat
loosely but a 52 ga. drill will have extremely little play at all (but
you can insert it and take it out without trouble). That should
help you in checking the hole's size.

"One other sidenote I observed, the serial number stamping on both our cylinders lines up with the cylinder extractor pin hole, or is this just common knowledge I didn't know about? Does this occur on your exc. condition Schofield also?"

As to the placement of the serial number on the cylinder, I believe
the location of the number being above the pin is just the way S&W
did it. It would be a natural way of doing it but if someone has
an exception, Please post it. If you look carefully at the pic of my
blued cylinder, you can see the pin is directly below the serial number.


Cheers!
Webb
 
The 'legs' of the extractor star appear to be fitted to the cylinder and marked for proper reassembly. On extractors without an alignment pin, there is a punch dot on the star that is directly under the serial number.
 
If you wet the end of such an alignment pin with red Loctite, then install it, it will stay in place. Numerical drill bits are available at many hardware stores. But, another method to make pins is to chuck a slightly large OD piece in a drill press or drill and spin it on a course diamond plate or file. I have a 4 way vice mounted on my one drill press and I have clamped a diamond stone in it and used the cross fee to hold it against a piece of round stock to reduce it
 
Last edited:
Back
Top