Russian ejector

somniosus

Member
Joined
Aug 3, 2025
Messages
15
Reaction score
12
Hi Gents

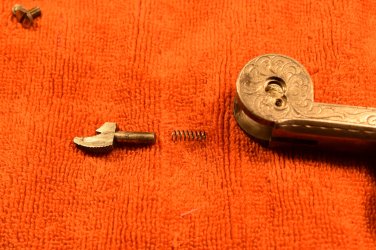
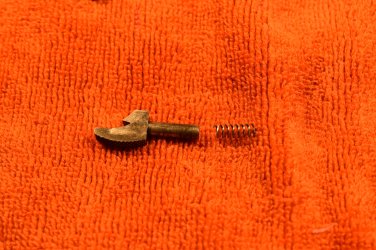
I am restoring an early SW Russian in 44 Russian which is missing some parts including the ejector star and parts of the ejector cam mechanism that engages the rings on the ejector rod mechanism.

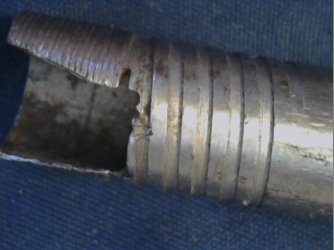
Unlike the other Russians I own, this one does not appear to use the spring loaded pivoting ejector lever which engages with the ejector cam as you break the pistol open to eject the cartridges. Instead there is small hole in the frame between the 2 lobes of the barrel pivot point which looks like some sort of a spring loaded pin would have sat in there like a piston to engage the ejector cam . I have not been able to find a diagram or schematic anywhere of this alternative mechanism for engaging the cam to provide the spring pressure which opposes and engages the ejector rod . If anyone has an exemplar or can share this information it would be greatly appreciated, I can likely fabricate it in my shop but an accurate dimension diagram or even a photo with scale would be a huge help. I have attached a shot of the frame with an adjacent frame from a regular Russian to show the difference in the pivoting ejector lever vs unknown mechanism. If anyone has these parts and would like to sell them that would be even better but that's likely Unobtainium in the periodic table of gun parts.

This pistols 7 inch barrel was marked:

Smith&Wesson Springfield. Mass. U.S.A. Pat July 16 60 Jan 17 Feb 17 July 11 65&Aug 24 69 Russian Model 1 ( 1 or perhaps +, cant tell as faint)

No expert but from what I can glean this would be the SW No 3 second model or "Old old Model Russian"?
In the photo you can barely see in the left hand frame the tiny hole versus the pivot ejector lever in the same location in the more normal frame on the right.

Any advice greatly appreciated.
 

Attachments

  • Russian2sytylesofejector.jpg
    Russian2sytylesofejector.jpg
    80 KB · Views: 1
Register to hide this ad
Hi There,

Welcome to the Forum!

I take it you have a S&W Russian 2nd Model. This model used the same
ejector gear catch as the 2nd Model American. Here are a few pics of the
parts.

Cheers!
Webb
 

Attachments

  • DSC_0040.JPG
    DSC_0040.JPG
    606.2 KB · Views: 0
  • DSC_0041.JPG
    DSC_0041.JPG
    1,000.5 KB · Views: 0
  • DSC_0042.JPG
    DSC_0042.JPG
    1 MB · Views: 0
  • DSC_0043.JPG
    DSC_0043.JPG
    990.8 KB · Views: 0
Hi There,

Here is a pic of the relationship between the catch and the gear.

Cheers!
Webb
 

Attachments

  • DSC_0046.JPG
    DSC_0046.JPG
    1 MB · Views: 0
Thanks Webb! The supplied non correct ejector cam gear must have come out of a different model 3 -looks nothing like the one you shared so my fixer upper Russian was a bit of a Frankengun, of course when bought the ejector was non functional. I should be able to fab a reasonable facsimile of the cam and ejector lever. Your help has been invaluable.
thanks again
Chris
 
hi Webb; heres a shot of the ejector cam- looks different from the one you supplied and also has a little slot for a spring in there where presumably the nose of the ejector spring piston would dock, and 10 teeth vs 8 but both have a 100 thou interval between the tooth tips. It is 156 thou thick and there is also an odd little round slot at one end of the arc of gears. The inner race of the bearing is 220 as opposed to 225 on my other ejectors. Bit of an oddball and as is it does not operate the ejector properly. I will probably use your images to make a copy and try that. If you have an image of your base pin bushing for the cylinder and your ejector rod I could compare those and see if the other bits with the gun are also not quite right, Thanks again for your generous help.
best regards Chris
 

Attachments

  • ejectorcamIMG_2360.jpeg
    ejectorcamIMG_2360.jpeg
    625.5 KB · Views: 0
Hi There,

WOW! That is an interesting modification to your gear. I have no idea
what the purpose was but I wonder if there were other modified parts
that went with this modification. It sure appears this was an original gear
that was used.

In response to the smaller ID in your ejector gear bushing, it should be
only 1 or 2 thousandths larger than the barrel pivot to minimize looseness
and improve functionality.

There is a seller that is offering wire EDM made ejector gears for these.
I purchased one of them and they are NOT a drop-in part and you will
have to do some fitting. Mine was a couple thou. too think and the bushing
had the wrong ID. But it wasn't much trouble for me to make the adjustments
necessary to achieve a proper fit and function (I have a small garage machine
shop). In fact, the gear in my pics is one of those EDM replacements. They
are not cheap (at $199.95 each). I will send you a PM with a link (I don't think
the rules allow the posting links to active auctions or 'for sale' adds).

The cylinder rotates on the base pin which is a hollow axle which is screwed
securely into the barrel. This is an easily broken part if you try to remove it.
Be Careful.

I'll do my best to get you the pics you requested. Just give me some time.

Cheers!
Webb
 
Hi There,

Well, I can make a start. Here are some pics of the Base Pin. The damage
is typical of what can happen when removing the base pin from the barrel.

Cheers!
Webb
 

Attachments

  • 1339880477475.jpg
    1339880477475.jpg
    41.3 KB · Views: 0
  • 1339880481031.jpg
    1339880481031.jpg
    34.1 KB · Views: 0
  • 1339880489628.jpg
    1339880489628.jpg
    41.3 KB · Views: 0
Thanks Webb. I am also refurbing a second Russian with the more normal ejector cam configuration while searching for parts for the first one above and was able to fully dismantle it after a good soak in the red stuff without mangling that ejector rod housing but its delicate, I have another Russian that works fine but you cant get that thin walled thing to budge so I am leaving it alone. I often use the brake fluid/ acetone bath for up to a couple of weeks to really eat into and release badly seized parts and have seen a few miracles using it.
This second gun was jamming and failing to eject at all, the whole rig would get stuck as soon as you broke the frame and started to push the barrel down. It turned out the base pin/ejector housing was loose and rotating the groover that faces down around thee cam to jam the whole thing up. I fixed this by cleaning and realigning it then locking it in place with a sparing amount of blue loctite. I also had to remanufacture the spring loaded pin which actuates the ejector , the tip of which sits in the ejector lever slot and engages the little grooved gadget under there which was bent and worn so no longer working, this was fairly straightforward lathe work with drill stock and a replacement spring. And so now voila she ejects properly. I will attempt to attach a video but this may be more bandwidth than the system can absorb.
This gun also looks like the frame and barrel/cylinder are notmatched. I am a bit suspicious that the barrel and cylinder are modern, the blue is gorgeous and the cylinder has a nice gold inlay. On the underside of the barrel latch is a 4 digit code (illegible number) then 579. The cylinder caliber is 470. The sight is cast as part of the barrel, not seperate
There are no marks on the barrel and cylinder other than a tiny backward P on the underside of the ejector housing.
The barrel top marking is (cross) Smith&Wesson Springfield Mass USA PattJuly 10 60 Jan 17 Feb 17 July 11 65 & Aug 24 69 Russian Model (cross).
The frame and butt are more worn finish and the butt is marked with 1874 in a box and mismatched number 47747.

Also I am looking for the ejector star and a few other bits for the first Russian- if you can advise me on a good EDM manufacturing or other source for this as you mentioned above I would really appreciate it. This gun is in 44 Russian and the cylinder dimensions are length 1.395, width 1.655.

cheers Chris
 

Attachments

  • cuylinderinlayIMG_2394.jpeg
    cuylinderinlayIMG_2394.jpeg
    521.8 KB · Views: 0
  • IMG_2399.JPG
    IMG_2399.JPG
    378.3 KB · Views: 0
Hi There,

Your latest Russian is a 3rd Model. These used a completely different extractor
system (although it is still a rack-n-pinion type). The letter "P" is not familiar to
me but I suspect the barrel may have been a Russian reject and S&W being a
thrifty Company, would sometimes re-use a rejected part on a domestic revolver
so long the reason for rejection didn't impair function or safety. Plus, it just may
have been a left over from the Russian Contract and not a reject at all.

I am a fan of Kroil but I have used a 50/50 mix of Acetone and ATF for soaking
large items.

The numbers you are encountering are called "assembly" or "fitting" numbers.
When a work order came down to the assembly dept. to fill an order, the assembler
would get a frame (previously machined and grips and serial number assigned). and
take it back to his workbench. Then he would collect the necessary parts (most are
already on his bench) and assemble the revolver. Sometimes, the first part tried
didn't fit exactly right so he tried another one until he gets the proper "fit" he wants.

Then the major parts are mark with a "fitting" number. This number was stamped
on the side of the frame near the heel under the right-hand grip panel, The back
of the cylinder, The underside of the barrel latch and the back of the barrel (in the
cutout for the latch). This number should match on the 4 major parts of the gun.
Here are some pics of a Model 3 American to show these assembly marks.

DSC_0965.JPG
DSC_0968_02.jpg
DSC_0971.JPG
DSC_0972.JPG

The barrel marking on yours are correct for a 3rd Model Russian. As a matter of
coincidence, I happen to own a 3rd Model Russian that is very close to yours.

DSC_0944.JPG
DSC_0959.JPG

Your cylinder does not match the correct dimensions for your revolver. It may be
a modern reproduction but it is way off. Typical cylinder dimensions are:

OD - 1.678",
Length - 1.420",
Chamber DIa. Rear - .460",
Chamber Dia. Front - .435".

These measurements will vary slightly from gun to gun but yours are too far off.

I don't know of any Wire EDM places but getting one is on my wish list.

Cheers!
Webb
 
Last edited:
hi Webb-thanks again for the master class on these Russians.I own 4 of them, 2 are runners, one is coming back and one is a basket case but I never give up.Its the basket case that also has the unusual extractor cam and a few other missing bits and the odd sized cylinder as described above which holds a 44 Russian cartridge just fine. I did measure the cylinder length from front to back not including the protrusion at the end, with this you would be close to your tolerances for length but the difference of 20 thou in diameter is puzzling.
all the best Chris
 
Hi There,

The measurements I provided does not include the ratchet or any other
protuberances on the cylinder. I'm sure .44 Russian cartridges fit but they
are going to be a little loose. The .44 Russian has a base diameter of .457"
and if your chambers are .470", That is too loose and the cases may split
when fired.

Have you measured the barrel to cylinder gap? How about the gap between
the cylinder and the recoil shield?

Cheers!
Webb
 
Thanks Webb!! Tried to fab the ejector prototype initially by hand in a softer metal, aluminum but fit and function is a problem,I took the lines off a reduced version of your photo but shes a bit irregular. Without an examplar to use a a template and exactly copy I think if its OK with you I will put up here your shot of the whole assembly and a plea to the listserv and gunsmiths to see if there are any of these bits out there people want to sell, I will pay top dollar. Or if some obscure fabricator out there is making these de novo thats another possibility.
best regards Chris
 

Attachments

  • ejectorandcamSWRussianScreenshot 2025-08-03 at 3.33.14 PM.webp
    ejectorandcamSWRussianScreenshot 2025-08-03 at 3.33.14 PM.webp
    28.5 KB · Views: 0
hi folks- trying to fabricate non existent parts for the SW Russian No 3 mentioned above. This particular part, the ejector lever, seems to be unobtainable, so I am fabricating one from scratch using silicon bronze which is hard but easier to machine than steel for me. Heres the interim part before the contours are cut. Once I get a good fit I will transfer the result to steel and hardening processes.
regards Chris
 

Attachments

  • ejectorcampivot.webp
    ejectorcampivot.webp
    494.4 KB · Views: 0
It took me a minute to distinguish the part from the block of metal, but it is looking very good.
 
Hi There,

Your efforts look good so far. Here are a couple more pics that may help.

2020_0704_210626_020.webp

2020_0704_210501_019.webp

2020_0704_211255_021.webp

Keep up the good work!

Cheers!
Webb

Edit: This pic may be of more help:

Estractor Gear Latch Dimensions-1.webp

Cheers!
Webb
 
Last edited:
hi Webb: those picture are a huge help, many thanks. I got some parts from VTI which arrived really promptly despite the border situation, this is a rarity with gun parts so I was quite pleasantly surprised. These would be Uberti parts for their 3rd model Russian. A few observations:
-their trigger springs are good in the old guns
The Uberti base pin bushings are over sized , thin walled and have one end closed, nothing like the originals, they also lack the threaded portion that threads into the barrel. so more or less not useful and likely something I will have to fab from scratch
My first attempt at the piston type ejector lever prototype was not a success as the bronze failed at the thin attachment point of the pin so I will build this up all in steel . I am also working on the rack and pinion prototype in aluminum.
The ejector star for this Russian is missing and appears to be unobtainable either as an original or replica part. It should be possible to make this but would require some specialty sized reamers. If I can find a way to copy one of my originals that fits this gun I might make a bunch and offer them for sale, I dont believe I am the only one having difficulty with parts for these old timers.
Thanks again for those great scaled photos!
best regards Chris
 
Hi all: After exhausting the possibilitiess of a fitting and filing new Pietta or other non existent ejector I decided it wasnt that complex and after miking out one that matched the cylinder I had, I began by making a steel blank for the ejector and fitting it to the cylinder. Once I had that I transferred the ejector outline to a oiece of brass shim as master, CA glued it to the blank and careflly machined it using an undersized mill, see the results. Now its a matter of fine filing to get it to fit and conform to the cylinder chambers perfectly. Then machine a square bar base for the cylinder as per original. The tough part is going to be figuring out how to machine and file those very fine compound curves on the ejector face that engage the cylinder hand in the exact right spot, but I am also an engraver with a microscope so thats a challenging but not impossible task. I saw someone had done this using very fine files and a lot of sweat so hats off to them. Will let you all know how it goes. Time was gunsmiths knew how to do this stuff and had templates in their workshops for the common pistols.
Final shot is another Russian that had ejector problems and some other issues which I got running again- I cant believe that barrel and cylinder are not modern, no numbers on cylinder ,they look way too good, any comments welcome.
best regards on the long weekend,
Chris
 

Attachments

  • cylinderno 442?MG_2571.webp
    cylinderno 442?MG_2571.webp
    296.7 KB · Views: 0
  • swrussianIMG_2457.webp
    swrussianIMG_2457.webp
    834.8 KB · Views: 0
  • ejectorprefittingIMG_2570.webp
    ejectorprefittingIMG_2570.webp
    624 KB · Views: 0
  • cylinderlayout.webp
    cylinderlayout.webp
    555.8 KB · Views: 0
PR0GRESS ON 44 RUSSIAN EJECTOR

It appears the ejector for the Russian no 3 44 is unobtainable through any source right now so I decided to make one from scratch as a learning exercise. I machined a blank from mild steel, excavated the notches using a mill and a Dremel and hand fit to the cylinder. Now the real challenge is getting those notches on the ejector star in exactly the right position, otherwise it will never time properly. It appears from caliper measurements of the leading edge of the ejector notch that the hand lifts, is at exactly 90 degrees perpendicular to the widest radius of the cylinder bore for individual cartridges which eases the issue of locating the ejector notches a bit, I can only hope the results work well in timing. I don't intent to ever shoot this old girl, this is more of a gunsmith/restorer learning exercise for me, but it would be gratifying to get a hand fit that indexed well. I took the star to some friends who are clockmakers, old school precision hand filers , and they said all they could do was hand bomb it, no C and C here, so I decided to try it myself.

I took a spent 44 Russian cartridge and filed a very accurate groove in the back of it to act as a jig/guide, then I fixtured the ejector to the cylinder and used a Japanese saw file, the same one I use to do fine screw heads, to file 6 perpendicular radial grooves precisely 60 degrees apart on the boss in the middle of the ejector, this would correspond to the position the hand indexes to in battery . These files are high quality, available form Lee Valley tools for about 25 dollars and they are fantastic for doing tiny little fiddly grooves and minute flats on hand machined screws. They are designed for cutting teeth on the super fine dozuki hand saws . I have used them to restore old bubbaed screw heads on antique revolvers, first I hand peen as much metal back into the slot groove as I can with a fine jewellers hammer, then I hand file the screw or bolt head with these, hit with abrasive up to 800,polish it on the wheel , fire blue and the screws look nice, not shiny new but with a slight aged patina as there are always some nicks you can't eliminate without reducing dimensions drastically, but nice clean cut screw slots versus bubba can make a slightly saddened gun look cleaner cosmetically.

Then I put the best ejector I have for this model under the engraving microscope and did some drawings and measurements and then carved an enlarged 3 d version in carvable foam to get the dimensions, angle and proportions right in my head. The configuration is 3 d complex, the flat the hand indexes to as you cock the pistol in SA is not square, it is asymmetrically radiused where it meets the hand, the slope on the back side is convex, there is a radius all the way around the entire top on the outside, and there is a curved concave slope the hand runs down on the back when re cocking in SA after firing. The next step will be to transfer this pattern to the blank, I plan to heat it up to decrease the temper and make working the steel easier and will re temper it after. Then put machinist blue on it, then put it back under the scope and hand trace the outline as well as I can, then use my Gravermax air engraver to rough in the lines from that, then jewellers saw, dremel and file it out. Sounds like a lot of work I know.
The last time I did something this silly was to make, without an exemplar, a stainless steel ejector filed and carved from solid stock for a little Stevens rolling block that I relined from 32 to 22 caliber, that was a whole lot of cutting and fitting let me tell you, took an entire weekend on a 50 dollar gun, but I learned a few things along the way. Plasticene and hot glue negative to positive molds were my friend for that one to determine dimensions.

I keep wondering if there is another eccentric out there who has figured all this out, c and ced all these Russian bits, and is just waiting to put them out there for sale. Or made them by steel investment casting ,EDM, or 3 d print casting. Maybe there is some barn somewhere full of old Russians and parts somewhere in the former Soviet where they bought a ton of them for military use . Maybe one of the Belgian backyard gunsmiths of the 19th​ century who copied this model left a store room full of parts and someone on the forum knows that guy.
Still its fun reverse engineering these old guns, kind of like 3 d sudoku in metal.

all the best Chris
 

Attachments

  • 3 d model revolver ejector notchScreenshot 2025-09-06 at 4.53.14 PM.webp
    3 d model revolver ejector notchScreenshot 2025-09-06 at 4.53.14 PM.webp
    113.8 KB · Views: 0
  • revolvernotchjig.webp
    revolvernotchjig.webp
    143.8 KB · Views: 0
Carving the grooves on an extractor star
Latest steps in making a SW 44 Russian extractor star. Fixtured the extractor on a block of wood with CA glue and hot glue to fit in the jaws of an engraving vice under my engraving microscope to keep things as accurate as possible. I made a small jig out of brass to mark the distances between the individual grooves in sheet brass, this was used to mark the dimensions of the protrusions on the star with a graver. Then used a Dremel and files to cut the individual grooves, this is interesting as they are 3 d complex but I am happy so far. I will cut the initial grooves and then further file and fit until they turn the cylinder to proper battery and index smoothly. Will update when I have either failed completely or have a working model. Nothing is impossible.
cheers CHC
 

Attachments

  • filingextractorstarIMG_2594.webp
    filingextractorstarIMG_2594.webp
    619.4 KB · Views: 0
  • mikeextractorstar.webp
    mikeextractorstar.webp
    359.2 KB · Views: 0
Carving the grooves on an extractor star

Latest steps in making a SW 44 Russian extractor star. Fixtured the extractor on a block of wood with CA glue and hot glue to fit in the jaws of an engraving vice under my engraving microscope to keep things as accurate as possible. I made a msall jog out of brass to mark the distances between the individual grooves in sheet brass, this was used to mark the dimensions of the protrusions on the star with a graver. Then used a Dremel and files to cut the individual grooves, this is interesting as they are 3 d complex but I am happy so far. I will cut the initial grooves and then further file and fit until they turn the cylinder to proper battery and index smoothly. Will update when I have either failed completely or have a working model. Nothing is impossible.
 

Attachments

  • 3 d model revolver ejector notchScreenshot 2025-09-06 at 4.53.14 PM.webp
    3 d model revolver ejector notchScreenshot 2025-09-06 at 4.53.14 PM.webp
    113.8 KB · Views: 0
  • mikeextractorstar.webp
    mikeextractorstar.webp
    359.2 KB · Views: 0
hi all:
The latest evolution in fabricating the ejector star. It is near finished although a bit more fitting is required. You can see the exemplar which of the 3 other Russians I own has the sharpest relief on the indexing notches that contact the hand. I made small jigs to get the offset correct on the inside and outside of the arc of each segment and then hand filed and ground the relief, used fine sanding down to 800 to take out the tool marks. I have other Russians whose ejectors aren't as sharp as the ones I cut due to wear but they cycle and time fine so hoping this works, I am doing some indexing and cycling tests today to see if this will rotate and time correctly. The images show the exemplar and the copy mounted in the cylinder. I may have to radius the faces of the studs as per the original but if it is not essential I will skip thsa step, as long as she cycl es smoothly and locks up OK.
Lots of fine work under magnification but worthwhile if it saves me form parting out a Russian and getting the old girl back to work.
 

Attachments

  • exemplarIMG_2605.webp
    exemplarIMG_2605.webp
    316.8 KB · Views: 0
  • copyejectorstarIMG_2601.webp
    copyejectorstarIMG_2601.webp
    361.2 KB · Views: 0
Hi There,

Excellent work so far!

I would have approached the problem differently. I would have set-up
an indexing head on a rotary table (or something to the same effect).
The rounded bottom to the ratchet teeth could be made this way.
The rotary table is used to make the radius on the ratchet tooth and
the indexing head is to accurately index the ejector to the 6 positions
of the ratchet pads.

Cheers!
Webb
 
Back
Top