Shield .45 7-round magazine reassembly tip

Joined
Jun 1, 2015
Messages
4,470
Reaction score
12,101
Location
North Texas
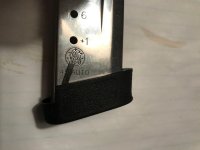
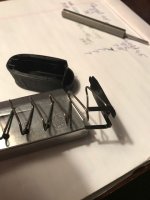
I broke down my Shield .45 magazines for cleaning last night, and encountered the dreaded reassembly problem with the 7-rounders. Once I had them back together, the guide tabs would not retract into the floor plate. The tabs were angled forward, and were not aligned with the slots in the floor plate that would allow them to retract. In this condition, the magazines are useless, as they cannot be inserted into the magazine well.

The obvious solution was to partially slide off the floor plate, and slide it back on again while trying to hold the tabs at just the right angle so they'd slip into their slots. At this, I failed miserably. Plan B entailed using a screwdriver to push the tabs rearward with the floor plate fully installed, hoping once I'd gotten them to just the right angle, they'd line up with the slot and retract. No go. Plan C was actually Plan B.2, using a small flat-head punch in place of the screwdriver. (When all else fails, go to the flat-head punch.) The punch was able to make better contact with the tab than the screwdriver, which made it easier to push. Because I was thoroughly annoyed by now, I pushed the tab way beyond what I thought was the correct angle, basically as far back as I could push it. At that point the punch slipped off the tab, causing it to snap forward...and into the floor plate. Success! I then repeated this procedure successfully with my other two 7-rounders. It took as many as ten push-and-releases to get get the other tabs to retract, but it eventually worked.

To summarize:
1. Reassemble the magazine just as if it was a normal, properly designed magazine.
2. Unless you are incredibly lucky (or good) you will now see the two guide tabs angled forward on each side of the magazine tube.
3. Using a flat-head punch or similar, push one of the tabs (the other will follow) as far toward the back of the magazine as you can, and let it snap forward.
4. Repeat as necessary.
5. Cuss out Smith and Wesson for designing this mess of a magazine, and for not showing you how to properly reassemble it in the owner's manual.

Hope this helps.
 
Register to hide this ad
haven't had the pleasure yet of taking apart my Shield 9 mags. not sure what to expect.
 
I remove the bottom plate from the spring, reassemble them as separate parts, easy peazy!

Sent from my Galaxy S8 using Tapatalk
 
Is the 45 mag that much different than the 9 and 40 to be such a problem?

haven't had the pleasure yet of taking apart my Shield 9 mags. not sure what to expect.

I'm not familiar with the .40 magazines, but the 7-round (large) .45 magazine is very different from the 9 magazines. The latter are pretty traditional in design, and are relatively easy to reassemble. The 6-round (small) .45 magazine is similar to the 9 magazines and is also easy to reassemble. It is the 7-round .45 magazine with its unique guide tabs that gave me problems. I have six other semi-autos (including a Shield 9 and an M&P 40c), and none have the guide tab feature. So if you don't have a Shield .45, you should be OK.
 
FYI. Watch what people sell you. The Pearce Grip Extension DOES NOT WORK on the 45 Shield 7rd mags no matter what they tell you. They do not have the guides molded in them.

They work just fine on the 6rd mags.
 
FYI. Watch what people sell you. The Pearce Grip Extension DOES NOT WORK on the 45 Shield 7rd mags no matter what they tell you. They do not have the guides molded in them.

They work just fine on the 6rd mags.
Well, isnt that interesting.

...considering I ordered a 4 pack last night:rolleyes:

Guess I need to warm up the ole Dremel:D
 
Of the Pearce extensions?...or the boogerbear tabs and reassembly process?
Just the factory "tabs" the OP is talking about. I haven't seen this issue, but I don't have a Shield 45 and can't picture what these "tabs" are.

Aftermarket accessories bring their own issues.
 
Just the factory "tabs" the OP is talking about. I haven't seen this issue, but I don't have a Shield 45 and can't picture what these "tabs" are.

I have a house full of company for the next couple of days, so I can't disassemble one of my magazines to photograph the guide tabs right now. However, I've attached the link to the Shield owner's manual from the S&W website. Scroll down to pages 29 & 30, and you can see the guide tabs that are part of the floorplate catch.

https://snwcdnprod.azureedge.net/si...als/M&P_Shield_All_09-30-16_441310000_web.pdf
 
OK Rastoff....just for you my man :D (and to help out swsig)

First piccy shows the tangs out of their groove due to unlocking the floorplate from the base, they should be straight up and down along the long axis of the mag when seated in their base slots. This denotes that the floorplate is also canted/stuck inside at this angle on a perpendicular...

Second piccy shows the whole mess pulled apart, note the tangs and their notches they fit through on the outside of the mag...

Third piccy shows the base, hopefully at a lighting angle so you can see the grooves in the rear that the tangs fit in to, also note the large notch in the front to arrest the large tongue on the front of the floorplate...

Fourth piccy...this was a trickky piccy:D (coulda been a disaster) This shows all the alignment as it goes back together, then slide the base back on. (and yes I held it backwards and had to spin it around :rolleyes: )

The actual "trick" comes when your all done because the floorplate will naturally "cant" like it does in the first pic and not be properly locked in. Then I reach in the lock slot with a punch and work to "level" the floorplate inside. When its just right it will all "snap" down in place in the base.

EDIT: CHECK BELOW FOR VIDEO OF FINAL SOULUTION TO THIS PROBLEM....THANKS
 

Attachments

  • IMG_0935.JPG
    IMG_0935.JPG
    68.4 KB · Views: 188
  • IMG_0936.JPG
    IMG_0936.JPG
    78.7 KB · Views: 187
  • IMG_0942.JPG
    IMG_0942.JPG
    68.9 KB · Views: 175
  • IMG_0943.JPG
    IMG_0943.JPG
    63.5 KB · Views: 171
Last edited:
Another user said take the baseplate off the spring and put it in the extension, then reassemble. Or fight it for 20 minutes. When it cants like it does, it can booger the slots in the extension and until those are cleaned up it will never go back together.
 
Last edited:
OK Rastoff....just for you my man :D (and to help out swsig)
I just now saw this. Thanks for the pics. It explains the issues perfectly. I have never seen a mag floor plate like that. I wish I could spend some time with this mag to figure out the intricacies of reassembly.
 
It is a total pita to put it back, I spend probably half an hour trying to figure it out. I almost lost it, what a weird design.


Sent from my iPad using Tapatalk
 
Last edited:
It is a total pita to put it back, I spend probably half an hour trying to figure it out. I almost lost it, what a weird design.

I agree, its a true test of a man's character:D


I just now saw this. Thanks for the pics. It explains the issues perfectly. I have never seen a mag floor plate like that. I wish I could spend some time with this mag to figure out the intricacies of reassembly.
Welcome:D

NEW TIP FOR ASSEMBLY... I believe I have discovered the "trick" to this process .

In the attached vid for reassembly, when you slide the baseplate back on the legs of the spring retainer "cant's" at an angle. When they do this it gets very persnickety to get the spring retainer to recess back into the baseplate.

At this point all you can do is reach in the locking tab opening with a roll punch or the like. As Shield9mm said, its a PITA and there is usually swearing involved:rolleyes:

The new trick.....

Pinch mag on its side between thumb and index finger in a manner that your fingers end up pointing at the ends of the legs. Once you poke the punch, at a downward angle, into the locking tab hole to level the spring retainer, move the punch back-and-forth while gently aligning the legs into their notches.

This is all by FEEL and after a few times you will get the hang of it when the spring retainer snaps into place.

Hope this works for everybody :D

[ame]https://www.youtube.com/watch?v=tg3qSEUitWs[/ame]
 
Last edited:
After watching the video it looks super easy, hopefully I never had to disassembled one again, I was just curios what was required to make the 6+1.
Also I was having some issues loading the mags specially the 7rnds with the uplula, at some point the mag follower seems to get stuck, that's why I took it apart, but when tried to reassembled the spring I noticed some binding between the follower inside the walls of the mag. I have only put 50 rnds through, no issues tough.
 
Last edited:
That video is pretty much how I got mine put back together. Too bad you didn't have it up sooner. Might have saved me fifteen minutes struggling with the darn thing before I figured it out.
 

Latest posts

Back
Top