You're always helping us to find new ways to spend money!

Off to search Karl Nill.

And now, to drag this out further...
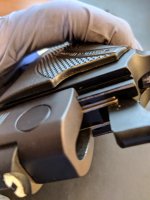
I did some testing this morning using the drill bit gauge. I tested my 3914NL and the pre rail 3913TSW.
The TSW has had the ambi safety swapped out for a left side only safety. Thus my interest in making sure everything is within spec.
The 3914NL easily passed the "no go" test, but the TSW did not. That did pass the "pencil" test and seems fine using the "red dot" test.
I then did an eyeball comparison of the two safety levers. The TSW safety is a bit "thinner" on the side of the body than the NL.
Then is struck me. I sent the safety to BMCM for a bit of a shave and dehorning. Which came out beautifully, BTW.
Noticing that the very tight tolerance and the need to be very, very, very, careful with the filing of the sear release lever, I have to wonder if the little bit of shaving done in the dehorning process accounts for this?
Note that I am not even in the least questioning the work BMCM did for me. It's excellent. I just wonder if that little bit of shaving of the safety body is what is account for the difference.
What do you think BMCM?
")


")