It comes down to mostly what you want/need, and partly to what you want to spend and there are pros and cons between the Sadlak and Springfield Gen 4 mounts.
The Sadlak mount is more expensive with the aluminum version running a bit more than a Springfield Gen 4, and the steel versions costing a lot more than the aluminum or steel Springfield mounts.
Sadlak pros and cons:
The Sadlak mounts are arguably better than the Springfield mount if you are *permanently* mounting the scope mount.
The Sadlak mount is also lower, with the ability to shoot with iron sights over the mount, through a groove in the rail.
However, you can’t do that without removing the scope first as the scope bells block the view. Consequently, you need QD rings to allow you to remove the scope to actually use the iron sights.
In other words, if the scope gets broke, or knocked out of zero and you want to revert to your iron sights, you have to remove the scope rather than just looking lower underneath the scope.
If you remove the Sadlak mount you have to go through the entire re-installation and fitting procedure again.
In other words the Sadlak mounts are a trade off, heavily biased toward permanent installation on an M-21 type of rifle/application.
There’s no free lunch even with the much vaunted and fan boy approved Sadlak mounts.
Springfield mount pros and cons:
The Springfield mounts are initially installed using a rubber mallet to tap on the mount in front of and behind the main mount thumb screw, rinsing and repeating as you continue to tighten the screw until the mount is fully seated in the receiver’s horizontal and vertical key ways. At that point the mount is precisely fitted to that receiver, and only that receiver. It’s how they achieve a reliable return to zero when removed and reinstalled.
In contrast to the Sadlak mount, once you have set up the Springfield Gen 4 mount, it comes off with two large thumb screws and will go right back on with nothing more than installing the screws (in proper sequence). The Gen 1 mount was a single screw design and went on and off even faster.
In my experience with the Gen 1 and Gen 4 mounts, both will go on and off with no loss of zero. The Gen 1 however did not allow you to use the iron sights with the mount installed. The Gen 4 with its second screw and using the stripper clip guide is no doubt more secure in terms of holding zero if the rifle gets knocked around, and lets you immediately transition to iron sights if the scope has gone out for a beer.
That second screw also allows for windage adjustment of the mount if necessary, where the Sadlak mount lacks that capability.
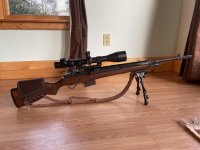
The Gen 4 lets you use the iron sights as they are visible under the scope with rear sight adjustments all the way out to 400 yards (with a 4-16x44 Vortex Viper and medium rings). However the Gen 4 Springfield mounts puts the scope higher than the Sadlak mount, so there is greater need for a cheek rest.
So again, there’s no free lunch and there are trade offs made with the Springfield mount, which is biased more towards quick access to the iron sights as a back up.
——
Back when I shot Service rifle competition with an M1A Supermatch, I used a scope only for practice load development and testing. I also used it in the field a few times on dee and an antelope hunts. The Springfield Gen 1 mount worked fine for those purposes and the Gen 4 would be even better.
Both Springfield mounts work just fine without a cheek riser. However the caveat is you have to either use a low power scope down around 4x-6x where parallax error is not a significant issue, or you need to use a higher magnification scope with a parallax adjustment and *use it*.
I currently use a Springfield Gen 4 mount for similar load development purposes and it’s both better and worse compared to the Gen 1. You do gain another point of contact and anchor screw by replacing the stripper clip guide and get better resistance to knocking the mount out of alignment. But you give up the stripper clip capability. For most folks it’s no big deal, but I did prefer loading with a stripper clip in rapid fire prone rather than swapping magazines. It was faster and required less change in position to accomplish.
I bought, used and ultimately sold my Sadlak mount as I just don’t always want a scope or mount on my M1A, and didn’t like having to go through the entire refitting process with the Sadlak mount.
Let’s talk about contact points.
Sadlak claims 12 points of contact and I think that’s mostly semantics of not an out right lie, and is in any case a distinction without a meaningful difference.
The Sadlak mount engages the horizontal key way on the receiver, but not the vertical key way, and it’s designed to slide along that horizontal key way as the cam screw is rotated. So you have a slip fit in that horizontal key way until you torque down the screw, and then you have some form of press fit.
At the stripper clip guide you have contact between the mount and clip guide dove tail with the key pulling the rear of the mount against one or of you are lucky both top faces of the dove tail.
You also have a set screw contacting the top of the receiver above the chamber.
So that’s one key way, the cam screw, the clip guide and the front set screw. That’s realistically four distinct contact points.
With the Springfield Gen 4 you have custom fitted contact in both horizontal and vertical key ways in addition to the main thumbscrew. You also have a custom fitted and pinned block replacing the clip guide into which the rear screw attaches as well as a sleeve around that screw that contacts the block and maintains a set distance between the mount and block.
The only thing it lacks in comparison is a front locking screw, and that’s not needed if the mount isn’t flexing. Sadlak included it because they could, not because its needed.