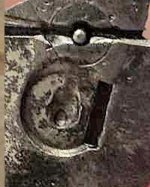
Is that a bushing around the firing pin with it's own Spanner slots?
If it is, remove that first, then you have a rough Saw Cut on each side to repair.
You can square up each of the cuts with some careful file work. Then fit a separate piece of steel into each one.
A tight fit to the edges, leave it high for fitting it back down.
Then just use the newer Tin/Silver soft solder (most call that Silver Solder now). The 'No Lead' is to satisfy the Green Agenda
It melts at around 400F and will remain bright white much like the nickle plating.
It works well and is as strong if not a bit stronger than Lead/Tin soft solder.
After soldering, file the fitted and soldered into place pieces down to the breech face. Plus any other contour they may need fitting.
Polish them as needed. Leave grit marks to mimic orig tool & machine marks on the breech face.
The steel you use doesn't need to be anything special. Low Carbon steel is fine. Common Cold Rolled Steel.
A large enough dia common nail will do if you can file the needed shape from it. Leave it long enough to hand onto while shaping and fitting. Clip off the excess once it's soldered.
If you want the Solder lines , however thin and small, to turn grey over time,,use the older Lead/Tin soft solder. It oxidizes and turns dull grey, almost black unlike the Tin/Silver stuff above which 'Stays Brite' (A brand name of one of them BTW)
Common plumbers solder . They are 50/50 or 60/40 Lead/tin % generally but it doesn't make a lot of difference which you use.
The flux for soldering with either of these I use is paste flux sold at the DIY store. Again nothing special, it's for plumbing jobs mostly but works for steel just fine.
If the Firing Pin Bushing won't budge and remove itself,, then leave it in place and just do the same thing and make 2 separate filler splices as above.
But just lay them in so they come up to and touch the edge of the bushing and leave the Spanner Slots clear in the bushing itself.
The slots will be a little harder to clean up with files this way as you can't work straight across the face with the bushing in place.
Some filing, sawing fitting, soldering, more filing and fitting. Then polishing. A bit of Antique finish to top it off....and you're done.
Hang it on Wall and call your friends over.
Raise a Glass