Learning to clean my 10-5 snubby

Kensterfly

Member
Joined
Dec 18, 2013
Messages
232
Reaction score
187
As posted elsewhere, I'm the proud owner of a 'new' 10-5 Blue snubby. I would like some simple guidance to cleaning it after I take it out and shoot it this afternoon. I've read many threads on cleaning, each filled with dozens of varying opinions on how to properly do it. Pictured below are the supplies I have on hand. I'm thinking there should be something here to get the job done.

Can you give me steps on cleaning that will use the tools and supplies I have on hand. I live in a remote rural area and would have to drive a good distance to find a gun supply shop.

Also, please advise if there is anything here that I should NOT use on my 10-5 Nickel 4 incher.

Thanks!
 

Attachments

  • clean1.jpg
    clean1.jpg
    47.3 KB · Views: 60
  • clean3.jpg
    clean3.jpg
    42.8 KB · Views: 62
  • clean2.jpg
    clean2.jpg
    42.1 KB · Views: 61
  • clean4.jpg
    clean4.jpg
    52.7 KB · Views: 60
  • clean5.jpg
    clean5.jpg
    39.1 KB · Views: 52
Last edited:
Register to hide this ad
I have several of those, actually, and I love them. Cleaning them is no different than cleaning any other firearm.

I cannot actually see the pictures you posted - this computer fights me off when I try to view them but it doesn't take much to clean a revolver. I do not actually think there is a single "proper" way.

One thing I generally avoid is removing the grips - when I have I find they are spectacularly clean underneath so I just leave the stocks on and try to avoid getting anything under them but I don't worry about it too much.

One thing I also try to avoid is the use of lead round nose (LRN) ammunition. If you use jacketed ammunition you avoid the "leading" which can be difficult to remove from the barrel, or anywhere that happens to pick the lead up.

Another point I'll make, much to the horror of shooters everywhere, is that if you're shooting quality, jacketed ammunition you do not have to go home and clean that gun immediately. As a matter of fact, if you do not clean it after ten range sessions you'll be well served. Smokeless powder just doesn't have to be cleaned every time.

But, okay, if you want the gun to be immaculate, that's fine, too. Let's break it down:

1. You have seven "tubes" to clean, 6 cylinders and the barrel. If you use a good cleanser, like Hoppes #9, or probably one of whatever is shown in your pictures, and you dip a copper bore brush into that stuff and then run run it through each "tube" a time or two, then follow that with a standard cleaning jag with cotton patches until they come out almost as clean as they went in (it doesn't take too long to get there), your seven tubes are clean. You might have burn marks on the front of each cylinder - your copper brush and solvent should get most of that off, too.

Then, to get rid of all of that junk, blow Gunscrubber through it (some folks use Brake Free, I think), or Ballistol - do this over newspaper or something so you can collect the mess and throw it away. Wipe it all off and your gun should be clean.

Then you can lightly oil the weapon - LIGHTLY! Never drench it in oil. Especially if you plan to keep it loaded. Oil can ruin your ammunition. Plus you really cannot carry an oil soaked gun - it will ruin your clothes or your holster or both. I just put teeny drops of oil on metal parts that touch and/or move, crane, base of hammer, cylinder latch, extractor rod- don't worry, even a little will move around and lubricate the gun. TEENY amounts.

Then wipe it all down with a silicone cloth, wipe excess oil off (T-shirts are good for this - use them long enough and the rag itself will be a nice lubricating rag as it absorbs excess oil, etc.) and then - my final trick - place the gun with its open cylinder someplace where it can dry off for 24 hours (this assumes no kids, guests, etc.). This allows all the alcohol based solvents left over to evaporate AND, very importantly, gets most of the nasty aromas off so that your closet or gun safe or whatever storage you use doesn't stink from that stuff.

That's just my method. Some might not like it - as we say, YMMV, but I have never had an issue doing it this way. My sole comment AGAINST my method of often not cleaning weapons after every range session is that with pistols you can have problems with slides that fail to stay back when the gun is shot empty if the gun is really dirty. Rifles can have issues, too, especially lever rifles and certain semi-autos, but that's a topic for a different thread.

Enjoy the M10! It's one of the best guns in the world IMHO!!!

***GRJ***
 
Last edited:
Walmart sells a package for about 4 dollars that has 2 plastic dental picks, a wire tooth brush and nylon tooth brush. I have several of them. I like to use them to scrub the cylinder face and inside the window. I take the cylinder off to give it a good scrubbing. A good wire brush inside the barrel and cylinders works. I find that when the wire brush for barrel and/or cylinder feel too lose or not enough resistance, I wrap #OOO steel wool around the brush and scrub away. Solvent on the brushes of course.

P
 
Easy. Cleaning an S&W revolver should not require removal of ANYTHING, including the grips.

You will need:
a cleaning rod with a bristle brush and a "jag," (the nylon slotted tip in picture 2 will work instead of a "jag")
a nylon type of cleaning brush that resembles a tooth brush, or you can just use an actual tooth brush (not one with tooth paste on it, and not the one you or your wife uses every day),
some cleaning patches,
a shop rag or old clean cotton t-shirt,
Hoppes No. 9 Solvent or your Outers bore cleaning solvent, and
Break Free CLP or your Outers gun oil.

(Your picture 2 has everything you need except patches and the shop rag or clean white cotton t-shirt.)

This job should take no longer than five minutes and the use of 2 or 3 cleaning patches.

Steps:

UNLOAD and triple check the revolver.

Attach bristle brush to cleaning rod.

Dip bristle brush into Hoppes bottle. Pass bristle brush with solvent through bore and each charge hole and then allow those areas to remain wet so the solvent has time to work. A couple of passes through the bore and each charge hole is all that is required.

Dip tooth brush into Hoppes bottle. Use tooth brush with solvent to scrub off ash and burned powder residue from exterior surfaces of the revolver, paying particular attention to face of cylinder (you will never get the burn rings off and you will damage the revolver if you use crazy methods like power drills and steel wool - all you need to do is make sure any debris is removed and that the cylinder spins freely), under the extractor star, the ratchets, inside the cylinder window, and around the barrel shank.

Use shop rag to wipe off all solvent from exterior surfaces of revolver. Black or dark stains will appear on the shop rag or old t-shirt. This is normal.

Attach jag to cleaning rod and use a patch to wipe out bore and each charge hole. A couple of passes in the bore and each charge hole is all that is required. Use one patch. The patch will come out with black or dark stains. This is normal.

Place a few drops of Break Free on a fresh patch and pass the oiled patch through the bore and each charge hole. Use a fresh dry patch after the oiled patch to wipe out excess oil as all you want in the bore and each charge hole is a light application or film of oil.

Now place one drop of Break Free on your finger tip and wipe the oil all over the exterior surfaces. Wipe away excess with shop rag leaving a light film of oil.

You are done.

If done correctly, this whole process should take no more than 5 minutes or less.

No more than once per year, place exactly ONE DROP of oil in the crane where the yoke pivots.

No more than once per year, place exactly ONE DROP of oil in the action by cocking the hammer and letting one drop fall into the open space created when the hammer is at full cock. Run the action several times to spread the oil around.

If you drop the revolver into a mud hole or into your fish tank, get back to me as additional steps will be required to make sure it does not rust.

DO NOT, under any circumstances, attempt to remove any screw, even a grip screw, or to disassemble the revolver in any way for normal cleaning without having a proper set of gunsmith-specific "hollow ground" screwdrivers (even for the grip screw) and without proper training on the exact procedure as irreparable damage can be done to your revolver.

EDIT: NEVER, EVER USE STEEL WOOL AS YOU WILL LEAVE MICROSCOPIC BITS OF STEEL (there is a reason that bore brushes are brass, not steel) that will turn your revolver a nice shade of rust-brown, this is especially evident when it happens on stainless revolvers as the surface will be freckled or pitted with tiny rust brown bits of shaved off steel wool. In addition, brass is softer and will not cause damaging scratches to your revolver. If your brass bristle brush seems too loose, spend a dollar or two for a new one. Don't damage your revolver with abrasives not designed for firearms.
 
Last edited:
I basically agree with Shawn. Remember never to dip a dirty brush in your bore solvent because you will contaminate the bottle.

However, I use a set of gunsmiths screwdrivers and remove the stocks every time I shoot the revolver because I've seen more than one with rust spotting under the grips. After wiping the frame down with a lightly oiled rag I replace the grips after I'm done.

When I became more familiar with my revolvers I started to remove the cylinder from the gun prior to cleaning. I feel it makes the process easier, particularly if you tend to be clumsy at times like me.

Use steel wool on my guns? Not likely.
 
Easy. Cleaning an S&W revolver should not require removal of ANYTHING, including the grips.

I like this guy!!!! I agree with everything he said. I think our words differ and our methods do not!

Use steel wool on my guns? Not likely.

Not sure I agree with everything he wrote but this statement I agree with 100%!

***GRJ***
 
My two cents - If I am cleaning a new to me revolver for the the first time I will use my gunsmith screwdrivers and remove the sideplate and grips just to make sure there is no hidden rust or gunk hiding out. If there is I use gunscrubber or something similar and clean it all out and lube it. After that, it is standard clean the cylinder, barrel, wipe down etc..no need to remove grips and sideplate every time. Remember, every time you turn a screw it is a chance to bugger said screw - even if you use the right screwdriver.
 
I have done this for 40+ years without ill effects. I guess no one told my Hoppes to quit working because of the dirty brush being dipped in the bottle regularly. :)

All good advice above.This old coot hasn't bought any patches in ages.Had to make do one night and wadded up a small ball of paper towel that was a tight fit to the bore and pushed it through with the cleaning rod after using the brush.Worked so well I just make one for each hole.
 
I've enjoyed the "read" on this subject as well. Always curious how others accomplish this basic (but required) step in maintaining a weapon in proper condition. Also noted to use minimal oil ( more is not always wanted or desired).
 
I have read on here that you want to be careful with some solvents on a nickel gun. Copper solvents in particular. The nickel is held to the steel by a layer of copper.
 
I shot my 10-5 snub this Tuesday and haven't cleaned it yet.
I wiped it off with a clean rag with a little bit of Tri-Flow on it and put it up. I was shooting 125 grain Remington +Ps and cheap (relatively speaking) Winchester 130 grain FMJs.
No leading yet, since I haven't run any lead bullets through it.
I fear no lead fouling.
Lead fouling is easier to remove than copper fouling.
A Lewis Lead Remover makes short work of this task.

The only reason I bought the FMJs (accuracy is terrible compared to the HPs), was for function testing new-to-me (used) guns.
That, and to have more reloadable brass.

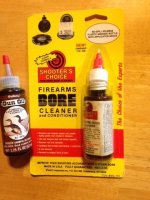
I cleaned my stainless Taurus 85 (it got nasty inside and out) with some military surplus rifle bore cleaner that smells suspiciously similar to Hoppes #9.

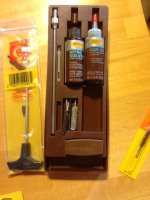
I didn't even break out the rod and brushes.
I used Q-tips and rags and one of the Nylon bristle brushes that looks like a double-ended toothbrush.
No, I didn't give it a full cleaning. Just wanted to get all the powder fouling out.
Didn't even worry about the carbon stains of the front of the cyl.
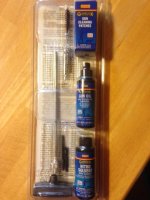
Used bore solvent/brush/rag on them to get the loose fouling off.
Not worried about the black rings on my stainless cyl.
If I shoot it, it will get stained. I'm not going to waste time scrubbing it off every time, only to have it return every time I shoot it.

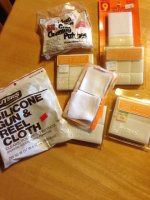
I used to remove the rings with a lead removal cloth.
Now, I just leave them.

BTW, I lube them with Tri-Flow Lube normally, because I have more of it.
Alternatively, I'll lube with Ballistol, BreakFree LP, FP10, Tetra Gun, or plain mineral oil, depending on what's close at hand.

I also use 2 versions of Ed's Red for cleaning.
One I made at home using the regular formula.
The other is what I call "field expedient Ed's Red".

"What is that?" you say?
I'm glad you asked.
Field expedient Ed's Red is a version I made at work, using leftovers.
I originally made it as a quicker penetrating oil for rusty parts.
I use my leftovers, IE, partial containers of Dexron 3, carburetor cleaner, brake cleaner, and rust penetrant.
I mix them in the Dexron bottle, until I get the consistency of bore solvent.
Works great, so far.
And, it doesn't cost me a dime, since these are leftovers from my job, that have to be disposed of, since I wouldn't otherwise have room for my restock.
Plus, sometimes, the aerosol chemicals will leak out their propellant after their first use.
Then, I'm left with an unpressurized can of liquid brake or carb cleaner or rust penetrant.
Open the bottom of the can with the handy-dandy P51 can opener, and I can pour said chemical into the ATF bottle and make my solvent.

As time goes buy and I lose a little of the solvent from it permeating the plastic bottle, I add a little brake and/or carb cleaner to get it back to the viscosity of Hoppe's #9.

There's more than one way to skin a cat.

Basically, the carb cleaner and brake cleaner contribute and substitute for the acetone/Stoddard Solvent, and the Rust Pen contributes and substitutes for the kerosene.
Of course, the Dexron contributes the Dexron.

It doesn't take long to accumulate enough to make a quart.
I currently have two quarts of it.

And, THAT'S my favorite way to make ER.

Hopefully, I helped someone figure out how to make ER that costs little to nothing, since anyone who does mechanical work usually has partial containers of these chemicals on hand.
Since they're already paid for, and you don't have to spend time, money, or gas going to the store to locate/buy ER components (plus, who needs a gallon of ER, anyway?), you savings can be huge.
 
Last edited:
How I learned my lesson on the "more oil is not always wanted or desired"
as a kid I oiled the heck out of my bicycle chain. I ended up with oil sprayed all up my pant leg. yikes.
 
One thing I like to do is use a piece of stiff leather or similar to protect thr firing pin hole when I am pushing a cleaning rod and brush/jag through the barrel - just adds a little more protection for that area
 
Back
Top