HomeSmith Trainwreck: The Rustbucket

Joined
Jul 25, 2017
Messages
1,252
Reaction score
7,463
Location
Arizona
I didn't intend to start another project so soon, considering that Project 10-3 Fifty Seven still needs trigger work, but this feral Model 15 wandered by looking for help and I just had to take it in.

"More than moderate aging" was the auction description. I think perhaps "crusty" would have been better.

Welcome to Project Rustbucket
 

Attachments

  • MORE THAN MODERATE AGING.jpg
    MORE THAN MODERATE AGING.jpg
    76.2 KB · Views: 201
  • IMG_4911.jpg
    IMG_4911.jpg
    130.4 KB · Views: 419
  • IMG_4912.jpg
    IMG_4912.jpg
    129.8 KB · Views: 328
  • IMG_4914.jpg
    IMG_4914.jpg
    134.6 KB · Views: 323
  • IMG_4925.jpg
    IMG_4925.jpg
    127.5 KB · Views: 272
Register to hide this ad
Rustbucket may look horrible, but she seems to have a good heart. Even as munged up as she was the timing was perfect on all 6 chambers.

Maybe I should have called this one "Freckles" instead....

And yes, there were things growing out from under the sideplate. :eek:
 

Attachments

  • IMG_4921.jpg
    IMG_4921.jpg
    152.9 KB · Views: 191
  • IMG_4918.jpg
    IMG_4918.jpg
    97.7 KB · Views: 168
  • IMG_4922.jpg
    IMG_4922.jpg
    119 KB · Views: 198
  • IMG_4923.jpg
    IMG_4923.jpg
    129.1 KB · Views: 164
  • IMG_4920.jpg
    IMG_4920.jpg
    88.6 KB · Views: 156
Last edited:
Rustbucket seemed to want to be rescued because every screw, including the rear sight screw, came right out and the sideplate popped off with a minimum of whacking.

It's about time to replant the garden so I saved the stuff from around the screws and sideplate to use as fertilizer.
 

Attachments

  • IMG_4927.jpg
    IMG_4927.jpg
    103.8 KB · Views: 118
  • IMG_4928.jpg
    IMG_4928.jpg
    137.6 KB · Views: 109
  • IMG_4929.jpg
    IMG_4929.jpg
    123.4 KB · Views: 99
  • IMG_4934.jpg
    IMG_4934.jpg
    114.7 KB · Views: 111
  • IMG_4935.jpg
    IMG_4935.jpg
    183 KB · Views: 127
The insides didn't really look that bad, but there was stuff growing under the rear sight that got saved for the garden also. All the insides were moved to the outside and placed into a container (labeled with the serial number because I have a couple of things apart now) and set aside.

There appears to be some contact from the inboard side of the trigger bevel that I'll have to take care of eventually.
 

Attachments

  • IMG_4931.jpg
    IMG_4931.jpg
    141.3 KB · Views: 164
  • IMG_4937.jpg
    IMG_4937.jpg
    78.2 KB · Views: 165
  • IMG_4938.jpg
    IMG_4938.jpg
    131.1 KB · Views: 164
  • IMG_4940.jpg
    IMG_4940.jpg
    149.3 KB · Views: 159
  • IMG_4941.jpg
    IMG_4941.jpg
    135.9 KB · Views: 144
Last edited:
Our next move was into the kitchen. She Who Must Be Obeyed (SWMBO) was at a crafting event, so we all know what that means: guns on the stove! :D

After a quick spritz with brake cleaner to degrease everything, all the major pieces were placed in the deep fryer with a couple of gallons of distilled water and boiled merrily for an hour while I had dinner. The controlled rusts that I do for rebluing only get a 20 minute boil, but this was uncontrolled lumpy rust that needed more time.

To be clear, this was not a refinish. This was triage. I needed to stop the rust and get an idea of what was hiding beneath it.

As usual, what came out looked worse than what went in. :o
 

Attachments

  • IMG_4942.jpg
    IMG_4942.jpg
    243.7 KB · Views: 183
  • IMG_4944.jpg
    IMG_4944.jpg
    116.8 KB · Views: 197
  • IMG_4945.jpg
    IMG_4945.jpg
    90.3 KB · Views: 188
  • IMG_4948.jpg
    IMG_4948.jpg
    69.5 KB · Views: 174
  • IMG_4950.jpg
    IMG_4950.jpg
    80.2 KB · Views: 169
Boiling water and a Grobet carding wheel do some magical stuff.

Here's the sideplate before, during, and after carding. There is some pitting but I think some careful draw filing, block sanding, and some time on the wheel will get most of it out.
 

Attachments

  • IMG_4953.jpg
    IMG_4953.jpg
    151.5 KB · Views: 222
  • IMG_4958.jpg
    IMG_4958.jpg
    153.3 KB · Views: 218
  • IMG_4959.jpg
    IMG_4959.jpg
    146.1 KB · Views: 217
  • IMG_4961.jpg
    IMG_4961.jpg
    167.1 KB · Views: 211
  • IMG_4962.jpg
    IMG_4962.jpg
    138.3 KB · Views: 213
The frame is a good news/bad news thing. The bad news is that it is covered with small pits. The good news is that the vast majority of them are on the flats and can be block sanded.

Laying the pieces together showed me that the sideplate lost quite a bit of color and is now significantly more grey than the frame. We're going to be rebluing it all anyway so that doesn't really bother me.

As I said earlier, this is triage....not refinishing. It also helped me to learn and predict what metal looks like under different rust coatings so that I can buy better Trainwrecks. :D
 

Attachments

  • IMG_4975.jpg
    IMG_4975.jpg
    113.7 KB · Views: 126
  • IMG_4977.jpg
    IMG_4977.jpg
    123.6 KB · Views: 128
  • IMG_4976.jpg
    IMG_4976.jpg
    119 KB · Views: 127
  • IMG_4971.jpg
    IMG_4971.jpg
    129 KB · Views: 121
  • IMG_4979.jpg
    IMG_4979.jpg
    126.2 KB · Views: 132
I could probably put it back together, lube it up, toss it on Gunbroker, and double my money now, but that's not the way I do things. For now all the pieces that were boiled and carded are soaking in RIG #2 to bring some oil back into play and make sure the rust is all stopped.

Now I have to figure out what I'm going to do with a fourth Model 15 project gun. :confused: You haven't met the other 3 yet. We'll come back to Rustbucket after I get some other things cleared out of the way...my short term plan is to clean up the insides, get her back together in a semi-finished state, and take her to the range so that she can tell me what else she needs besides new clothes.

Stay tuned.......
 

Attachments

  • IMG_4980.jpg
    IMG_4980.jpg
    136.9 KB · Views: 95
  • IMG_4981.jpg
    IMG_4981.jpg
    134.8 KB · Views: 98
Here's how she looks after the RIG bath and the other work. I'm normally not a fan of goodyear stocks, but Rustbucket seems like a rubber boot kind of girl. ;)

As all the pieces went from the outside to the inside they got what I guess I can start calling my "normal" trigger job. It's become both predictable and repeatable, with a DA pull of just under 8 pounds and a 2 pound single action pull. The yoke alignment was good, the rear gauge was in spec, endshake is .002", and the cylinder gap is .010".

Range trip tomorrow.....
 

Attachments

  • IMG_4998.jpg
    IMG_4998.jpg
    131.7 KB · Views: 215
  • IMG_4999.jpg
    IMG_4999.jpg
    131.7 KB · Views: 206
I could probably put it back together, lube it up, toss it on Gunbroker, and double my money now, but that's not the way I do things.

The gun show bandits in my area would have wanted $300 for it in the condition is was before you started!
 
Rustbucket made a range trip today with Project 10-3 Fifty Seven and another Model 15 that is a project to be named later.

I fired 6 shots from each gun standing at 50 feet and then seriously thought about just packing up and going home....the 3 targets are below. :cool:

Rustbucket chugged along with no issues, just bang bang bang with every shot in the 10 ring or better. My SWAG rear sight setting turned out to be pretty good.

I'm really torn now about what to do with Rustbucket. I've wanted to build a faux pinto on a Model 15 frame with a Model 67 barrel and cylinder, but I keep running into things that shoot well and I have a hard time tearing them apart. Pretty is as pretty does.

Speaking of pretty does, the project-to-be-named-later did pretty well too. More of that same conundrum.

I suppose it's a good problem to have. :rolleyes:

To finish out the day I put 6 shots from each gun into the same target at 10 yards, all double action. It was a good day. :D
 

Attachments

  • IMG_5003a.jpg
    IMG_5003a.jpg
    174.6 KB · Views: 136
  • IMG_5005a.jpg
    IMG_5005a.jpg
    75.7 KB · Views: 139
  • IMG_5008.jpg
    IMG_5008.jpg
    121.4 KB · Views: 132
  • IMG_5015.jpg
    IMG_5015.jpg
    118.8 KB · Views: 127
  • IMG_5017a.jpg
    IMG_5017a.jpg
    84.6 KB · Views: 123
Thank you Chief. This project was quick, fun, and had good results. I want to do a bit more work such as painting the front sight and smoothing out the really aggressive trigger serrations but I think that will be about it.

Working guns have their place and Rustbucket seems like a great choice for that.
 
When painting front sights, it's very beneficial to use thin coats and let them dry thoroughly between coats. I have had the best results by using a white first coat, then florescent orange. Then a top coat of clear nail polish. The white undercoat makes the top coat a lot brighter than if it were applied over the black color of the sight. Back in the day, (before florescent paints), light blue was a popular color in my area.

The clear top coat makes the color stay like new for a long time. Without it, the smoke and dirt from shooting will get embedded in the paint and make it darker and darker over time. The clear top coat allows you to just wipe off the dirt with a soft cloth and be like new again.

Once everything is completely dry, shave off the sides and top with a single edge razor blade or Exacto knife to get fine definition of the sight picture and best accuracy.
 
Last edited:
Rustbucket has taken over duty as my "truck gun" and has been shot every week at the range. He continues to be exceptionally accurate and functions flawlessly.......but he looks like hammered dog poop.

I can't take it anymore.

It rained all day Friday and it's going to rain every other day next week, so I wanted to take advantage of the high (for AZ:rolleyes:) humidity and work on a different restoration project. I decided to bring Rustbucket along for the ride and get him some new clothes.

As always, the first step was to move all the insides to the outside and put everything into a labeled container.
 

Attachments

  • IMG_5329.jpg
    IMG_5329.jpg
    121.1 KB · Views: 63
  • IMG_5330.jpg
    IMG_5330.jpg
    124.5 KB · Views: 53
  • IMG_5349.jpg
    IMG_5349.jpg
    128.6 KB · Views: 53
  • IMG_5350.jpg
    IMG_5350.jpg
    103 KB · Views: 48
  • IMG_5351.jpg
    IMG_5351.jpg
    128.4 KB · Views: 54
Three flat topped screws were used to attach the sideplate so that everything could be sanded as a unit.

The adventure began by sanding with 180 grit sandpaper just to see how deep the pits really were, but it quickly became apparent that both Rustbucket and his companion would need draw filing to get rid of the big pits.

Out came the file and the chalk, I put on some music and settled in for a few hours of making that weeky-weeky noise that my wife loves so much. :rolleyes:

Both guns had pits deep enough that drawfiling was going to take approximately 3 days longer than forever, so I gave up and just started "regular" filing on both as if I was trying to make them into a pair of Model 12's. That technique actually worked out rather well and I learned just how deep the logo really is. The guns that we all see with the logo completely washed out must have had Mongo leaning his full body weight onto a grinding wheel.

By naptime both guns were looking much more presentable.
 

Attachments

  • IMG_5356.jpg
    IMG_5356.jpg
    183.3 KB · Views: 117
  • IMG_5364.jpg
    IMG_5364.jpg
    171.5 KB · Views: 120
  • IMG_5369.jpg
    IMG_5369.jpg
    124.9 KB · Views: 110
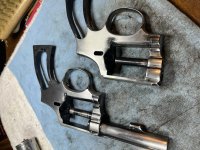
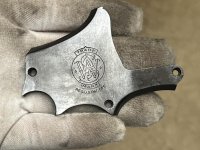
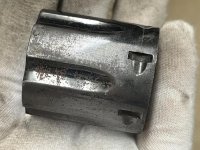
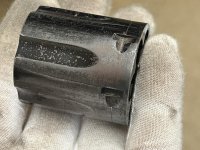
After the shop assistant and I had our nap, it was time to fix the directionality of the file cuts with some 120 grit sandpaper on a block, and then work through 180, 240, 320, 400, 600, 800, and 1200 grip sandpaper smoothing things out.

It took a solid two hours to get out of the 180-240 stage on both guns. It seemed like every time I thought I was done, I'd find another scratch that was too deep for the grit I was working with and I'd have to go back.

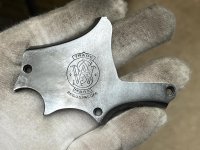
The 240-320 transition took about 45 minutes, then 400 through 1200 only took roughly 20 minutes.

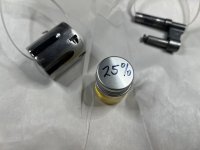
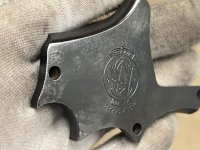
Using the diluted rust-encouraging solution worked so well on Project 10-3 Five Seven that I decided to run an experiment on these two guns. Instead of starting with a double application of full strength solution, I started with a single, light application of 25% solution. The working theory is that using the diluted solution from the start will result in less etching of the metal surfaces and produce a better shine...albeit with quite a bit more time invested for the rust/boil/card cycles.

The bathtub was filled with hot water, and both frames, both yokes, and Rustbucket's cylinder were hung up for a nice rustfull relaxation session in the closed-up bathroom while I had dinner and watched an old episode of Top Chef.

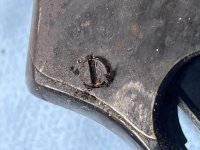
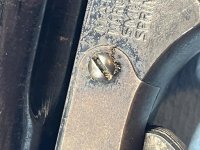
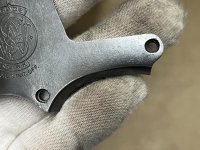
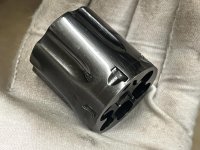
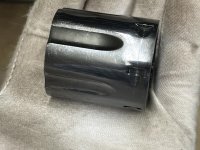
Two hours later, all the pieces were boiled in distilled water for 20 minutes and some quality time was spent with the carding wheel. The result was less than I expected but definitely a step in the right direction. The full-strength method always puts a strong coat of blue down with the first rust....this time everything turned a very light greyish blue. I think I would call it a "shiny patina". The "shiny" part is what I was looking for. :D

Based on the results of the first cycle, I'm going to estimate that it will take about two weeks to complete everything at a rate of of one cycle per day after work. For now, all the pieces are untreated and hanging in the high-humidity bathroom until tomorrow so that some natural oxidation can help things along.

Stay tuned...this may be a long one.
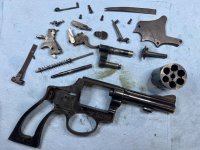
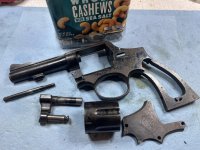
 

Attachments

  • IMG_5373.jpg
    IMG_5373.jpg
    146.2 KB · Views: 133
  • IMG_5375.jpg
    IMG_5375.jpg
    52.5 KB · Views: 109
  • IMG_5385.jpg
    IMG_5385.jpg
    76.8 KB · Views: 112
Back
Top