27-9 Classic flame cutting, etc.

My local Ace does have gun screws, so nothing to lose in removing the existing screw to determine if it's merely a matter of cutting a replacement to the proper length.
Wish me luck!
 
Here’s the envelope of the replacement screws. Forster brand, can’t remember the vendor. I’ve only shot this gun maybe 50-75 rounds and probably half were .38 spl. It’s hard to see the burn marks with a cheap IPad camera, but they’re there. I keep forgetting about taking it to a smith.
 

Attachments

  • IMG_0808.jpg
    IMG_0808.jpg
    81 KB · Views: 18
  • IMG_0809.jpg
    IMG_0809.jpg
    68.8 KB · Views: 20
  • IMG_0814.jpg
    IMG_0814.jpg
    88 KB · Views: 18
  • IMG_0811.jpg
    IMG_0811.jpg
    81.5 KB · Views: 18
Contacted S&W customer service, and received a, "Sure, we'll send you a couple of longer screws." OK, so that's an improvement from ignoring my request that they replace the screw while they had it.
The screw package indicates the screws are .010" longer, the screw was easily installed, there was no loctite.
Took the gun to the range yesterday, having dithered for a couple of months.
There are still distinct circular marks between the cylinder flutes, but it cleaned without abrasives or excessive scrubbing.
How did it shoot? Without any load development, using components on hand, I was able to put the last eight rounds of 50, into 3.75" at 50 yards. I think there must be a bullet/powder combo that will shoot into 3".leaf screw3.jpgcylinder.jpgcylinder2.jpg
 
A buddy of mine was showing me the PC 629 he just picked up Thursday. Nice revolver BUT I pointed out the same short screws holding the sight to the frame, the posts here highlight. Same marks on the stainless cylinder. Don’t think he was too happy …. but this thread proved useful.
 
The screw is a #6-48 which is an Extra Fine thread pitch that is rarely stocked at your typical hardware store. Brownell's is the most reliable source for these screws. As for removing a screw that has been loctited in place, that is very simple. Put the EMPTY gun in an oven set to Warm and heat it up until it's in the 130-150 degree range. Put on some gloves and then loosen the screw and it will come right out. Note, steel springs have to be heated to a minimum of 380 degrees in order to have any effect on a "Spring Temper" so 150 degrees is perfectly safe.

Personally I've never been bothered by the flutes on the cylinder getting sooted up due to that screw. It takes far more time getting the face of the cylinder clean than a simple pass with a patch soaked with Ballistol that is all the fluting requires.

Springs are tempered at around 700 to 800F 380 F would just barely soften a file. 380 C on the other hand is 716F
 
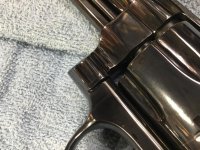
I've seen some videos showing discoloration to the exterior of the cylinder, between the flutes, apparently caused by gases "swirling around" the hole in the top strap for the screw that retains the rear sight.
Older Smiths have the screw farther forward, and the hole is not drilled completely through the top strap, so it's not an issue.

My gun is back at the factory for a trigger issue, but my letter describing the top strap/hole/screw asks for a longer screw that fills the hole flush.
Is S&W likely to respond with, "We've installed the longer screw designed to prevent that issue", or something more like, "We don't know what you're talking about"?

Anyone else have the issue and tried to apply a home remedy?
My first thought was filling the screw hole with epoxy, but then I thought about trying to get a replacement screw, cutting a few threads off and making a headless screw to fill the hole.
S&W sent me replacement screws for my 66-8 and 19-9. They are not the same screw. The 19-9 has a slightly thicker top strap.
 
I have a new 27-9 and the screw is flush. They finally fixed the issue
 

Attachments

  • IMG_9105.png
    IMG_9105.png
    5.2 MB · Views: 4
Back
Top