Wanted a little change with my 15-22 so i figured I would change the color.  I used Aluma-Hyde II in Coyote color from brownells.
I stripped it down, blue taped the holes, hung and sprayed away.

The next morning I removed the blue tape very carefully. I also put the mags back together carefully.

My plan was to put a spikes 12" BAR Rail on it but that did not work. I guess not all rails will work on this rifle. I got the adapter from tractical22 but the way the BAR rail works, it left about a 1/4" gap in between the rail and the upper receiver. So I guess I will keep the BAR rail for my next AR15 build.
More pics to come when the paint finishes curing, so probably next weekend I will put her back together.
Before:

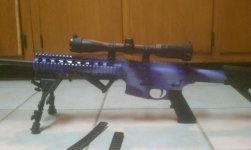
After:

And with it's Cousin the Sig 226 Scorpion:

Chad
I used Aluma-Hyde II in Coyote color from brownells.I stripped it down, blue taped the holes, hung and sprayed away.
The next morning I removed the blue tape very carefully. I also put the mags back together carefully.
My plan was to put a spikes 12" BAR Rail on it but that did not work. I guess not all rails will work on this rifle. I got the adapter from tractical22 but the way the BAR rail works, it left about a 1/4" gap in between the rail and the upper receiver. So I guess I will keep the BAR rail for my next AR15 build.
More pics to come when the paint finishes curing, so probably next weekend I will put her back together.
Before:
After:
And with it's Cousin the Sig 226 Scorpion:
Chad
Last edited:
 but this will give it more time to cure so I am ok with it.

")
")