Forcing Cone Problem

teamgeek

Member
Joined
Jan 21, 2025
Messages
7
Reaction score
11
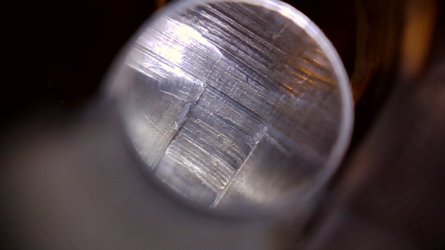
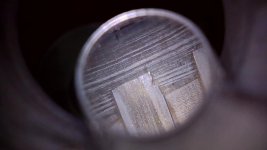
I have a new 686-6 with a defective forcing cone. Referring to the digital bore scope image, significant burrs have been pulled off the side of each rifling land and laid over into the adjacent groove. This image is of the replacement barrel following return from Smith & Wesson. The first barrel showed equivalent defects. I also owned a recent model 986 with very similar forcing cone defects. Apparently, this is becoming a common quality defect in Smith & Wesson revolvers.

Burrs at these locations are certain to cut grooves down the full length of the bullet bearing surface creating significant leak paths for high pressure gas. These leaks will reduce velocity and result in gas cutting of bullets. Greatly increased barrel leading will result if lead bullets are used. None of this can be good for accuracy.

I have many earlier Smith & Wesson revolvers. None have this problem. I have chambered many firearm barrels and have never damaged a forcing cone like this. There can be no good excuse for putting out revolvers with this type of defect. I am hoping others on this Forum will examine their new revolvers and express concern to Smith & Wesson if they find forcing cone defects.

I have Brownell’s forcing cone tools and could use them to attempt my own repair. Jacketed bullets were fired at the Smith & Wesson repair center indicating the burrs are obviously very sturdy and hard to remove. I don’t have confidence the Brownell’s tools will work because of the significant amount of material that would need to be removed. Can Forum members suggest other approaches to repair?
 

Attachments

  • S&W 686 Forcing Cone2.jpg
    S&W 686 Forcing Cone2.jpg
    43.7 KB
First of all, a new gun shouldn’t need repair. Ever. There are too many owners of S&Ws that own reamers. What does that tell you?

What would I do? I’d shoot it. If it groups well, hold your nose and look the other way. The proof is in the pudding, as they say. Put it on paper.

I’ve had good luck with fire lapping. That’d be my first course of action. The one or 2 rounds that the factory fires isn’t going to do a whole lot when it comes to smoothening out a rough barrel. The more you shoot something, generally speaking, the better it shoots.

You want to ream it? Ream away, it’s your gun, your money. But if you do, there’s more of a chance that if things go sideways, you’re on your own if smith’s customer no service spots that.

Posts, and photos like this is why I buy old smiths and new Colts.
 
Looks like a tooling problem. (ETA: might also be tooling feed being a "bit abrupt".) That said, most of us don't have borescopes, so it's unknow just what one would show in barrels from "the good old days". I just had a flashback to a old (tan box) but pristine M&P that turned out not to have a forcing cone at all.

I'd go with the "run a box of jacketed bullets and then look again" thought and then re-evaluate. I've got an old military rifle whose barrel looks horrid to the naked eye, but it shoots MOA all day.

I'm not sure what angle S&W currently uses for their forcing cones, but if it really nags you, a super cautious application of an 11 degree reamer might be worth a try. But re-read paragraph 4 in the above post.
 
Last edited:
Having been both a production and prototype machinist, QC wouldn't be using a bore score. Unless it was required under some special contract-that the taxpayers would probably be financing. Heck, I toured a barrel plant who's products were considered premium 50 years back and don't recall seeing a bore scope. Air gauge for uniformity, yes.

ETA & bearing on problem: a long time back, there was a brief thing in the American Rifleman. One of the army ammunition plants suddenly realized their test rifle for accuracy of ammo lots (M1 Garand) had fired 80,000 rounds. They replaced it with a new rifle. Some curious soul sectioned the barrel. Despite erosion having removed the rifling for 8-9 inches in front of the chamber, it still shot acceptable groups. A picture was included.
 
Last edited:
I'm not sure if available in pistol caliber, but rifle calibers can be bought with a abrasive coating which is touted for breaking in a barrel. I've never used it but thought might be a possible fix.
 
Not an S&W, but my Ruger Blackhawk .44 Special. Notice the chunks out of the left sides of the lands-

Ylglz04l.jpg


I cut the forcing cone with a Brownell's 11° cutter then fire-lapped the barrel. This did not eliminate the areas in question, but made them better-

f3hAlOgl.jpg
kbN6SXQl.jpg


Even with the flaws, the revolver is still very accurate-

RFsXRdHl.jpg
gOWMPyWl.jpg


So I would suggest cutting the forcing cone and fire-lapping the barrel (I used a Wheeler kit)

Good luck.
 
WOW Scout! That is some fine shooting!

As stated earlier, the proof is in the shooting.

I have a 4 5/8 inch stainless Bisley in 44 Special. Before I bought it, I read a couple of articles stating how accurate this guns were. Mine shoots really good. But I’ve never gotten a group as good as Scout’s.

The 44 caliber Ruger barrels that I have all started out a bit rough. Ive fire lapped all 4 of them with good results. I’ve never felt the need to fire lap any of my old Smiths, nor new Colts.

I’ve also read the fire lapping helps the barrel shank, that some manufacturers make too tight and thus reduces the bore diameter in the shank area, is made better by fire lapping. I can’t prove that. It’s just what I’ve read.
 
WOW Scout! That is some fine shooting!

As stated earlier, the proof is in the shooting.

I have a 4 5/8 inch stainless Bisley in 44 Special. Before I bought it, I read a couple of articles stating how accurate this guns were. Mine shoots really good. But I’ve never gotten a group as good as Scout’s.

The 44 caliber Ruger barrels that I have all started out a bit rough. Ive fire lapped all 4 of them with good results. I’ve never felt the need to fire lap any of my old Smiths, nor new Colts.

I’ve also read the fire lapping helps the barrel shank, that some manufacturers make too tight and thus reduces the bore diameter in the shank area, is made better by fire lapping. I can’t prove that. It’s just what I’ve read.

Thanks!

I once owned a New Vaquero 45 Colt that had the tight spot to which you refer. 60+ fire-lapping rounds helped, but only somewhat.
 
Why do forcing cones always look like they were cut as somebody's first lathe project in junior high metal shop class?
Cost cutting; by using a cutter that is worn out and should have been replaced long ago and by using less skilled labor that does not care about quality, but cares about meeting production quota.
 
I'd actually be afraid to send a gun back to the current S&W repair center in fear they might actually make a bad situation worse! You might try sending a few hundred jacketed rounds through it - it might smooth out. I know it looks nasty, however the rear of the barrel (forcing cone area) is usually nowhere's near as critical for accuracy as the muzzle end. It might shoot fine. Eventually it should smooth out by just shooting it.

That said, it's a shame things are this way from S&W!

If you have a very small delicate needle file and are handy, you could try smoothing it out a but. Just don't hit the sides. I know you should not have to do this on a brand new gun, but it is what it is......
 
Last edited:
My 29-10's forcing cone pre-lapping-

QYRuYdql.jpg
p2XubOLl.jpg


I need to get better post-lapping pics, but this gives an idea-

mIaiKfol.jpg
 
Why do forcing cones always look like they were cut as somebody's first lathe project in junior high metal shop class?

I kind of suspect they do the forcing cones in what amounts to a fixture on a drill press. And, they don't change tooling as often as they should. Apparently the surface finish spec is either really generous or doesn't exist.

That said, the forcing cone is pretty much a funnel to allow for minor misalignment between bore and chamber. Surface finish-within limits- doesn't have much effect on practical accuracy for most of us. Heck, my first new revolver (Herter's single action) only had a chamfer where the forcing cone was supposed to be and was/is very accurate. I cut a forcing cone maybe 20 years later.

That rifling form-and apparent surface finish-doesn't make me a fan of EDM rifling.
 
Last edited:
Thanks for all the feedback. I failed to report that I sent this 686 revolver back a second time to S&W. They returned it three months later with the comment “No Repair Required”

You have made many good suggestions. I am considering firing full power 357 loads with jacketed bullets, and/or using my 11 degree forcing cone reamer. I will, however, test the accuracy of this 686 using my Ransom Rest before attempting to correct the defects in the forcing cone.

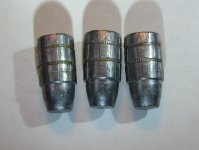
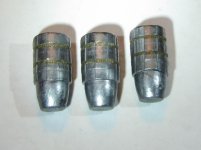
I did fire some carefully prepared lead target loads in 357 cases in the 686. For comparison, I also fired some of the same loads in my 1970’s vintage M66. I was able to recover projectiles by shooting into snow. Images are included below with the rougher looking bullets coming from the 686.

Hopefully the images are clear enough for you to see the differences. On the bullets from the 686, the rifling marks are tapered with the raised portions narrower at the front of each bullet. There are also areas on the raised portion of the rifling marks at the back of the bullets that are ablated by high pressure gas. The burrs on the sides of the 686 rifling at the forcing cone are on the driving side and appear to have left a very rough edge on the bullets in some areas. Also, much of the bullet lube has been blown out of the rolled lube grooves. Surprisingly, for twelve rounds fired, there was hardly any leading in the throats or barrel.

The bullets from the M66 look much better with parallel sides on the rifle marks. There were no ablated areas and the lube remains in the lube grooves.
 

Attachments

  • Zero SWC from 686 V2.jpg
    Zero SWC from 686 V2.jpg
    68.4 KB
  • Zero SWC from M66 V2.jpg
    Zero SWC from M66 V2.jpg
    56.5 KB
Why do forcing cones always look like they were cut as somebody's first lathe project in junior high metal shop class?

no real tool set up is happening? most of the forcing cone burrs i have seen on smith revolvers, could probably be solved with a few twists of a forcing cone cutter. even a good shaped insert with lapping compound..
 
I apologize for my delayed return to this thread. Family illness and a pistol tournament down in Phoenix got in the way. I was finally able to test the 686-6 for accuracy in my Ransom Rest. Following warmup shots from all cylinders, I fired five consecutive five shot groups at 25 yards on the same multi bullseye target. I moved the target between each group so as not to disturb the Rest. I used 357 cases with a slightly increased powder charge, selected using QuickLOAD, in an effort to duplicate the performance of my standard 38 special bullseye ammunition. The average group size was 1.90 inches. The average velocity was 734 fps, standard deviation was 25 fps.

For reference, I can report that my model 67-5 shoots 1.26 inch average groups with my standard 38 special bullseye ammunition under the same test conditions. I have recorded average velocity at 750 fps, standard deviation at 24 fps.

About 50 rounds had been fired in the 686 by the end of this testing. Limited leading was present in the barrel beyond the forcing cone. For comparison, my model 67 showed less leading after firing about 180 rounds in the centerfire stages of Phoenix match.

I also slugged the barrel and each cylinder throat on the 686. I used round Hornady lead balls driven into clean lubricated throats and barrel. To be sure I get accurate readings, I bump up the resulting lead slugs after they are in place. The cylinders were very consistent at .3576. The barrel minimum groove dimension was .3552. The barrel was tight at this minimum at the muzzle and at a point just forward of the forcing cone. Between these two locations the barrel was loose on the slug. I did not push the barrel slug over the burrs at the forcing cone.

My plan now will be to fire full power jacketed 357 ammunition to see if the burrs can be worn away. If this works, I will repeat the accuracy testing with bullseye ammunition.
 
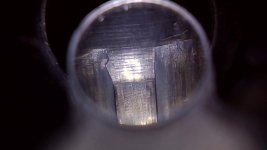
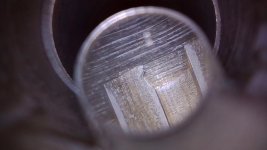
I am grateful for all the input. Following suggestions from the Forum, I fired fifty 357 rounds loaded with 110 grain jacketed bullets using the maximum charge of WW 296 listed in the Hodgdon Reloading Data Center. Before and after pictures are included with the “after” picture being the darker of the two.

To remind everyone, the pictures are taken using a lens that views the rifling at 90 degrees from the direction of bullet travel. The forcing cone reamer cuts each rifling land in a way that produces a ramp. It is at each of these ramps that a burr has been created and pulled over into the adjacent groove effectively making the land wider but just at the forcing cone. The ramps on the other lands have similar burrs.

The two pictures are of the same location in the barrel. It is apparent that fifty rounds of full power jacketed ammunition had little or no effect on the burrs.

I will be considering other actions that have been suggested. I would appreciate any additional comments.
 

Attachments

  • Model 686 After Mag Firing.jpg
    Model 686 After Mag Firing.jpg
    36.8 KB
  • Model 686 2nd Barrel P2.jpg
    Model 686 2nd Barrel P2.jpg
    47.3 KB
I just picked up a new 632 UC i ordered online, and the forcing cone has to be seen to be believed, looks like it was done with a Sawzall. I've dozens of Smiths over the years and I've never seen anything like this, it's Rock Island-tier bad.

Pics to come later.
 
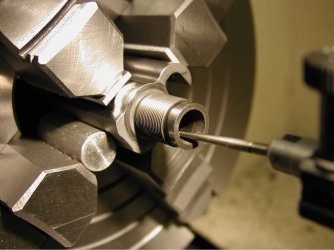
Hello to all those following this thread. As a next step, I ordered a 9mm throating reamer from Brownells. It arrived and was marked “35 CAL Pistol”. My measurements indicate that this reamer is .3595 inches in diameter on the cutting surfaces.

I removed the barrel from the 686. Please see the attached image of it mounted in my lathe. I made successive shallow cuts with the reamer followed by observations with my Hawkeye Borescope as I tried to remove the burrs. It seemed to me that the shallow angle of the cut, combined with either the poor machining properties of the metal or course cutting surfaces on the reamer, tended to maintain the burrs. I eventually advanced the cutter about a tenth of an inch to achieve removal of most but not all the defects. An image inside the barrel following reaming is included showing the most prominent remaining burr. I am not impressed with the finish left by the reamer.

I also removed the constriction I previously reported just forward of the forcing cone using a cast lead lap and 400 grit abrasive. The barrel groove diameter now measures .3562 at the breech end tapering to .3552 at the muzzle. Lapping of this barrel seemed to proceed quickly compared to other barrels I have lapped indicating that the metal might be softer.

I reinstalled the barrel and will repeat some accuracy testing.
 

Attachments

  • Barrel in the Lathe.JPG
    Barrel in the Lathe.JPG
    342 KB
  • 686 Reamed Forcing Cone.jpg
    686 Reamed Forcing Cone.jpg
    99.9 KB
I fired 12 fowling shots and then six consecutive 5 shot test groups through the 686 at 25 yards using my Ransom Rest. The ammo consisted of carefully prepared lead target loads in 357 cases similar to my best target 38 Special handloads. The average group size was 1.60 inches. This is an improvement but still not up to the accuracy of my M-67.

A summary of my actions:
  • I returned the 686 to S&W twice for repair. The barrel was replaced but the second barrel included similar burrs. S&W declined to take additional action on the second return.
  • I tested with loads in 357 cases that were patterned after my best 38 special loads.
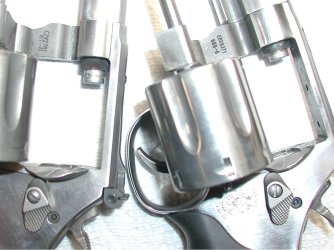
  • I was largely able to remove the burrs found at the forcing cone. To achieve this, it was necessary to move the origin of the rifling forward in the barrel increasing the jump of bullets as they leave the cylinders. An image is included showing bullets in the back of the barrel for this 686 and in my Model 67 for comparison.
  • I used an inexpensive throating reamer with a larger than optimal diameter (.3595). I declined to secure a custom reamer in a diameter closer to the nominal value of .357. Also, the barrel steel may be of a type selected for ECM rifling processes but not particularly suitable for forcing cone reaming.
I am inclined to conclude that barrels with burrs in the forcing cone cannot be sufficiently improved to justify the cost and effort. Please let me know if you have questions. I would also appreciate any additional comments or suggestions.
 

Attachments

  • 67 and 686 after reaming.JPG
    67 and 686 after reaming.JPG
    247.3 KB
You might want to recheck for barrel constriction with the barrel installed. When you take the barrel off, the diameter mostly springs back to original size. When you put it back on, it will be compressed again unless you have turned a couple thou. off the back where it butts up against the frame so it's not twisted on as tight.
 
T
What don't pass?? They don't have a quality inspection.
'Passed' means it went out the factory door. The customer trying to shoot his brand new revolver is the QC. And when you send it back they either say it's 'in spec' or replace it with an equally poor part. That's why I stick with the old ones.
 
Thanks to Protocall_Design, BTM and rwsmith for their great comments and questions.

I can report that the barrel seemed very tight when I removed it. Based on the position of the barrel at a more reasonable torque, I calculated an amount I then removed from the shoulder of the barrel before reinstallation. I will, however, go back and make some measurements with lead slugs on the installed barrel and report what I find.

In the case of the throating reamer, it came from Brownells at the oversize dimension of 0.3595. I had hoped it would come out slightly over .355 since it was listed as a 9mm reamer but I suppose they have only one they supply for both 9mm and various “35 caliber” chambers. I have not tried personally to regrind any of my chambering or throating reamers primarily because I do not have the right equipment. I chose not to wait the time or spend the money for custom rework of the Brownells (Clymer) reamer, or for a custom reamer.

Yes, I did use the 0.3595 throating reamer in the barrel at the forcing cone in an effort to clean out the burrs.
 
Back
Top