JBWeld Repair

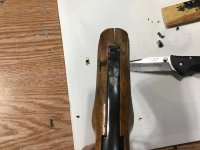
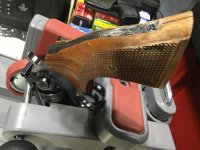
I didn't notice the different versions of the product, and never thought about pigments until I mixed the first batch. Today I'm going to add the reinforcement on the heel section and maybe mix up some more.
Again, JBWelders United Local 357 comes through again! A happy time as the JBWA the Steamfitters come together on a multi trade job!!
But, can the harder stuff be put over the stuff I have, the 5 Minute stuff that doesn't dry in 5 Minutes. Never mind, I'll try. It can always be removed. "I would think epoxy resin pigment would be much better for adding color." This!!! It would have to be better than adding more chemicals.
 
Can't vouch for JB Weld, but used AcraGlas to attach a front sight to a Colt Series 70 in .45 over 40 years ago. Have shot many thousands off rounds through it in competition and just plain plinking. Still as solid as the day I did it.
 
JB Weld can be some tough stuff and I've used it for many years, looking forward to the finished pics! :)
 
I rigged a piece for the heel build up. Oh yeah, I put a tiny screw in first to kinda keep a grab on that thickest part.
I really like the jay scotts.
I'm getting close to finishing the final (minor) project. Mistakes will be thrown in, too
 

Attachments

  • IMG_0534.jpg
    IMG_0534.jpg
    46.2 KB · Views: 60
  • IMG_0536.jpg
    IMG_0536.jpg
    53.6 KB · Views: 60
  • IMG_0535.jpg
    IMG_0535.jpg
    54.2 KB · Views: 63
  • IMG_0539.jpg
    IMG_0539.jpg
    79.9 KB · Views: 64
Devcon used to be only found in industrial supply houses. We could not core cut holes in the floor of the old Life Magazine building and grout the leveling jacks where the tool show was. Devcon was the only alternative and it worked perfectly. Granted the alignment between chucks of .002 mm could not be held but the machine did mill several crankshafts each day of the show. Tough stuff for sure.
 
I used JB weld to fix a Remington 742 that became a single shot. The locking lugs on the bolt cut into a rail in the receiver. The JB weld was fine for at least a box of ammo, before I traded it for a Knight MK85. Told the guy about the fix. He had no problem with it. I still use the Knight. Don't know about his luck. The JB weld did better than I expected. The 742 was a 30-06, so it stood up to some abuse.
 
In 1980 we used Devcon to glue the bases of leveling jacks for a 30' machine bed at the International machine tool show in Chicago. After the show had to use a forklift to " break" the bases loose. Problem was it pulled up a 15" Dia. x 8" sections of the concrete floor. Tough stuff.
"Tougher than woodpecker lips" !
 
This very interesting thread has exemplified some severe-duty successful applications of JB Weld.

I can't compete, so I will go in the opposite direction.

I have a (supposedly) high quality fly reel from an old high-end manufacturer with some hairline cracks on the back (frame side), both inside and out. As I have read it, the cause was too much pressure from die stamping in the manufacturer name and logo on the back. I can't tell if the cracks are just on the surfaces, or full thickness.

The reel is long out of warranty, unlike for example Orvis fly reels which come with a lifetime warranty against factory defects.

The reel has only seen light use, so as far as I can tell, there has been no issue besides their presence. But I didn't like it. Having no other alternative I opted to (probably) go overboard with a fix.

I bought a couple of small flat stock steel angles at the hardware store. I mixed up some JB Weld, coated the contact side of each angle, and pressed each on to the inside surface of the frame. Pressing caused some of the JB Weld to emerge from underneath the angles, but still in contact with the aluminum frame.

It took what I thought was a long time to cure, having a plastic feel to the surface, but it was a thick coat. I just put it aside for a few days, and when I next checked it, it was extremely hard. Between the direct presence of the JB Weld and the splinting effect of the now-integral steel angle stock, I think I have more than sufficiently reinforced the frame.

The best part is this fix does not affect function and is not visible from the outside. The spool has to be removed to see it.

Overkill?

I hope so.
 
I'm starting to be a believer (thanks to Mickey Dolenz,) but it does seem to take some time curing; perhaps I'm just too impatient; but I will wait. I have a picture for a "so far" pic. I'll give this time to set up. I think I have built up enough to let it set and try to file it down. This is a good project because I can remove the stuff and start over. Win win…practice practice!
I like the jay scott stocks. Classy!
 

Attachments

  • IMG_0540.jpg
    IMG_0540.jpg
    51 KB · Views: 41
  • IMG_0539.jpg
    IMG_0539.jpg
    79.9 KB · Views: 32
I like the uses of this product and others similar. Similar to Ret Capt in no. 52. I can honestly say I have never seen it stop a refrigerant leak, BUT, long enough to keep a six month warranty. The property manager needed a serious attitude adjustment but I had calmed down in my 40s. So I cared not one bit about hunkying in a service issue!!!
 
This is def one of those "Try it and see" kind of repairs, which I love because they are so satisfying when they work out.

Two thoughts: Do you really need the black coloring in all the layers or would just the top two or three be enough?

And would a metal "filler" piece like a small nut help reduce the amount of layers needed?

Either way, let us know how it turns out!
 
Good questions post #54 by RMFnLA…In hindsight I should've used what someone mentioned in an earlier comment about a tint that can be used with JBWeld, but I didn't know about it. There's a picture up there with a tiny screw I used just for that purpose, on the heel area.
Presently I need to let it dry out then maybe one more application and I can smooth it out. If you don't see any more of my comments that means I failed and I'm starting over!
 

Attachments

  • IMG_0543.jpg
    IMG_0543.jpg
    55 KB · Views: 30
  • IMG_0542.jpg
    IMG_0542.jpg
    61.5 KB · Views: 29
  • IMG_0541.jpg
    IMG_0541.jpg
    58.3 KB · Views: 29
Last edited:

Latest posts

Back
Top