Mod 18-4 mainspring bind

Joined
Nov 29, 2014
Messages
3,491
Reaction score
8,706
Location
central Virginia
My recently acquired 18-4 had a hitch in double action pull.
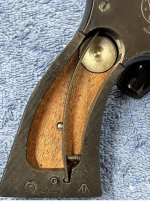
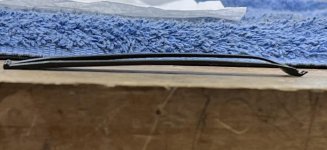
I found the mainspring binds up on the grip screw before the strain screw is all the way home. Note how the mainspring overlaps the grip screw in the pic attached.
I checked my 17-4 and 17-3, and they have the same issue.
Is there something different in the rimfire hammer geometry that causes this? I've never seen this in any of my center fire revolvers.

I can back off the strain screw and check double action ignition with a lighter hammer fall, and then shorten the strain screws if I have reliable ignition, but my chambers are too tight to even load the guns at present.
I've ordered a Manson finisher cylinder reamer, but it won't be here until July.

Have any of you encountered this, and what have you done to fix it?
 

Attachments

  • S&W Mod 18-4 mainspring bind on grip screw.jpg
    S&W Mod 18-4 mainspring bind on grip screw.jpg
    111.8 KB · Views: 128
Register to hide this ad
They probably have a longer strain screw for more tension because rim fires are harder to ignite. Interestingly, have 5 K 22s 2 of them 5 screw, a 4 screw and a 28-4 and a 17-3 and don't have this problem.

I would try taking off on stock panel, cocking the gun and then turning the tension screw out till the mainspring just clears the panel screw hole. Then shoot the snot out of it to see if it fires every time. If so you could shorten the screw tip. they are 32 to the inch threads so each turn is .03125 and 1/4 turn .008
 
It wouldn’t be the first time someone disassembled a S&W revolver and got the screws mixed up. I have no idea if the thread pattern is different than the other screws but you might be able to tell by looking at a schematic.

I looked at the schematics at Numrich Arms and the strain screw looks correct for your model 18-4. I doubt if someone tried bending the main spring but Numrich sell the parts for the model 18.


Smith & Wesson 18-4 Revolver Parts, Schematics | Gun Parts Corp.
 
Last edited:
Once upon a time, I had an early 625 wearing rubber Hogues. The hole for screw must have been drilled in the wrong spot, as the manspring would bind up against it as the action was worked. I simply located the grip screw to a non-interfering location and filled the first holes with black RTV. Worked fine. Don't do this to nice wood grips please.
 
Can you actually complete a double action pull? As in, does the hammer retract as you'd expect? Looking at the mainspring, it appears the upper "stirrup" isn't engaged on the hammer. As if it's hung up on something in the guts. I assume you've taken off the sideplate and checked. But if not, it might be worth a look.
 
Mainspring bind update - Bubba was here

A combination of Bubba and tolerance stack up got me.
W4 nailed it - too much arch in the mainspring, but why?

1. Bubba bent the mainspring - see attached pic for nearly flat original vs Bubba bent mainspring.
2. The strain screw was 0.025" longer than all my spare strain screws, which all measured 0.605/0.602" OAL. That increased the arch.
3. The pivot pin for the hammer in the 18-4 was 0.015" closer to the spring seat notch in the bottom of the grip frame than the same measurement in my 15-3. This moved the hammer down in the frame toward the bottom of the grip frame, causing more arch in the mainspring.

Add all that up, and the arch in the tensioned mainspring increased enough to bind on the grip screw with the strain screw fully tightened.

Fix: I installed a proper flat mainspring, installed a new strain screw shortened by .020".
Changed out a Bubba double action sear that was too short and too rounded off.
Polished various spots in action.
Result:
1. Plenty of grip screw clearance.
2. Hammer weight: 3lb 8 oz. (56 oz)
3. Single action pull with 12 lb rebound spring: 2lb - 8oz. I may raise that after I test fire the gun.
4. Double action pull - smooth at 8 lb 8 oz.

Thank you all for your comments and suggestions!
 

Attachments

  • Bubba mainspring.jpg
    Bubba mainspring.jpg
    65.2 KB · Views: 41
Last edited:
A combination of Bubba and tolerance stack up got me.
W4 nailed it - too much arch in the mainspring, but why?

1. Bubba bent the mainspring - see attached pic for nearly flat original vs Bubba bent mainspring.
2. The strain screw was 0.025" longer than all my spare strain screws, which all measured 0.605/0.602" OAL. That increased the arch.
3. The pivot pin for the hammer in the 18-4 was 0.015" closer to the spring seat notch in the bottom of the grip frame than the same measurement in my 15-3. This moved the hammer down in the frame toward the bottom of the grip frame, causing more arch in the mainspring.

Add all that up, and the arch in the tensioned mainspring increased enough to bind on the grip screw with the strain screw fully tightened.

Fix: I installed a proper flat mainspring, installed a new strain screw shortened by .020".
Changed out a Bubba double action sear that was too short and too rounded off.
Polished various spots in action.
Result:
1. Plenty of grip screw clearance.
2. Hammer weight: 3lb 8 oz. (56 oz)
3. Single action pull with 12 lb rebound spring: 2lb - 8oz. I may raise that after I test fire the gun.
4. Double action pull - smooth at 8 lb 8 oz.

Thank you all for your comments and suggestions!

I love it when a plan comes together. Good job.
 
"Changed out a Bubba double action sear that was too short and too rounded off".
How much trouble was removing the pivot pin for the double action sear?
Nice fix, Ameridaddy! Take a bow!
Moon
 
double action sear to trigger clearance, punch size update

"Changed out a Bubba double action sear that was too short and too rounded off".
How much trouble was removing the pivot pin for the double action sear?
Nice fix, Ameridaddy! Take a bow!
Moon
Thanks for the complement :D
I put the hammer on a block with a relief hole below the sear pin location and knocked it out with a nice straight, flat-ended 1/16" pin punch. I used a 12 oz ball peen hammer choked up so the hammer weight did the work, not a hard swing from an errant arm. The pin came out with two taps very nicely.

The hard part was putting the pin back while trying to keep the new sear's pin hole aligned with the hammer pin hole while the sear spring underneath was making the sear move all over the place, and at the same time start the tiny pin.
I finally assembled the group by using the punch partly through the hammer pin hole and partly in the sear pin hole, held the punch in a vise with the hammer lying flat on top of the vice, then held the pin with needle nose pliers and tapped the pin enough to start it, then removed the punch and drove the sear pin flush with the hammer. I put some masking tape on top of the vise so I didn't mar the hammer case colors.

Once assembled, I measured the let out - it was OK as is, then put the hammer in the gun, checked the double action sear to trigger clearance and stoned the sear face (it needed hardly any) to get the clearance in the Kuhnhausen book, and lightly polished the trigger roundover where the double action sear contacts and glides over the trigger.

STAY AWAY from the single action trigger sear just below the roundover.
Everything I've read said that is sacred and messing with it without a jig is a quick way to a trigger for the scrap barrel.

The book is down in my shop at the moment, but IIRC, the clearance spec was 0.010" - 0.020" with a small chamfer on the point of the double action sear. If you need that number confirmed, wait and I'll look it up and edit this post tomorrow.
0.010"- 0.020" confirmed, start at 0.010" and work up to 0.020" if necessary. pp 50-51 Kuhnhausen S&W Revolvers, 4th edition. The 4th edition has a better explanation and clearer illustration of this area than the 5th edition.
 
Last edited:
Thanks for the complement :D
I put the hammer on a block with a relief hole below the sear pin location and knocked it out with a nice straight, flat-ended pin punch. I forget what size it was - it was almost pin diameter, but not quite. I used a 12 oz ball peen hammer choked up so the hammer weight did the work, not a hard swing from an errant arm. The pin came out with two taps very nicely.

The hard part was putting the pin back while trying to keep the new sear's pin hole aligned with the hammer pin hole while the sear spring underneath was making the sear move all over the place, and at the same time start the tiny pin.
I finally assembled the group by using the punch partly through the hammer pin hole and partly in the sear pin hole, held the punch in a vise with the hammer lying flat on top of the vice, then held the pin with needle nose pliers and tapped the pin enough to start it, then removed the punch and drove the sear pin flush with the hammer. I put some masking tape on top of the vise so I didn't mar the hammer case colors.

Once assembled, I measured the let out - it was OK as is, then put the hammer in the gun, checked the double action sear to trigger clearance and stoned the sear face (it needed hardly any) to get the clearance in the Kuhnhausen book, and lightly polished the trigger roundover where the double action sear contacts and glides over the trigger.

STAY AWAY from the single action trigger sear just below the roundover.
Everything I've read said that is sacred and messing with it without a jig is a quick way to a trigger for the scrap barrel.

The book is down in my shop at the moment, but IIRC, the clearance spec was 0.010" - 0.020" with a small chamfer on the point of the double action sear. If you need that number confirmed, wait and I'll look it up and edit this post tomorrow.

A 12 ounce ball peen hammer? For that pin? You lucked out on that one. Just kidding.:D

I always bend those skinny little punches. I should buy them by the dozen.
 
A 12 ounce ball peen hammer? For that pin? You lucked out on that one. Just kidding.:D

I always bend those skinny little punches. I should buy them by the dozen.
Actually, I've found by using a heavier head and using a choked up grip with a short stroke and letting the head weight do the work gives me more control and a truer hit than a swing like driving a nail.
I've tried Craftsman, Starrett (lovely in the hand, but since I bought a set maybe five years ago, too soft and bendy, and some other brands of punches I've forgotten, but so far my Grace punches seem to have held up better than the others.
 
Back
Top