- Joined
- Apr 4, 2006
- Messages
- 19,507
- Reaction score
- 30,776
We moved about 9 months ago and we donated, sold or disposed of almost all our home furnishings. We wanted a fresh look in our brand new home and it is much more of a modern style than our old traditional Colonial home. There were only a few items we took with us and one of them was our Grandfather Clock (bought that when we were first married). It was shipped 1,500 miles, stayed in storage for two months, was completely refinished to coordinate with our new home and then sat idle for 4 more months while I let the Oak normalize to our home temperature and humidity once again.
I reassembled the clock two days ago and to my disappointment it did not function. I knew virtually nothing about Grandfather Clocks and I spent a few hours playing with the pendulum trying to get it to work while looking inside at the mechanism to try and see what was wrong. I was getting nowhere fast.
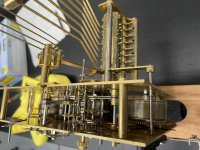
Today, I took the plunge and decided to remove the entire clock's movement and all the drive parts in hopes that I could figure out what was up. I had no instructions and anything I saw on youtube was next to useless. I just used common sense, mechanical skills and proceeded very carefully. Finally after the movement was on my workbench I studied everything and saw that two out of the three steel cable spools were all tangled up - I knew that was the issue as soon as I looked at the spools. I packed the clock up very well but the moving company did their best to undo every precaution I took. That is where the damage probably occurred. It could also have happened when the refinisher took the clock out while working on it. Knowing what I know now I should have removed the guts first! To fix the damage I had to disassemble a good part of the movement and since I had never done that before (never even looked at it closely) it was pretty scary. Anyway, I got all the parts out that I needed too in order to gain access to the spools. I figured out how to depress the ratchets to pull the cable out, free it up and then rewound them properly. OK - that was the easy part!
After dinner I lubricated all the points (about 35 of them) with some special clock oil I had gotten from a friend who used to own a clock shop. After that, I started the reassembly process which was a terrific learning session. I took my time making sure everything seemed correct and I really learned quite a it about clocks today. There was one part I installed backwards but caught myself soon thereafter and reversed it. It took me another hour or so to put everything back and I had trouble reinstalling the clocks face. So now that everything was back into the clock's case the big moment came --- would it work? YES it did!!!
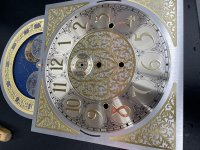
The clock ran perfectly but the chimes and strike were way off. That took me about 15 minutes to figure out how to adjust those. Anyway, all is back working well and my clock is chiming away right on cue. This is a job I would probably not have voluntarily done but finding a clock technician these days is very difficult - and since I just moved here I don't know anyone. I was determined to get this thing working again and am actually glad I took the chance. I learned a huge amount, figured out how and where to lubricate it, (will do my own 5 year maintenance myself now) and in a stressful way I actually enjoyed the process. Just a few crummy pictures below as I was not planning to do a show and tell but since I am, here they are.
I reassembled the clock two days ago and to my disappointment it did not function. I knew virtually nothing about Grandfather Clocks and I spent a few hours playing with the pendulum trying to get it to work while looking inside at the mechanism to try and see what was wrong. I was getting nowhere fast.
Today, I took the plunge and decided to remove the entire clock's movement and all the drive parts in hopes that I could figure out what was up. I had no instructions and anything I saw on youtube was next to useless. I just used common sense, mechanical skills and proceeded very carefully. Finally after the movement was on my workbench I studied everything and saw that two out of the three steel cable spools were all tangled up - I knew that was the issue as soon as I looked at the spools. I packed the clock up very well but the moving company did their best to undo every precaution I took. That is where the damage probably occurred. It could also have happened when the refinisher took the clock out while working on it. Knowing what I know now I should have removed the guts first! To fix the damage I had to disassemble a good part of the movement and since I had never done that before (never even looked at it closely) it was pretty scary. Anyway, I got all the parts out that I needed too in order to gain access to the spools. I figured out how to depress the ratchets to pull the cable out, free it up and then rewound them properly. OK - that was the easy part!
After dinner I lubricated all the points (about 35 of them) with some special clock oil I had gotten from a friend who used to own a clock shop. After that, I started the reassembly process which was a terrific learning session. I took my time making sure everything seemed correct and I really learned quite a it about clocks today. There was one part I installed backwards but caught myself soon thereafter and reversed it. It took me another hour or so to put everything back and I had trouble reinstalling the clocks face. So now that everything was back into the clock's case the big moment came --- would it work? YES it did!!!
The clock ran perfectly but the chimes and strike were way off. That took me about 15 minutes to figure out how to adjust those. Anyway, all is back working well and my clock is chiming away right on cue. This is a job I would probably not have voluntarily done but finding a clock technician these days is very difficult - and since I just moved here I don't know anyone. I was determined to get this thing working again and am actually glad I took the chance. I learned a huge amount, figured out how and where to lubricate it, (will do my own 5 year maintenance myself now) and in a stressful way I actually enjoyed the process. Just a few crummy pictures below as I was not planning to do a show and tell but since I am, here they are.
Attachments
-
 2A45ECDB-C641-4C94-BEBE-21E536BB28B7.jpg75.3 KB · Views: 169
 -
 7BCA1AF7-5F7B-4448-8CB1-0922B4963CC2.jpg74.8 KB · Views: 165
 -
 F15F8DFC-54B8-48F9-A026-1B53230FDBC5.jpg112.8 KB · Views: 148
 -
 1B67CD55-42A4-4A79-92A9-8238A049EC40.jpg122.5 KB · Views: 149
 -
 674F0F6C-88BA-4C4D-909A-1DC81DC79694.jpg131.2 KB · Views: 139

")