In
I promised a few days ago to chronicle the change out of the sights on two Shields, my 9 and a .40 which belongs to my 88 year old Father-in-Law. My 9 will be getting a new factory rear to replace the one I chewed up in development of a proper push pin to deal with the sight profile. The .40 is getting new FO's, front and rear.
To accomplish this task, you are going to have to have a sight pusher, plain and simple. I know a lot of folks swear by the punch and hammer method, but IMHO your prospect of success is very limited in this case. There are a number of sight pushers on the market and not all of them are up to the task. I know for fact the MGW with Shield adapter will work, as will my JMT line of pushers. A lot of the pushers on the market are made from square tubing and employ the same operating principle as the MGW tool, ie a bar that travels on a threaded rod. Some of these may be capable, but many have disclaimers in their advertising indicating that they may not work with really tight sights. Inquire before you buy is the best advise I can give here.The Shield rear sights are quite tight. Maybe not as tight as some XD's or as tight as some Gen3 S&W's, but they nonetheless take some significant force to move.
After choosing your tools, the first step is going to be to remove the rear sight set screw. You will need a 1/16" Allen wrench, and a pretty good quality one. You may need to heat the screw since they are installed with Loctite. There a re a lot of ways to do this. I use a small "pencil" torch I swiped out of the kitchen. Used to heat some sort of baked stuff I think. The wife doesn't know I have it. Shhhh. I was 50/50 on the two I worked with. One wouldn't budge without heating the screw; the other broke loose with only moderate pressure. Once the set screw has been removed, spray some penetrating oil down the hole and allow it to sit for a while.
The sight is installed from right to left as you view the slide from the rear, as if shooting. Removal is best accomplished in the opposite direction, ie back out the way it came in.
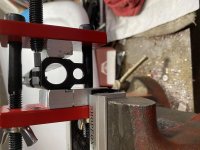
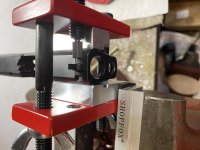
Time to set up the pusher and remove the rear sight:

Note that even as far as the sight has pushed out of the dovetail, the plunger is still captured under the sight. The plunger is spring loaded, but by the time the sight is moved far enough to release it everything is hand tight. Just be aware it's there. You can easily capture it when you pull the sight all the way out.

This gooey stuff was all underneath the 9 rear sight. Don't know what it is, but solvent removed it. You can see the location and size of the plunger

After cleaning the goo off, I reversed the pusher jackscrew and pressed the new sight in. The only fitting required was to smooth the bottom of the dovetail with a few light strokes on a fine stone. The sight pressed in far enough by hand to capture the plunger.

I then repeated the process on the .40

The new FO rear is pressed in from the right just like the original.

And the rear is done.
The stock front pressed out pretty easily. No unexpected drama.

Nice machining job on the front dovetail

New front going in

This is how to tell if you have the sight centered. This one came out to within .001 on the first try. Pure luck, I might add. Usually takes me several tries. Place a straight edge on the side of the slide and measure in both directions until they are equal. Same for rears on many models.

A few more random thoughts:
Freezing the slide probably doesn't help much. All materials have a coefficient of expansion. The steel slide and the steel sight, though slightly different materials, won't expand (contract) at enough different a rate to matter. Same goes for heating the slide/sight. If you can spray the sight with something like nitrogen and freeze the sight only, it might make it contract enough to make a difference. Not necessary if you have the proper tools to start with.
Use extreme caution heating the set screw. The plastic plunger is well off to one side, but you still don't want to heat the sight any if you can help it. The screw may break loose without heat, but be careful not to strip it.
I'll come back and edit as I think of more things. Sorry for the cell phone pics. I just didn't feel like dragging the good camera/tripod/etc. out for this project. Next time I will.
Added a couple of updated pictures of the front sight set up.
I promised a few days ago to chronicle the change out of the sights on two Shields, my 9 and a .40 which belongs to my 88 year old Father-in-Law. My 9 will be getting a new factory rear to replace the one I chewed up in development of a proper push pin to deal with the sight profile. The .40 is getting new FO's, front and rear.
To accomplish this task, you are going to have to have a sight pusher, plain and simple. I know a lot of folks swear by the punch and hammer method, but IMHO your prospect of success is very limited in this case. There are a number of sight pushers on the market and not all of them are up to the task. I know for fact the MGW with Shield adapter will work, as will my JMT line of pushers. A lot of the pushers on the market are made from square tubing and employ the same operating principle as the MGW tool, ie a bar that travels on a threaded rod. Some of these may be capable, but many have disclaimers in their advertising indicating that they may not work with really tight sights. Inquire before you buy is the best advise I can give here.The Shield rear sights are quite tight. Maybe not as tight as some XD's or as tight as some Gen3 S&W's, but they nonetheless take some significant force to move.
After choosing your tools, the first step is going to be to remove the rear sight set screw. You will need a 1/16" Allen wrench, and a pretty good quality one. You may need to heat the screw since they are installed with Loctite. There a re a lot of ways to do this. I use a small "pencil" torch I swiped out of the kitchen. Used to heat some sort of baked stuff I think. The wife doesn't know I have it. Shhhh. I was 50/50 on the two I worked with. One wouldn't budge without heating the screw; the other broke loose with only moderate pressure. Once the set screw has been removed, spray some penetrating oil down the hole and allow it to sit for a while.
The sight is installed from right to left as you view the slide from the rear, as if shooting. Removal is best accomplished in the opposite direction, ie back out the way it came in.
Time to set up the pusher and remove the rear sight:

Note that even as far as the sight has pushed out of the dovetail, the plunger is still captured under the sight. The plunger is spring loaded, but by the time the sight is moved far enough to release it everything is hand tight. Just be aware it's there. You can easily capture it when you pull the sight all the way out.

This gooey stuff was all underneath the 9 rear sight. Don't know what it is, but solvent removed it. You can see the location and size of the plunger

After cleaning the goo off, I reversed the pusher jackscrew and pressed the new sight in. The only fitting required was to smooth the bottom of the dovetail with a few light strokes on a fine stone. The sight pressed in far enough by hand to capture the plunger.

I then repeated the process on the .40

The new FO rear is pressed in from the right just like the original.

And the rear is done.

The stock front pressed out pretty easily. No unexpected drama.

Nice machining job on the front dovetail

New front going in

This is how to tell if you have the sight centered. This one came out to within .001 on the first try. Pure luck, I might add. Usually takes me several tries. Place a straight edge on the side of the slide and measure in both directions until they are equal. Same for rears on many models.

A few more random thoughts:
Freezing the slide probably doesn't help much. All materials have a coefficient of expansion. The steel slide and the steel sight, though slightly different materials, won't expand (contract) at enough different a rate to matter. Same goes for heating the slide/sight. If you can spray the sight with something like nitrogen and freeze the sight only, it might make it contract enough to make a difference. Not necessary if you have the proper tools to start with.
Use extreme caution heating the set screw. The plastic plunger is well off to one side, but you still don't want to heat the sight any if you can help it. The screw may break loose without heat, but be careful not to strip it.
I'll come back and edit as I think of more things. Sorry for the cell phone pics. I just didn't feel like dragging the good camera/tripod/etc. out for this project. Next time I will.
Added a couple of updated pictures of the front sight set up.
Attachments
Last edited:
") I really wish I would have thought to look here first.
I really wish I would have thought to look here first.