27-2 With Tight Yoke

Joined
Dec 31, 2010
Messages
11,186
Reaction score
27,538
Location
Atlanta area
I just purchased a pristine 27-2 that appears to be unfired outside the factory. Opening the cylinder is very stiff, which usually indicates, to me anyway, that the front side plate screw (fitted) was inadvertently swapped with the other domed screw. The screws don't look they have ever been touched. As of now I have the cylinder partially opened and have applied some Rem Oil to the pivot area. No change after an hour or so. I'll have to let my tremors calm down before I remove the yoke to avoid scratching this beautiful gun.

Any ideas? If the Rem Oil doesn't loosen it up I can go with Kroil. There is no corrosion anywhere on this gun.
 
Register to hide this ad
You're likely not fighting a corrosion issue, but a fitting issue. On the older models, the yoke button and the pilot on the yoke screw are factory fit.

I would loosen the front (yoke) screw a bit and try opening and closing the cylinder a few times. This may free up the tightly fitted interface between the yoke button and the pilot on the yoke screw.
 
Last edited:
The fitting of the yoke screw consists of slightly shortening the "tit" on the end of the yoke screw. Try loosening the yoke screw about 1/8 turn, if the yoke then is free you only need to shorten the yoke screw by .002" to .005" with a fine mill file.

Did you try switching the round headed screws, or you just comparing how they look?
 
Last edited:
Well, this is something I've never seen. I tried backing out the screw 1/8 at a time until it was out. No change. The yoke was a bit stiff coming out but it's out. The usual old dried oil, so I thoroughly cleaned the yoke and the cavity in the frame and it is still stiff. Not as bad, but not like anything I've seen before.

The resistance is even from start to finish with mating surfaces really clean.

So, I took some 0000 with oil and lightly buffed the shaft. It's still a tight fit but the yoke swings freely now. I still need to put it back together to see how everything is with the screw in and I will get back. It looks like this one got out of the factory with a minor defect.
 
Just to clarify, the interface of the piloted yoke screw and the yoke button on these older models is correctly fit based on the diameter of the yoke screw pilot (unthreaded portion) at the end of the screw, not the pilot's length. The overall length of the pilot should not be modified or shortened.

This critical fitment is adjusted, if needed, by either removing material from the front facing side of the interior of the yoke button, if the yoke fit is too tight, or by peening the yoke button itself to increase contact with the yoke screw pilot if the yoke is too loose. (end shake on yoke) Proper fitting allows for the yoke to move freely when opening and closing, but remain in direct contact with the screw pilot when the yoke/cylinder assembly is fully closed. (installing a new/different screw may also be a viable option. see below)

Because of minor differences in the yoke screw's pilot diameters, changing the position of the piloted screws in the sideplate will sometimes cure a fitment issue of the yoke being too tight or too loose on closing. Changing the position of these screws can make the fitment issue better or worse, depending on the diameter of the pilot at the end of the yoke screw.
For these reasons, care should be taken to return the yoke screw to it's original position in the sideplate if, or when it has been removed for cleaning or disassembly.


Carter
 
Last edited:
Everything fits well with the cylinder in and closed and the screw tightened down. Another thing I noticed is the exposed blueing on the pivot point of the yoke wore quickly, opening and closing a few time. I know that is a metal to metal point but the wear happened pretty fast.
 
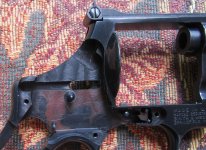
Here is another anomaly. After disassembly and cleaning I see these brown areas on the inside. I scrubbed with a nylon brush and solvent but it did not come off. At first I thought it was rust, but it looks like paint.
 

Attachments

  • IMG_1220 (2).jpg
    IMG_1220 (2).jpg
    194 KB · Views: 88
Back
Top