Change of a 686 rebound spring

Register to hide this ad
That will work. He used the correct method of removing the sideplate. I remove the mainspring, which he left in. It appears that he is left handed, by the way he worked. We all use our own methods, it seems, of how we handle the guns. I line all the screws up, left to right, so I know which hole they came from so I can replace each screw into the same hole it came from.
 
The Jerry Miculek video is good but I do not agree with tapping the sideplate back on I turn the gun top strap down when installing transfer bar and sideplate.
 
The Jerry Miculek video is good but I do not agree with tapping the sideplate back on I turn the gun top strap down when installing transfer bar and sideplate.

No transfer bar; that is on Rugers.


I think you mean hammer block.
 
Since there is no dialog to go along with this video it would be good to mention a few things.

1) Having the correct fitting screwdriver is essential to not damage screw heads. Make sure you have a proper fitting screwdriver before you remove the side plate screws. It is easy to damage the side plate too with a screw driver that’s too wide. This person appears to have good screw drivers in the video.
2) The forward side plate screw retains the cylinder yoke. Once that screw is removed the yoke, and cylinder, can be removed. The yoke retaining screw is different from the others. Make certain you know which screw came out of this hole. At 1:22 you see him remove the entire assembly all at once, with the cylinder and yoke coming out as a single unit. This is a good way to scratch the cylinder against the frame. Once that screw is removed hold the cylinder and frame in your left hand and then pull the yoke out by itself with your right. Do it once and you’ll see what I mean.
3) Removing the side plate does require tapping on the frame where the grips panels came off. Just don’t use anything too hard or metallic, like a hammer. You could damage the frame. This person used a screw driver handle, good choice.
4) When you remove the side plate the hammer block bar is likely to fall out. Make sure you know how to put it back in during reassembly. Do not force the side plate back in if it gives you resistance, this could be caused by the hammer block bar not sitting in the channel correctly in the side plate.
5) Generally, it is good to control parts that might fly through the air during disassembly. When this person released the rebound slide he didn’t cover the back of it and allowed the spring to just fly out. You can actually hear it happen at 1:52 in the video. I understand the point of this video was to replace that particular spring. But maintaining better work habits will mean you won’t lose something more valuable at another time. Always control a part that could get lost, you’ll be happy later if you do. There is actually a tool made just for this purpose. If you did this sort of work often you might buy one of them but it isn’t worth it for a one-off job like this.
6) On reassembly he again pushes the cylinder and yoke onto the frame together. Reverse the procedure I described above, holding the cylinder in the palm of your left hand along with the frame and push the yoke back on with your right.
7) The person in the video might have already had well-fitted parts. But replacing the rebound slide spring is a good opportunity to examine the slide and determine whether any stoning is required to remove burrs from the back or bottom sides. You might also want to flatten the bottom of it at this time. If you want to take it a step further, lightly polish the interior of the rebound slide where spring resides. When you insert the new spring apply a small amount of lubricant to it.
8) At 3:03 you see him using his screw driver to tap the side plate into place. The tapping/pounding continued until 3:12! If this is necessary then something is wrong. Granted, they can sometimes be very tight. Nonetheless, do not be tempted to pound it in. This is a recipe for damaged parts! You only need your thumbs to press a side plate into place. Start at the top and insert the tab under the frame and then pivot the plate down. If the hammer block bar doesn’t get lined up then remove the plate and start over. You can place the side plate down over the transfer bar and slide it up to the top if that makes sense.

I’ve probably missed something but hope this helps.
 
Last edited:
Thank you very much for all the good advices. I have to read it again before I do the job. I hope the hammer block will not fall out when I remove the side plate. Then I can take a picture as "backup" so I now how the different parts should be mounted. My 686 has a tuned trigger. SA is just about 1 kg (2.2 LBS). It has just been to light. At competitions it shall hold 1 kg. I have a set of Wolff springs (no.12,13,14,15,16). I don't know what SA trigger weight each of these springs will end up with. So I have to experiment and try to reach 2.3 - 2.4 LBS to be on the safe side.

I may be able to use the already installed spring by just put a small steel ball into the hole to add a bit of tension to the spring?

I have 5 of each Wolff springs from 12 to 16 ....so it may be a better solution to find the right one and I hope the Wolff springs will keep their tension and not getting "looser" over time like the one I use now. It was fine when it was installed.
 
The Jerry Miculek video is good but I do not agree with tapping the sideplate back on I turn the gun top strap down when installing transfer bar and sideplate.

The proper way to remove the sideplate is to tap the frame with a non-marring (plastic) hammer (mallet) to vibrate it up. Never pry it up.

To install the sideplate, make certain everything is in its proper place, especially the hammer block. Also, make certain you still have spring tension on the hand (some people accidentally pull the hand back too far when removing or installing the trigger, causing the internal stud on the hand to slip past the spring inside the trigger).

Once you are certain everything is in its proper place, place the sideplate in its correct location and gently start pushing it down into its place. Then, lightly tap it back into its fully seated position using the same non-marring hammer or mallet. This is how the factory does it and it is how the armorers are trained.
 
...My 686 has a tuned trigger. SA is just about 1 kg (2.2 LBS). It has just been to light. At competitions it shall hold 1 kg. I have a set of Wolff springs (no.12,13,14,15,16). I don't know what SA trigger weight each of these springs will end up with. So I have to experiment and try to reach 2.3 - 2.4 LBS to be on the safe side.

I may be able to use the already installed spring by just put a small steel ball into the hole to add a bit of tension to the spring?

I have 5 of each Wolff springs from 12 to 16 ....so it may be a better solution to find the right one and I hope the Wolff springs will keep their tension and not getting "looser" over time like the one I use now. It was fine when it was installed.

Suggest you forego adding the small steel ball to increase tension. Neither necessary, nor a good idea. Probably cause coil bind, & lock up the action.

The rebound spring weight should have little - if any effect on your SA pull weight. Primarily, it is designed to return the trigger, but WILL effect your DA pull weight.

Suggest you try the #14 rebound 1st. Normally it will be heavy enough for a snappy trigger reset, but light enough (used in conjunction w/ the ribbed "reduced power" main spring) to improve your DA pull - over factory.

Some guys use a lighter rebound, but stay w/ the factory main - out of concerns about light firing pin strikes. Never had that problem, personally...

If your current rebound spring seems weak, it may be a factory spring, that has been shortened incorrectly - as opposed to replacement w/ a lighter weight spring.

If your SA pull weight is too light, the fix may well be replacement of "hard parts" (hammer & trigger)- expensive to say the least. Who ever originally "tuned" the action, may have gotten a bit over enthusiastic, w/ the stone. As long as the hammer does not fall from full SA cock - when pushed from behind (follow through or "push off"), you might be better off living w/ the light pull.

Very few S&W revolvers have a SA trigger pull heavy enough to justify modification. There are VERY FEW "gunsmiths" today, that are knowledgeable - & skilled enough to actually improve a S&W revolver SA pull, with out causing problems. Sadly, there are a lot of so called "smiths" out there, that do not realize this.

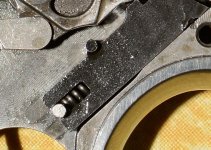
I think it is a factory rebound spring that have been shortened. When it was just replaced the SA trigger was ok. But after some use the SA trigger was just on the limit. The problem is that it must be able to hold 1000g (2.2 lbs) for competition use. It will be checked before I am allowed to use it. It can hold 2 out of 3 tries with the trigger control weight. But I want to be on the safe side so I will try with the #14 spring as you suggest and see if I can get on the safe side. I have ordered a Brownell tool set and also their electronic trigger pull control unit. Then I can check for constancy. I hope the change of the rebound spring can just add a bit to the SA trigger pull and that it will stay stable during use.
 
I have now removed the side plate and are ready to remove the rebound spring but as you can see on the picture there is a vertical pin blocking the entry. I did not see this on any of the instruction videos? .....I assume that if I use a plier and pull up the pin the spring jumps out. But what is the best way to insert the new rebound spring / pin?
 

Attachments

  • DSC_0998.jpg
    DSC_0998.jpg
    161.6 KB · Views: 101
I reviewed the videos.....and I think I understand it now. On the first view I did not realize the pin......but I can see now that I need to lift of the block until the spring releases......
 
There is a bent screwdriver/hook to make pulling the rebound spring easier. That spring is the hardest one for me. Dont bend that pin.
 
With Wolff spring no. 14 the trigger pull was a bit weaker than with the original spring. So I should probably try with no. 16 which is a bit longer and then probably much harder to get into place.....
I lost one of my no. 14.......it jump out....I could hear it land.....but was not able to find it......so far......
 
Thank goodness....you did not try to pull that "pin". It's the stud that holds the rebound system in place.

If you have a small room or closet....like a small bathroom. Close the toilet-lid, plug all the drains and remove any rugs. Clean-out the space completely and have a seat on the toilet-lid. A jumped-spring can't go where you can't fund it. After you do a few of these....it gets pretty easy to do. All I use is a medium flat-pointed screwdriver for taking out and putting in.

When I thought I was macho-man gunsmith, I lost springs all over the place. Take my advice....it's easier to shut yourself up in the bathroom.:)

The Ruger Red Hawk is one of the easiest to do a spring change on....they use one spring for everything and yes....it (like the Taurus) has a transfer-bar and not a hammer block. Some shooters I know routinely remove the hammer-block from a Smith thinking it helps TP.....I do not hang around these guys with loaded guns.
 
Last edited:
I have just installed no. 15......it was a bit harder but now the SA trigger weight is where I want it.....on the safe side on 1 kg. I hope the Wolff springs keep there tension as I don't think I will be able to install a no. 16 :-) ....when you use a medium size screw driver. How do you push the spring? ....with the edge of the blade? .....or the "side" of the blade? ......the change of rebound spring was not as easy as it seemed on the video :-) .....I took a big box and put it in front so the spring would jump into the box. Will see if I find the lost no. 14 one day :-) ....the no. 15 did not jump.....
 
If you have a small room or closet....like a small bathroom. Close the toilet-lid, plug all the drains and remove any rugs. Clean-out the space completely and have a seat on the toilet-lid. A jumped-spring can't go where you can't fund it. After you do a few of these....it gets pretty easy to do. All I use is a medium flat-pointed screwdriver for taking out and putting in.

What I do is put the gun in a large, clear plastic bag. Even if the spring flys away it can't get out of the bag.
 
I just use a wooden pencil tip to push the spring into the block and get the lower part of the coil over the pin, then pull the pencil while pushing down on the apparatus with your other thumb.
The spring will slide down the pin down until the top of the coil hits the pin, then you can just use a flat screwdriver to push it back and press the whole shebang down where it needs to be.
 

Latest posts

Back
Top