Shooting4life
Member
- Joined
- Dec 23, 2009
- Messages
- 1,124
- Reaction score
- 452
10-2-11
Admin Edit-
STAY OUT of this thread if you don't have any pertinent discussion to add.
California bashing is NOT pertinent discussion.
If that is not clear, I'll be clarifying it for you.")
Lee Jarrett
____________________________________
I am not sure if this is the right section or not so mods feel free to move. If you don't feel it is appropriate for the sight I ask you to reconsider but if you wish this be taken down just let me know. I have used this process without issues on more than one occasion to buy pre lock s&w's from the board and fromgunbroker. This is specific to California and working around the approved handgun roster. The roster has an exeption for single action revolvers and this post explains how to convert a double action revolver to single action so it can be legally imported into California.
How to convert your S&W revolver from Double Action/Single Action to Single Action Only so it is legal for import into California.
I have been asked on more than one occasion how I have purchased pre lock S&W from out of state through the single action revolver exception. So I have decided to create this how to guide to help those other smith collectors on this board. A lot of this same process can be used to convert other brand revolvers as well.
The law says that single action revolver that holds 5 or more rounds with a barrel of over 3 inches and an overall length of 7.5 inches is roster exempt. This means that any S&W K, L, N or X frame revolver with a barrel over 3 inches can be imported into the state of California once converted to Single Action. I have not verified if a J frame with a 3 inch barrel meets the overall length requirement of 7.5 inches.
Now you need to find a local FFL that is willing to accept a S&W revolver from out of state that has been converted to single action. I have found that Rob Blank at RMB Enterprises in Milpitas will accept revolvers like this.
Some FFL's will let you convert the revolver yourself in there shop before starting the paperwork negating the need for it to be done out of state. If you are going to do this you should be proficient in the conversion process. An FFL does not want to be answering your questions on how to put the revolver back together or have your shenanigans stop them from being able to help other customers.
You know what gun you have been lusting after that meets the size requirements, now you just need to find someone selling it that is open minded.
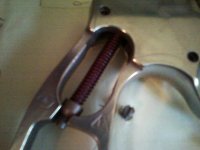
Ultimately you are going to be removing the double action sear from the hammer. This is what causes the hammer to cock back when the trigger is pulled. Once this is removed and the gun is put back together when the trigger is pulled the cylinder will still rotate but the hammer will not cock. However; the gun will still work when the hammer is cocked manually, thus making it single action only. Since removing the double action sear requires a hammer and a punch I have found it best to purchase a used hammer from gunbroker and remove the double action sear myself. Then if someone is going to do the conversion I can ship out the hammer and it becomes a drop in job. Also if you are doing the conversion at a gun shop just dropping in the hammer without the double action sear in place of the stock hammer is much faster. After a few tries the conversion process takes less than 10 minutes and all you need is a screw driver.
Here is a picture of a factory N frame hammer next to a N frame hammer that the double action sear has been removed. Note the red arrow shows the double action sear.

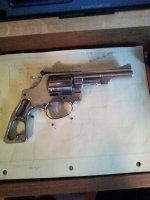
This following section is for those that do not know how to take your S&W apart. I am going to be using my 624 3 inch for an example.

First thing you are going to do is remove the grips. Next you are going to unscrew 4 screws using the proper sized hollow ground screw drivers. The first three hold the side plate on, the 4th screw holds the leaf spring. Please note which screws come from which holes as they are all different.

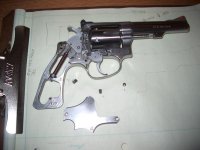
So now you are going to need to take the side plate off (do not pry the side plate off!). The easiest way to mess your S&W up is to try and pry the side plate off. So you are probably thinking, "the side plate is on there really well, I don't even know why they need screws. How the heck am I going to get this thing off?!?!?" Don't worry, I have you covered. What you are going to do is turn the gun over and strike the frame in the two spots indicated in the picture bellow. You are going to use a rubber gunsmithing hammer or something like the back of a rubber screw driver. If you are working on a blued revolver it might be best to use a towel in between the gun and the hammer. Make sure to keep your week hand that is supporting the gun under the side plate, don't want it to pop off and fall on the ground.

Once the side plate comes off you are going to see this

The red arrow shows the transfer bar safety, this sits on top of everything else. It can easily fall out. The green arrow shows the double action sear. The blue arrow shows where the trigger and hammer meet. To remove the hammer you are going to need to remove the transfer bar safety. Then you are going to pull the hammer back to almost half cock. Then you are going to need to pull the trigger back till about the same point. Once you pull the trigger back so it is not touching the hammer you will then be able to remove the hammer. Then you replace it with the hammer that has had the double action sear removed.
Now you are going to need to reassemble the smith. First thing you are going to do is install the leaf spring. It hooks onto the back of the hammer and fits into the grove at the bottom of the frame. Once the screw is in place you can test the revolver for function before putting the side plate back on. Second thing you do is install the transfer bar safety. Note on the inside of the side plate that a small grove that the bar fits into. Also on the top of the inside of the side plate is a small nub that fits beneath the frame.
You are going to start by installing the part of the side plate with the nub first making sure that the transfer bar safety is in its proper place. Next you are going to gently push in the other areas of the side plate. Once you are sure the side plate is lined up properly you are going to use the same rubber screw driver handle or rubber hammer to tap the plate back into place. Again, use a towel if you are working on a blued revolver. Once the plate is fully seated you are going to install the remaining three screw in the correct holes. Now install the grips and you have a single action s&w revolver.
Once you wait your 10 days and get your new revolver home you are going to need to follow the same exact procedures to return the factory hammer in place of the single action only hammer. Then you are going to crack open a beer and take pride in how you have stuck it to the man.
I hope this helps you get that hard to find smith.
Jordan
Admin Edit-
STAY OUT of this thread if you don't have any pertinent discussion to add.
California bashing is NOT pertinent discussion.
If that is not clear, I'll be clarifying it for you.
Lee Jarrett
____________________________________
I am not sure if this is the right section or not so mods feel free to move. If you don't feel it is appropriate for the sight I ask you to reconsider but if you wish this be taken down just let me know. I have used this process without issues on more than one occasion to buy pre lock s&w's from the board and fromgunbroker. This is specific to California and working around the approved handgun roster. The roster has an exeption for single action revolvers and this post explains how to convert a double action revolver to single action so it can be legally imported into California.
How to convert your S&W revolver from Double Action/Single Action to Single Action Only so it is legal for import into California.
I have been asked on more than one occasion how I have purchased pre lock S&W from out of state through the single action revolver exception. So I have decided to create this how to guide to help those other smith collectors on this board. A lot of this same process can be used to convert other brand revolvers as well.
The law says that single action revolver that holds 5 or more rounds with a barrel of over 3 inches and an overall length of 7.5 inches is roster exempt. This means that any S&W K, L, N or X frame revolver with a barrel over 3 inches can be imported into the state of California once converted to Single Action. I have not verified if a J frame with a 3 inch barrel meets the overall length requirement of 7.5 inches.
Now you need to find a local FFL that is willing to accept a S&W revolver from out of state that has been converted to single action. I have found that Rob Blank at RMB Enterprises in Milpitas will accept revolvers like this.
Some FFL's will let you convert the revolver yourself in there shop before starting the paperwork negating the need for it to be done out of state. If you are going to do this you should be proficient in the conversion process. An FFL does not want to be answering your questions on how to put the revolver back together or have your shenanigans stop them from being able to help other customers.
You know what gun you have been lusting after that meets the size requirements, now you just need to find someone selling it that is open minded.
Ultimately you are going to be removing the double action sear from the hammer. This is what causes the hammer to cock back when the trigger is pulled. Once this is removed and the gun is put back together when the trigger is pulled the cylinder will still rotate but the hammer will not cock. However; the gun will still work when the hammer is cocked manually, thus making it single action only. Since removing the double action sear requires a hammer and a punch I have found it best to purchase a used hammer from gunbroker and remove the double action sear myself. Then if someone is going to do the conversion I can ship out the hammer and it becomes a drop in job. Also if you are doing the conversion at a gun shop just dropping in the hammer without the double action sear in place of the stock hammer is much faster. After a few tries the conversion process takes less than 10 minutes and all you need is a screw driver.
Here is a picture of a factory N frame hammer next to a N frame hammer that the double action sear has been removed. Note the red arrow shows the double action sear.
This following section is for those that do not know how to take your S&W apart. I am going to be using my 624 3 inch for an example.
First thing you are going to do is remove the grips. Next you are going to unscrew 4 screws using the proper sized hollow ground screw drivers. The first three hold the side plate on, the 4th screw holds the leaf spring. Please note which screws come from which holes as they are all different.
So now you are going to need to take the side plate off (do not pry the side plate off!). The easiest way to mess your S&W up is to try and pry the side plate off. So you are probably thinking, "the side plate is on there really well, I don't even know why they need screws. How the heck am I going to get this thing off?!?!?" Don't worry, I have you covered. What you are going to do is turn the gun over and strike the frame in the two spots indicated in the picture bellow. You are going to use a rubber gunsmithing hammer or something like the back of a rubber screw driver. If you are working on a blued revolver it might be best to use a towel in between the gun and the hammer. Make sure to keep your week hand that is supporting the gun under the side plate, don't want it to pop off and fall on the ground.
Once the side plate comes off you are going to see this
The red arrow shows the transfer bar safety, this sits on top of everything else. It can easily fall out. The green arrow shows the double action sear. The blue arrow shows where the trigger and hammer meet. To remove the hammer you are going to need to remove the transfer bar safety. Then you are going to pull the hammer back to almost half cock. Then you are going to need to pull the trigger back till about the same point. Once you pull the trigger back so it is not touching the hammer you will then be able to remove the hammer. Then you replace it with the hammer that has had the double action sear removed.
Now you are going to need to reassemble the smith. First thing you are going to do is install the leaf spring. It hooks onto the back of the hammer and fits into the grove at the bottom of the frame. Once the screw is in place you can test the revolver for function before putting the side plate back on. Second thing you do is install the transfer bar safety. Note on the inside of the side plate that a small grove that the bar fits into. Also on the top of the inside of the side plate is a small nub that fits beneath the frame.
You are going to start by installing the part of the side plate with the nub first making sure that the transfer bar safety is in its proper place. Next you are going to gently push in the other areas of the side plate. Once you are sure the side plate is lined up properly you are going to use the same rubber screw driver handle or rubber hammer to tap the plate back into place. Again, use a towel if you are working on a blued revolver. Once the plate is fully seated you are going to install the remaining three screw in the correct holes. Now install the grips and you have a single action s&w revolver.
Once you wait your 10 days and get your new revolver home you are going to need to follow the same exact procedures to return the factory hammer in place of the single action only hammer. Then you are going to crack open a beer and take pride in how you have stuck it to the man.
I hope this helps you get that hard to find smith.
Jordan
Last edited by a moderator:
") )
)


