M63-3 Yoke/Crane Alignment etc.

Joined
Jun 21, 2012
Messages
3,011
Reaction score
5,026
Location
South Florida
Pictures below.

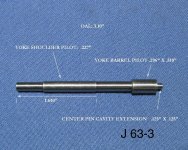
#1. Picture of tool with specs posted by a generous forum member some time ago.

Thanks again Sir.

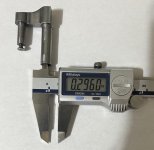
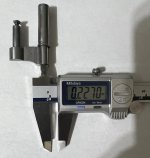
#2 and #3 are from our 63-3 and agree with #1.

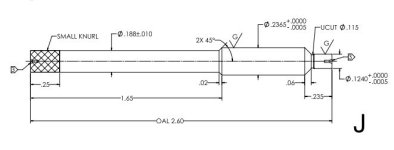
#4 appears to be specs for J frame Center Fire.
Is that correct?

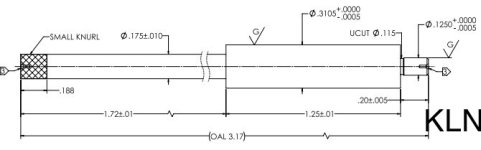
#5 appears to be for KLN frames.

Just wanted to confirm this as the specs of picture #4 was sold when the customer specifically asked for a tool for a 63-3 22LR.

Also, is the .510" length of the yoke barrel pilot short so it can be tapped in that area to make the adjustment, and no need for it to be any longer?
Makes sense to me.

Cylinder End Shake.
Would you make it .001" or .002"?
No yoke movement issues.

The BC gap will be about .011" maybe .012" which is Smith's current Max spec. Will deal with that after test firing if needed.

Thanks again all.
RT
 

Attachments

  • 912040EF-BC26-4722-B6B9-5CC5DC5EEB45.jpg
    912040EF-BC26-4722-B6B9-5CC5DC5EEB45.jpg
    180.1 KB · Views: 101
  • 33BC7438-AD60-4893-96A5-D96A0D703E15.jpg
    33BC7438-AD60-4893-96A5-D96A0D703E15.jpg
    62.2 KB · Views: 80
  • 3B406D47-B935-4F6C-98F4-356BF82104E5.jpg
    3B406D47-B935-4F6C-98F4-356BF82104E5.jpg
    55.1 KB · Views: 78
  • F39639A8-7E1C-4A64-8BE0-09E7EF07C944.jpeg
    F39639A8-7E1C-4A64-8BE0-09E7EF07C944.jpeg
    23.1 KB · Views: 81
  • 4EEE87CB-3298-4EFB-AF75-7728E2DA907E.jpeg
    4EEE87CB-3298-4EFB-AF75-7728E2DA907E.jpeg
    24.6 KB · Views: 54
Register to hide this ad
The tool in photo #4 is for the centerfire j-frame yoke. #5 photo represents the measurements for the K, L, and N series yoke tool.

Not sure about the shorter length (.510") of the pilot that goes into the yoke barrel of the 34/63 tool.. Most likely shorter because the actual yoke barrel itself is a bit shorter.

I would make the end shake .001" to start. You can always open it up if there are rotation restrictions or other issues.

Be sure to clean the interior of the yoke cavity in the cylinder (all the way to the bottom) before fitting.....they can be quite dirty, which can affect measurements quite a bit.

Carter
 
Last edited:
^^^^
Thanks,
The yoke barrel length is about 1.25".
How long would you recommend the length to be?

Hopefully the forum member that sent #1 will respond.

Thanks,
RT

No other gun problems now, but Elves got into my computer/printer and those gun fabric transfers came out as pictured. The grips are red but the rest was not on purpose.
"Merry Christmas", said those Elves?
 

Attachments

  • 772DF15C-566D-43E0-AB23-B794196E46CD.jpg
    772DF15C-566D-43E0-AB23-B794196E46CD.jpg
    146.2 KB · Views: 53
Last edited:
The forum member that sent #1 already responded. (my photo)

The tool for the model 34 and 63 will not be available "over the counter". The model 34 and 63 do not use a J-fame yoke.
I obtained the tool shown in the photo above while at the factory armorer's school.

If this post concerns purchasing or obtaining this particular yoke liner tool, you could always make one....or have one made.
 
Last edited:
Thanks again Carter.

I will talk with the company about making the proper tool for the 63/34 series to replace the one that was sent to us.
I specifically asked for a tool for the 63-3 which they said they had in stock.
They can add it to the line of tools now that they are aware of the difference. A win win situation. :D
I will request a 1" long yoke barrel pilot.

I did make a tool holder for our small, but stout Taig vertical mill, and it was braced properly for turning chores.
The mill will take a .375" rod, so I can make one, but I believe they will respond in a positive manor.

If I have to make one, what type of metal rod would you recommend, and will it need to be heat treated?
The 63-3 needs just a very small adjustment but best to make things right.

Some decades ago I dressed down the contractors that outfitted a Custom's boat that caught fire, on a chase, do to their total incompetence.
Best to do things correctly so the Agents have dinner with their famlies as oppossd to be crispy treats for Sharks.

Thx again,
Robert.
 
Last edited:
Robert,

I am definitely not a machinist, so I have no idea exactly what type of steel would be best to use if you have to create one of these on your own. I would be surprised if the company you purchased from (Pacific Tool and Gauge?) would add these to the ones they are selling for the J, and the K,L, and N frames. There would be almost zero market for them.

I believe Grainger, and other sources do have both carbon steel and stainless drill rod that would be suitable. Since you won't be using the finished tool on a daily basis, I doubt if additional hardening of the tool would be necessary.

Perhaps one of the machinists here on the forum would be willing to offer an opinion here concerning the proper grade steel to use for such a project.

Also, as a side question, could someone please comment on the origin of the unique yoke and cylinder assembly in the model 34, and the 63. I'm assuming this is due to the origin of the model being designated the "32/22". I've often wondered why the cylinder assembly measurements, including the yoke, are not like the other j-frame models' like the model 36 for instance,....and is unique to the 34 and 63.

Interestingly, I can't find any mention of this unique model 34/63 yoke, or the alignment tool for this yoke in the Kuhnhausen book.

Thanks

Carter
 
Last edited:
I wonder which yoke/crane the 43 uses?

No mention of the different yoke/cranes, J/63/34 just the other J frames in Kuhnhausen's S&W book, unless I missed that page. :D
 
Last edited:
If your using it to check alignment or to keep the tube from collapsing when using outside pressure any steel should work. If you are going to be using it to form or pry I would use O1 drill rod available from places like Fastenal. It is avalible in lots of diameters, machines easy unless fully hardened and has good strength. If you want to harden it it does fairly well with a simple process of heating red until a magnet will not stick to it then quenching in oil, temper in oven at 400f for 2 hours and it would be around 57-58 RC 450f would drop it to mid 50s. Not as hard but not as easy to break either.
I have made most of the tools I use to check alignment from aluminum bronze, fairly hard, machines well. I have also used W2 tool steel but I have about 50# of it in both 3/4" and 1" hex stock on my shelf
 
I would make the part that just fit in yoke tube just a bit shorter than the frame window. If it goes in the tube and the tip clears the recoil shield when you close the yoke and are able to press it toward recoil shield to see if the tip mates with center hole in your good. The more shaft fitting snug in the yoke tube when you check alignment the better.

I have made a couple for this and for checking barrel alignment. I have always put a point on mine and look if point centers in hole. But either way is good. The average human eye can detect a .001 gap
 
I have some quibbles about using the alignment gauge as a mandrel while tweaking the yoke into alignment, unless it's really minor. I used to do a lot of N frame work and ran into a couple of yokes that needed major adjustment. I made up a separate mandrel to protect the yoke barrel for that. Often wondered exactly how they got that messed up.
 
It depends on how you're "tweaking" it into alignment. If you're bashing it with a hammer, you're not doing anything any good. If you're using a closely fitted metal tube slipped over the outside of the yoke barrel, and using that as a lever (much more civilized), then you don't need any support on the inside anyway.
 
Even striking the end of a yoke tube side ways with a nylon hammer face could in theory deform it. Never had anywhere near that kinda problem myself and if I did I would probably be looking for a new yoke anyway. But, I guess at that point your not to apt to make the yoke any worse than it already is. Some times I figure it is already close to being wrecked wky not see what happens. LOL
 
At the armorers school, instructors taught students to use a wooden wedge along with the yoke alignment tool as a supporting liner inside the interior of the yoke barrel.

The oak wedge they provided was inserted inside the cylinder window, either above the exposed yoke to move it downward....or below the yoke to move it upward. Left to right adjustments were made by striking the side of the yoke barrel either closed or open, depending on the desired adjustment direction. This adjustment was also made with the appropriate size yoke liner inserted to prevent damage to the yoke itself.

Amazing how just a tiny bit of misalignment can negatively affect the cylinder rotation.

Carter
 

Latest posts

Back
Top