Pre 27 Hammer Stud Damage...Need Your Help !!

fleabus101

SWCA Member, Absent Comrade
Joined
Dec 25, 2018
Messages
849
Reaction score
1,712
Location
S W GA
20220717_153603.jpgI am in need of help and guidance
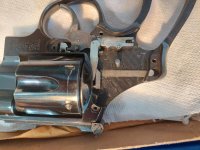
on my late Dad's early 50s pre 27 357
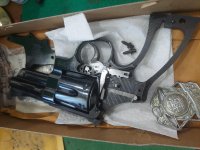
S&W used by him in the 50s , 60s as a Police Officer. As the result of a relatives bad
mistake , I won't go there in this message for help. ( I'm trying to be calm) The hammer
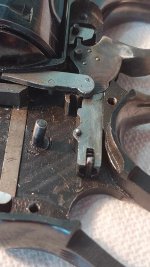
stud is bent and about to snap off.
I wasn't present for this situation happening.
Regardless, I'm asking you guys who to recommend
for a repair. I want to keep the original finish
my Dad's hands was on at whatever cost to keep the
orig finish. I have aquired from Nancy First
2 orig blued N Frame blued studs if needed
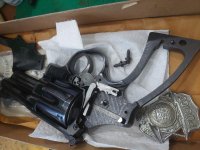
. I also aquired a spare 3 screw sideplate that can be used as a expendable jig if needed, along w a expendable spare N Frame hammer. The orig target parts are ok as far as I see..
I believe the orig stud needs to be machined
or cut off level and a new stud or fabbed up
pin needs to be installed, as I see the
problem in hand..
I would appreciate help on who can do the repair w/o
having to sacrifice the orig finish.
Cost is not a problem on my Dad's gun.
I understand it is a meticulous time procedure to
machine, drill, and measure to do it correctly.
It will stay in our family from now on.
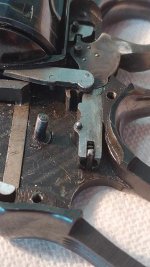
Even if it required drilling thru the frame for the
bottoming the stud, I see no need to refinish the whole gun, hopefully just touch up left side where it may come thru..hopefully not..
Any help and guidance is really really appreciated.
I have researched this problem and done a search
and see some of the talented members have repaired this problem W&O refinishing the Gun.
Pictures if they show up OK.
my email is ..
[email protected] for other pics or info..
Thanks terribly much for your help
Randy..
 

Attachments

  • 20220717_153354.jpg
    20220717_153354.jpg
    117.1 KB · Views: 213
  • VideoCapture_20220717-153915.jpg
    VideoCapture_20220717-153915.jpg
    54.7 KB · Views: 208
  • VideoCapture_20220717-154002.jpg
    VideoCapture_20220717-154002.jpg
    54.4 KB · Views: 190
  • 20220718_133847.jpg
    20220718_133847.jpg
    111.1 KB · Views: 141
Last edited:
Register to hide this ad
I did find this thread (shown below) about the replacement of a frame (trigger) stud. Gives you an idea of the complexity of the job itself, if you have the proper tools. I believe the hammer studs are .140" (9/32), so you could use a piece of drill rod or a drill shank for the stud itself.

Speaking as a complete novice in terms of frame repairs, and looking at your images of the damage, I'm wondering if attempting to bend the stud back into proper position would be a possibility?

If you can locate someone, finding a competent gunsmith to do the work is probably your best alternative.


http://smith-wessonforum.com/s-w-sm...-highway-patrolman.html?656965=#post141224010
 
Last edited:
That's what I'm looking for. Someone who can do a repair/replacement.. There are threads about
hammer stud repairs done before in my search here
on the subject.
The stud in the Gun needs to be replaced. No joy from a known Smith on straightening the one in it.
Been there already. .Needs Replacement as told to me..
Thanks Buddy..
 
Last edited:
Wow..C&S has a 20 month backlog..Great...
I'm hoping someone knows a Good Smith that can replace or fabricate a pin replacement possibly within a year or less. I know good work takes time and I'm willing to pay the needed cost asked to save my Dad's gun..
Thanks for the suggestion..Best Randy..
 

Attachments

  • 20220718_133605.jpg
    20220718_133605.jpg
    108.8 KB · Views: 37
Last edited:
The stud in the Gun needs to be replaced. No joy from a known Smith on straightening the one in it.
Been there already. .Needs Replacement as told to me..
Thanks Buddy..

Things like this are always subject to different opinions. That doesn't mean any of them are wrong, just different.

I always consider the least invasive remedy first. By that I mean if you try an easier fix first and it doesn't work, you haven't lost anything and you can always go to Plan B.

Is the stud actually cracked at the bend? Check with 10 power magnification.

I ask because I agree with armorer951's thinking; bending the stud back if it's not cracked. The way to do this would be to use a 6" flat steel bar. Drill a hole in one end of the bar the exact size of the hammer stud hole in the hammer. Slip the hole onto the stud until it won't go any further down. Gently push down on the other end of the bar to straighten. When the bar is parallel to the frame the stud is straight. If the stud breaks off, no loss, you can still have the stud replaced. If it straightens, the stud will be stronger due to 'work hardening' the metal. You're back in business and it'll likely last the life of the gun. And you don't have to worry about touching up the bluing.

Good luck fixing you dad's gun,
 
Last edited:
I will go with try to straighten also. One of steels greatest attributes if is ability to be formed. I like Hondo's idea. I might do it just a bit different by chambering the entrance to the hole a bit so it slid onto bend a tiny bit and it would be less apt to make a mark when you applied pressure. Like he said if it does break you are no worse off.

Good Luck
 
Last edited:
Fleabus101,
Frank Glenn of Phoenix, Arizona replaced a broken hammer stud on a baby chiefs for me. The finish around the stud area looked a little different but I was and am very happy with the work. It has held up for at least 2000 rounds since the repair. I would also recommend Andy Horvath in LaGrange, Ohio. He has done a lot of work on S&W double actions for him. He is top notch.

1chessiefan
 
I like Hondo's idea. I might do it just a bit different by chambering the entrance to the hole a bit so it slid onto bend a tiny bit and it would be less apt to make a mark when you applied pressure. Like he said if it does break you are no worse off.

Good Luck

Good idea to chamfer the edge of the hole entrance a bit.

And once the stud is straightened, it might need a little smoothing clean up on the sides for the hammer to drop in place.
 
I'd take the rest of the parts out.
Then put a piece of steel bar in the vise with a nice smooth top surface w/a 90* to the sides..

High enough off the vise top so you can place the revolver inverted over the bar and put the bent hammer pin down flat on the top of that piece of steel.
The inside flat surface of the frame is held against the side of the steel bar.
Pin and frame are at 90* to each other.

Either clamp the revolver in position of have another person hold it there.

Then from the top with a brass or copper punch and hammer, bend the hammer pin back into shape.
You will have to come at it at a slight angle as the frame cut for the sideplate will be in the way.
But the slight angled approach won't bother much as the pin is bent on it's upper portion, and the pins are soft and easily bent back.

The steel bar and the inside face of the frame form a nice 90^ angle for the pin to be reformed against.
Rock the frame position slightly but keep the same 90^ angle if you need to tidy up the 'straight up' position of the pin.

If it does break off, you can always make a replacement that fits inside and uses the remaining swaged inplace base.
That way you don't disturb the base nor the finish on the outside of the frame.

Remove/mill the old snapped off pin down flush to the frame on the inside.
Make a new pin of the right dia and with an extra somewhat smaller dia left end to it.

The smaller end will have to fit in a blind hole you have to drill or mill cut in the remains of the flushed off base still in the frame.
It must be precision cut in the center of the remaining base.

A solid fit is needed.
Try fit the parts together first to make sure everything fits.
The new pin will be kept in place by the side plate in position.

Once the parts w/ hammer and springs are fitted, disassemble and final assemble the pin only with red LocTite on that small dia end into the orig base and with the side plate in place....Leave the hammer and other parts out till the Loctite cures.

After that reasemble parts and there's your new hammer pin and the old base is still there , no orig finish disturbed on the outside of the frame.
 
Interesting solutions I'm a tool and die maker and offer this idea based on tool room experience. Could the frame be mounted in a mill then with a boring head the OD is cleaned up then a bushing/sleeve made to fit over the stud or press fit in the hammer?
 
I would hesitate to use a hammering on the side of stud method over a pry method for a few reasons. Marring and misshaping and I would think more apt to loosen stud and slowly steady pressure is more controllable. You can put a dent in steel with a brass punch or hammer if the brass has more surface area than the steel. Trust me on this as I have done it.

If it was mine I would make a brass pry using the hole method as I have lots of brass. If it broke I would put it in my mill and use the method used in thread referenced earlier. Flush off stud drill blind hole and ream to size of stud, use a cut to length drill bit, polished to correct od, stick in with red loctite, let dry, then reassemble and be done with it.
 
Last edited:
Mom and I have been dealing w her sister, who fell & broke a femur 2 days ago..doing the hospital and stuff still w her fracture.. so I've been away.
I really want to thank all of you for your ideas, thoughts and suggestions and people to try..
I'm checking with a local member w better hand control(stroke mess) that was mechanical background like I was on USMC base here for yrs..
He will look at it with me next week..
I have the misc items mentioned so far on order from your posts and then some. .hopefully here in 4-5 days..
I will holler back to you terrific guys here with the scoop ASAP..
My Best !!
Randy..
 
Last edited:
I would try straightening it first.
If that fails, I would just replace it.

I have done it this way-
Chuck the new stud up and spin it so you can face it off to produce a gentle dome on the frame end that will be slightly below the side of the frame when installed. Polish it to at least 600 grit while spinning. You can cold blue the end, or mail it off to someone who does bluing and ask him to drop it in the tank next time he fires it up. Install it, and it will look similar to a pre-war domed stud.
The other method is to face it off square, but just a few thou short and let it be slightly below flush with the frame side. Not great, but beats rebluing the gun. You might think you could face it off to be exactly flush, but good luck wid dat. It'll be a thou or two high or low and won't look any better than just going with a few thou low, or better yet, the domed end. Either way, domed or flat, break the edge of the hole with a stone before installing the stud and touch up with cold blue. You don't want it sharp and catching your thumb when you open the gun. ;) Believe it or not, I have used a drill to face them off with files and polish them.
I did a nickel gun one time and left the end in the white with a very high polish. It wound up being only about .002" below flush and was not very visible at all. :D
 
Well, So far I haven't had any luck finding a Gunsmith
to repair/replace my hammer stud on my Dad's Smith. Appears many are booked one plus yr out or more. I can see 6-12 months, but shoot, with 2 strokes, I may not be around to see it again LOL.,
If anyone here knows a well known Smith that can
do it sooner send me a PM.
I wish one one of our long time trusted members
who has done this was able to repair it.
I know it's an expensive time consuming repair with shipping thru FFLs back and forth.
I have no problem paying the tab asked..
Just a follow up note to say still looking for repair for my Smith..
My Best Randy..

Edit: spelling...
 
Last edited:
Maybe one of the good folks here like steelslaver, Handejector, 2152hq, etc could fix that.

Ask for credentials and proof of insurance. :D
 
Back
Top