The "Plug" for a S&W J-Frame

exfebee

Member
Joined
Jul 28, 2009
Messages
479
Reaction score
91
Location
North Florida
John has been cranking out "Plugs" for our S&W IL transplants for several weeks now & I believe he really has them down pat. Looks like they are set up for J, K, L, & N Frame revolvers in Blue, Stainless, & Matte finishes. I've gotten several "Plugs" from John, and they all are perfect regarding thicknesses into the IL hole. They are easy to put in and are held in by the Forked Spring. Well worth the $25.00 he is charging. Here are a couple pictures of my S&W model 638 Airweight Bodyguard, as well as the actual milled "Plug". Lets see some more of those J-Frames.
Carl
 

Attachments

  • SW.jpg
    SW.jpg
    88.2 KB · Views: 8,257
  • DSC_1525SW.jpg
    DSC_1525SW.jpg
    73.7 KB · Views: 9,156
  • DSC_1516SW.jpg
    DSC_1516SW.jpg
    44.4 KB · Views: 8,441
Register to hide this ad
exfebee:

Looks great!

I think it makes a firm yet polite statement to those who might notice these little details. Sure, S&W doesn't see it although I have read a few recent threads where S&W is starting to produce more products without the IL.

I have a "Bullseye Smith" plug in my 686 SSR and one will be going in my 640.

I hope to see these plugs offered in Brownell's or the Midway catalogs someday soon.

Chris
 
My no lock 640 died one day when the barrel blew using std 38 special ammo.I wound up getting a new one with the IL which I never touch.I might buy one of these plugs to make a statement to S+W to get rid of them.....Mike
 
Cruiser RN:

Wait no longer: get a plug! "Banish the lock and be free of the key" is my new motto. OK, I only have two revolvers but it's still my new motto. Reward the creativity of Bullseye Smith who is filling the need (yes, pun intended) of fellow S&W owners. :D

Chris
 
Dumb question from a Forensic Pathologist and not a gunsmith or tinkerer with guns , but a shooter and a collector.

What does one have to do to disable the infernal internal lock so that the plug can be inserted. I don't have but one or two with the locks, but I really want them to go.

Be nice to an old guy and explain it SIMPLY!
 
Hopefully helpful...

I posted this on another forum:

Okay, guys, here you go:

I assumed that everyone already knows how to pop the sideplate, so hopefully, the pics will be adequate. I realized today that there was one I should have taken, and didn't, but I'm not going to strip it down to shoot one photo.

Here's the original, ugly-ass lock:
P1020386.jpg


Here's the internal view, with all components of the lock assembly in place:
P1020388.jpg


Here, the "flag," along with its tiny spring, have been lifted out, the lock cylinder/cam assembly has been removed, and you see the lock plug lying on top of the lock hole, just so you can see what the plug looks like. (I intended to shoot one of the assembly with just the flag and its tiny spring removed, but forgot.):
P1020390.jpg


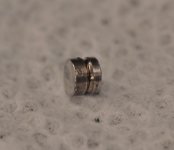
Here's the plug, from the inside, held in place by the same fork that held the lock cylinder/cam:
P1020391.jpg


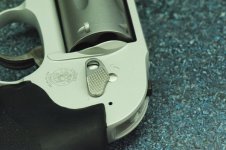
Now, here's the outside, looking much better, I think:
P1020393.jpg

P1020392.jpg


Overall, I just like my gun better now:
P1020394.jpg


Removal of the lock cylinder/cam is the only tricky part. The fork must be firmly held back against its little blue spring, to full compression, while the lock cylinder is plucked out with a dental pick or pushed out from the outside. I had to put the revolver in my vise to have the necessary third hand. I used a tiny punch, on which I'd shaped the end to a chisel for some long-forgotten task, to depress the fork and spring. Insertion of the plug was easier, and can be done from either outside or inside. From the outside is easier, aligning the flat with the fork, so a little less compression of the spring is necessary.

The flat on the plug eases assembly, and John Whitt advises me that it also is a place to rest the flag, if one chooses to leave it in. Other than just having it there to fill the slot in the frame, I don't know why one would want to do that.


Hope this helps.
 
Ok. I used the video to exorcise my 642 and it was great, BTW. It only took 20 minutes for a non-handy guy. When I went to perform the IL-ectomy on my 629 and 610, I saw the the basic strip is way different. I have searched the site for two days and can't find anything. I know I'm pathetic, but can somebody provide me A-Z instructions on the procedure for external hammer guns?
 
This is quite interesting.

It's my understanding that on Smith & Wesson's super light weight titanium/scandium revolvers, there is a chance the internal lock system will engage itself under recoil.

The recoil of these super light weight revolvers can be quite a lot with full power loads, so it's plausible for the ILS to engage itself under recoil.

With that said, does the "Plug" prevent the remaining parts of the ILS from engaging under recoil or any other mechanical failure?
 
The only parts of the ILS that remains after installation of the plug is the fork and it's spring. This holds the lock in place and serves the same function for the plug. It's held in place pretty solidly, I don't think it would be a problem. I believe most (all) of the problems have been caused by the flag jumping up into locked mode during heavy recoil, it's only held in the unlocked position by a tiny spring. I hope this helps.

Paul
 
Great idea! Improves the looks 98% and no more worries about a frozen revolver. S&W screwed the pooch on this marvelous engineering fiasco.

Betcha Bullseye will reach retirement age early with the sales of his plugs.

Excellent idea and congratulations! Them revolvers look SO much better.

SG
 
So, by removing the flag, that disables the lock from engaging itself under recoil?

If the spring for the fork were to fail, what could possibly happen?

I don't suppose the spring could fail, but how long could that spring stay at the proper tension to keep the Plug in place? 10 years? 20 years? 30 years?
 
Back
Top