UPDATED: MORE pics - Bought a 1917..have a few questions. Date of mfg...etc...

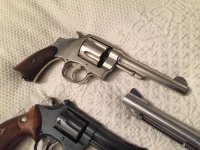
I have a couple of Smith 1917s and a another pair of Colt 1917s...not to mention a shaved Webley MKVI. Not many pistols more fun to shoot than those big 45s. I would recommend that you investigate 'Rim-Z' plastic Moon Clips. Very easy to load and unload, and fit all the revolvers above.
 
Last edited:
Here are a couple images. I haven't cleaned the gun, and it wasn't clean when I picked it up, so I may post more, but I figure not too many members get excited about seeing a refinished gun... so these pics will likely be enough.
 

Attachments

  • 134CFA1F-6C71-45A3-A88E-F5B9129FE00D.jpg
    134CFA1F-6C71-45A3-A88E-F5B9129FE00D.jpg
    78.9 KB · Views: 126
  • 4FCC9409-380C-4983-97D7-4313C5280530.jpg
    4FCC9409-380C-4983-97D7-4313C5280530.jpg
    53.9 KB · Views: 110
Thanks, I like it a lot.

Oh, almost forgot the range report:
Shot standard 45 acp reloads, fairly light charge. These are all I had to shoot. Long story short, ran through 4 moon clips and aside from the heavy double-pull, the gun is an absolute joy to shoot and incredibly accurate on the single action trigger. I'd like to lighten the double... it feels like 20lbs. A side note: I shot a new GP100 for the first time back to back with this 1917 and I liked the Smith a lot more.
 
Last edited:
Glad you like it! I don't lighten my mainspring but I do smooth the action. I prefer a smooth trigger pull. Two ways to do it. Dry fire a bunch or do or have an action job done. The action job is merely accelerated wear on the parts, basically a short cut to a million cycles of the action. What you are accomplishing with either is wearing in the parts and reducing friction between moving parts.

Kevin
 
Give it a through cleaning prior to any work on the action. I had one that would barely cycle in double action. Disassembly and cleaning resolved the problem. There was old lubricant inside that had gummed up and fouled up the operation of the action.
I for one would welcome more pictures and comments from you as you become familiar with your 1917.
 
Here are a couple images. I haven't cleaned the gun, and it wasn't clean when I picked it up, so I may post more, but I figure not too many members get excited about seeing a refinished gun... so these pics will likely be enough.

I think you've underestimated us, my friend. You may have possession of that nice revolver, but we all now have a vicarious ownership stake.

We want to see pics from 360 degrees, we want to see the back of the cylinder, check for forcing cone erosion, we want to debate the size of the side plate gap, talk about whether it's actually nickel or some other silver looking finish, we'd like to see both sides of the grip frame to check for any telltale stampings, we'll need to know if all the numbers match, are the stocks numbered to the gun and so on.

Ultimately we'll decide it's pretty much what it appears to be but we take our vicarious thrill of ownership pretty seriously...

:)
 
Last edited:
Well then, here are pics from earlier today. As you can see it is pretty dirty inside and very gummy. I'm going to strip it down, clean it and see if that resolves any of the heft in the trigger.
 

Attachments

  • BB7820ED-908A-44F4-A1F1-6AC7C0E87FF7.jpg
    BB7820ED-908A-44F4-A1F1-6AC7C0E87FF7.jpg
    57.6 KB · Views: 86
  • 42170775-4CE6-4B16-9AB1-42A4EACB94B7.jpg
    42170775-4CE6-4B16-9AB1-42A4EACB94B7.jpg
    36.4 KB · Views: 77
  • 0BF57C15-EA34-48D6-BB78-B18161FE59DE.jpg
    0BF57C15-EA34-48D6-BB78-B18161FE59DE.jpg
    35.3 KB · Views: 75
  • 7CC95E24-CBAC-4E6A-AC30-CAA019D468DB.jpg
    7CC95E24-CBAC-4E6A-AC30-CAA019D468DB.jpg
    44.5 KB · Views: 79
A few more pics
 

Attachments

  • DE2FB302-0AC1-4515-B04A-28B75E59761B.jpg
    DE2FB302-0AC1-4515-B04A-28B75E59761B.jpg
    34.8 KB · Views: 68
  • 3C55D402-AD73-4EDC-9EB1-8931CA6009B4.jpg
    3C55D402-AD73-4EDC-9EB1-8931CA6009B4.jpg
    42.8 KB · Views: 68
  • 8F2B27E7-1FB7-46BF-AD6B-16C91EC17DE5.jpg
    8F2B27E7-1FB7-46BF-AD6B-16C91EC17DE5.jpg
    32.3 KB · Views: 68
  • 86914F4D-6BC4-4390-8EA7-9B3DA4F7DBD6.jpg
    86914F4D-6BC4-4390-8EA7-9B3DA4F7DBD6.jpg
    30 KB · Views: 70
And a few more. Note the 4 notches in the right side grip. Not sure if they mean anything, but they do raise curiosity.
 

Attachments

  • 3D276CB9-18DE-4C5A-B1F9-E022FFCE454D.jpg
    3D276CB9-18DE-4C5A-B1F9-E022FFCE454D.jpg
    30.8 KB · Views: 62
  • EE13C6FC-93DE-43BB-86BD-77167E656B26.jpg
    EE13C6FC-93DE-43BB-86BD-77167E656B26.jpg
    33.6 KB · Views: 62
  • 589F69FE-F50F-4041-B029-1D0C1A755994.jpg
    589F69FE-F50F-4041-B029-1D0C1A755994.jpg
    31.3 KB · Views: 58
  • 1C978764-ED5B-4CD0-A757-3B007F590FEA.jpg
    1C978764-ED5B-4CD0-A757-3B007F590FEA.jpg
    29.2 KB · Views: 65
Put the side plate back on. Put the grips in a drawer somewhere you will be able to find them. Put the revolver in a dish, container, etc that seals. Cover with a 1/1 mixture of ATF/ acetone. Slosh periodically. After a week or so, remove and blast with an air hose (face shield recommended). Remove side plate. If gunk is still present AND you feel comfortable, remove pieces and scrub with a toothbrush. Reassemble and try the action.

Let us know what you find out.

Kevin
 
So... soaking it as an assembly is no longer an option. Here is the gun ALMOST completely disassembled. I do not have the proper cup punches (yet) for the convex pins, and I will take the cylinder assembly apart once I fabricate some sort of soft covers for my plier jaws.
 

Attachments

  • 0D4E7329-1360-4A81-8869-933C6DB06388.jpg
    0D4E7329-1360-4A81-8869-933C6DB06388.jpg
    43.4 KB · Views: 66
Last edited:
It is pretty filthy. The yoke retaining pin took a lot of prodding to get out and of course the piston spring went flying across the room. Fortunately I only had to move a coffee table an upright reading light a recliner and a couch to retrieve it. Upside; found my backscratcher, the missing Q for my Scrabble set, a piece of petrified hot dog the cat left behind and 6 writing utensils.
 
Put the side plate back on. Put the grips in a drawer somewhere you will be able to find them. Put the revolver in a dish, container, etc that seals. Cover with a 1/1 mixture of ATF/ acetone. Slosh periodically. After a week or so, remove and blast with an air hose (face shield recommended). Remove side plate. If gunk is still present AND you feel comfortable, remove pieces and scrub with a toothbrush. Reassemble and try the action.

Let us know what you find out.

Kevin

Is there a chance this mix will hurt the nickel plating? In particular the hammer just below the nose is slightly peeling.
 
So... soaking it as an assembly is no longer an option. Here is the gun ALMOST completely disassembled. I do not have the proper cup punches (yet) for the convex pins, and I will take the cylinder assembly apart once I fabricate some sort of soft covers for my plier jaws.

I don't feel a need to remove any pins. The only time I ever have was to remove the barrel.
 
Is there a chance this mix will hurt the nickel plating? In particular the hammer just below the nose is slightly peeling.

It shouldn't bother the nickel plating.

The peeling on the hammer may continue with use or it may wear in to the point it won't peel any more. Adding the plating to the hammer (and trigger) changed the working dimensions and tolerances. If it were my revolver, I would think about stripping those two parts back to bare metal. Casehardening would be expensive but blued they would nicely contrast with the nickel.

Kevin
 
Well then, here are pics from earlier today. As you can see it is pretty dirty inside and very gummy. I'm going to strip it down, clean it and see if that resolves any of the heft in the trigger.

Very nice, thanks. We can safely conclude it's a non-factory refinish. The plated trigger is a giveaway and the lack of a service date stamped under the grips pretty much seals the deal.

Is there some kind of peening next to the window where the hand engages? Maybe it's just an optical illusion. I can't imagine what would hit it there.
 
I will take the cylinder assembly apart once I fabricate some sort of soft covers for my plier jaws.


I use a wooden clothes pin clamped on the extractor rod knob. Then I clamp that with channel lock pliers or you could clamp the clothespin in a vice. Then put 3 empty cartridge casings in alternating charge holes to support the extractor star. You should be able to unscrew the cylinder and star from the rod by turning the cylinder counter-clockwise (right hand thread).
 
Back
Top