A few questions on my latest project

daveboy

Member
Joined
Sep 5, 2024
Messages
201
Reaction score
526
I repaired 20mm and 30mm aircraft gatling guns in the Air Force. I've repaired all manner of military surplus rifles. I have my share of slicking and tricking 1911s. I have recently taken the plunge and began tinkering with and trying to make S&W revolvers work a hopefully look a little better. I am a work in progress myself, and am soaking up all the information I can. You guys are a great resource, so I will thank you even before I ask my questions.

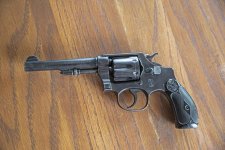
I just received this Model 1903 .32 Long Hand Ejector that I purchased from an online auction. I thought I got a pretty decent deal, paying only 2 and a half for it. I noticed in the auction photos that it was missing the sideplate screw, and it appeared that the yoke screw was incorrect. I've sourced those (thanks to you guys). It seems to be in pretty decent shape. My biggest concern was the push up, and it locks on all chambers, so that was a relief. Bore and chambers are great, so this might be a good paper-puncher. I have disassembled it, and inspected, and am pretty pleased. Now to my concerns/questions:

1) I forget the title of the different measurements, but when pushing the empty cylinder forward, the gap between cylinder and forcing cone is .009". When pushing the cylinder to the rear, the gap is .019". That much endplay seems excessive to me, but I'm not familiar with this model, or any model of this vintage. As I will only be firing this gun at paper/tin cans, should I be concerned? If so, is there a somewhat easy fix?

2) When the trigger is pulled and hammer is down, the cylinder seems to have a lot of rotational "wiggle". It seems sloppy. I don't have a way to measure it, but it just isn't as tight as my other newer S&W revolvers. I've read that the cylinders on these old ones were not heat-treated. It appears that the trail-side of the cylinder notches are a bit worn. Is it adviseable to lightly peen the trail-edge only (I know that messing with the lead-edge could lead to all sorts of problems) to tighten this up? Or, is there a better way? Or, am I worried about nothing?

3) And, finally, the question all us novices seem to ask...Serial number is 85829. Can anyone give me an approximate date of manufacture/shipping? I'm just looking for a ballpark.

Thank you!!!!
 

Attachments

  • DSC_2045.jpg
    DSC_2045.jpg
    115.7 KB · Views: 81
  • DSC_2048.jpg
    DSC_2048.jpg
    94.9 KB · Views: 72
  • DSC_2053.jpg
    DSC_2053.jpg
    85.4 KB · Views: 65
Register to hide this ad
I’ll chime in. The terms you are looking for are barrel/cylinder (B/C) gap and end shake. the .009 B/C gap is not too bad, around .005 is optimum. The end shake is not good, but fixable with shims if you can get the correct size.

The “wiggle” is a timing issue. Could be the cylinder stop, the ratchets on the extractor or the hand. Don’t peen anything yet!

If you have any empty/dummy rounds, try it with those in the chambers. If the extractor is loose, it might make a difference.

Also look for the “Leroy Brown” thread in this forum.
 
The front side plate screw is a fitted screw that retains the yoke and cyl. It looks like it is overly deep in the side plate suggesting that it may have been switched with one of the other two causing excessive movement of the cyl and increasing end shake. The front screw is not interchangeable with one of the others.
 
Last edited:
I’ll chime in. The terms you are looking for are barrel/cylinder (B/C) gap and end shake. the .009 B/C gap is not too bad, around .005 is optimum. The end shake is not good, but fixable with shims if you can get the correct size.

The “wiggle” is a timing issue. Could be the cylinder stop, the ratchets on the extractor or the hand. Don’t peen anything yet!

If you have any empty/dummy rounds, try it with those in the chambers. If the extractor is loose, it might make a difference.

Also look for the “Leroy Brown” thread in this forum.

I've read the Leroy Brown thread with great interest. I've seen mention elsewhere about the shimming fix to solve the endshake issue. Do you know of a link to explain this procedure? The cylinder stop looks perfect. I don't understand how the extractor ratchets or the hand could cause the wiggle. They are not in contact at lockup, are they? I was under the assumption that the cylinder stop's interaction with the grooves is what controlled that, but admittedly I am still learning. Thanks for the input.
 
The front side plate screw is a fitted screw that retains the yoke and cyl. It looks like it is overly deep in the side plate suggesting that it may have been switched with one of the other two causing excessive movement of the cyl and increasing end shake. The front screw is not interchangeable with one of the others.

It's definitely the wrong screw. I'm ordering the correct one. But, my issue is that the cylinder moves back and forth on the yoke excessively. The yoke doesn't move when doing the test with the cylinder locked. Maybe I'm missing something.
 
1) I forget the title of the different measurements, but when pushing the empty cylinder forward, the gap between cylinder and forcing cone is .009". When pushing the cylinder to the rear, the gap is .019". That much endplay seems excessive to me, but I'm not familiar with this model, or any model of this vintage. As I will only be firing this gun at paper/tin cans, should I be concerned? If so, is there a somewhat easy fix?
With the cylinder pushed forward, you are measuring the barrel-cylinder gap and 0.009" does not sound bad. Pushing the cylinder to the rear and re-measuring that gap gives you the amount of end-shake. In your case 0.019"-0.009=0.010" of end shake. That is excessive. This can easily be corrected by installing shims on the cylinder yoke. Ideal end shake is 0.001", but with non-magnum S&W revolvers you can go up to 0.006".

Beware that installing shims pushes the cylinder to the rear, so make sure there will still be adequate head space for the cartridge case heads to move across the breech face and recoil shield as the cylinder rotates. Also, pushing the cylinder back increased the barrel-cylinder gap. Adding 0.004" of shims to get the end shake within maximum spec will result in a barrel-cylinder gap of 0.013", which falls on the excessive side. Will that much gap be of any real consequence? Perhaps not, it's not like this is a magnum caliber revolver.
 
2) When the trigger is pulled and hammer is down, the cylinder seems to have a lot of rotational "wiggle". It seems sloppy. I don't have a way to measure it, but it just isn't as tight as my other newer S&W revolvers. I've read that the cylinders on these old ones were not heat-treated. It appears that the trail-side of the cylinder notches are a bit worn. Is it adviseable to lightly peen the trail-edge only (I know that messing with the lead-edge could lead to all sorts of problems) to tighten this up? Or, is there a better way? Or, am I worried about nothing?
The S&W is not a Colt, so some cylinder rotational play with the trigger pulled is normal. As long as it is not enough play to cause a chamber to be out of alignment with the bore, it's ok.
 
It's definitely the wrong screw. I'm ordering the correct one. But, my issue is that the cylinder moves back and forth on the yoke excessively. The yoke doesn't move when doing the test with the cylinder locked. Maybe I'm missing something.

I suggest that you buy the Kuhnhausen 5th edition shop manual for S&W revolvers if you want to learn how to work on them. You can find them on Amazon and you will learn every thing you need to know rather than guessing and asking questions on here.
 
Here's a Larry Potterfield video about installing the shims. Be aware that your gun will have a standard RH thread and will unscrew the other way.

[ame="https://www.youtube.com/watch?v=JII__KNLYY0"]Cylinder Shim Install[/ame]

I got the shims I used in Leroy Brown from Triggershims.com. Note that the older I frame guns use the J frame rimfire size shims....scroll down slightly in the link.

Larry uses a padded vise to hold the ejector rod in his video. It can also be done with a drill press chuck (be careful...that one can leave marks) or, if you think you'll do this several times, Power Custom makes a tool specifically designed for the task.
 
It's hard to tell from the pictures, but it looks like your excess rotational play is coming from the cylinder notches being peened. The tell is if there are raised burrs on the sides of the slot. If that is the case, the fix is to peen the metal back where it came from. Do not file the burrs off.

For the straight side, use a hammer with a polished face, or flat ended punch and hammer to tap the metal back down to the original surface. For the ramp side, use the side of a round steel rod that fits the radius of the ramp and tap it down. A 5/16 diameter is usually a good fit.

Doing this will bring the cylinder notch back or close to, the original width, and minimize the rotational play. There should still be a very small amount left. You can do this multiple times on the same cylinder of a gun that gets used a lot.
 
Last edited:
Regarding the large cylinder gap, you need to decide how much you're going to shoot it, how much time/effort/$$ you want to put into the project, and whether or not it's safe. The large gap is beyond the maximum spec and will cause some velocity loss, but this isn't a long range magnum gun. The real issue is whether or not it spits lead out the sides when you shoot it.

I have one with a huge cylinder gap (Mr. Fitz) that still shoots just fine. I tested for spitting by cutting the ends off of a cardboard box to make a tunnel and firing the gun 6 times holding the gun inside the cardboard tunnel. There was no evidence of sideways spitting, so I left it alone. If yours spits lead out the sides you have other problems in addition to the large gap.
 
Here's a Larry Potterfield video about installing the shims. Be aware that your gun will have a standard RH thread and will unscrew the other way.

Cylinder Shim Install

I got the shims I used in Leroy Brown from Triggershims.com. Note that the older I frame guns use the J frame rimfire size shims....scroll down slightly in the link.

Larry uses a padded vise to hold the ejector rod in his video. It can also be done with a drill press chuck (be careful...that one can leave marks) or, if you think you'll do this several times, Power Custom makes a tool specifically designed for the task.

That's great info. Thanks!
 
It's hard to tell from the pictures, but it looks like your excess rotational play is coming from the cylinder notches being peened. The tell is if there are raised burrs on the sides of the slot. If that is the case, the fix is to peen the metal back where it came from. Do not file the burrs off.

For the straight side, use a hammer with a polished face, or flat ended punch and hammer to tap the metal back down to the original surface. For the ramp side, use the side of a round steel rod that fits the radius of the ramp and tap it down. A 5/16 diameter is usually a good fit.

Doing this will bring the cylinder notch back or close to, the original width, and minimize the rotational play. There should still be a very small amount left.

Good info. Thanks!
 
(Snip)
****
2) When the trigger is pulled and hammer is down, the cylinder seems to have a lot of rotational "wiggle". It seems sloppy. I don't have a way to measure it, but it just isn't as tight as my other newer S&W revolvers.****

Hammer down, trigger pulled all the way back, the cylinder
should be bank vault tight. Could be cylinder bolt holes,
loose/worn bolt, worn extractor star, or worn hand.

BTW, I got all of my S&W revolver spare/rebuild screws from
either MidwayUSA or Brownells.
 
Last edited:
Here's a Larry Potterfield video about installing the shims. Be aware that your gun will have a standard RH thread and will unscrew the other way.

Cylinder Shim Install

I got the shims I used in Leroy Brown from Triggershims.com. Note that the older I frame guns use the J frame rimfire size shims....scroll down slightly in the link.

Larry uses a padded vise to hold the ejector rod in his video. It can also be done with a drill press chuck (be careful...that one can leave marks) or, if you think you'll do this several times, Power Custom makes a tool specifically designed for the task.

Thanks for the info. I'm really enjoying your Leroy Brown series!
 
Good info. Thanks!

Thank you! I'm currently waiting on a few minor parts to continue the project. I was looking closer yesterday and the edges of the cylinder notches are in fact slightly raised. What you describe is my plan. I was wondering how to do the concave side, and your idea is great. I'm thinking of the smooth end of a 5/16" drill bit.
 
(Snip)


Hammer down, trigger pulled all the way back, the cylinder
should be bank vault tight. Could be cylinder bolt holes,
loose/worn bolt, worn extractor star, or worn hand.

BTW, I got all of my S&W revolver spare/rebuild screws from
either MidwayUSA or Brownells.

The bolt seems good and its slot seems pretty tight. Don't have much wiggle in the extractor star. Pretty sure my issue is the cylinder notches.
 
Again, S&W revolvers do NOT have a "bank vault" lock up....Only the older Colt revolvers do that.
Holding the trigger back and checking cylinder lockup is not a valid test for the S&W or most other modern revolvers.

Most modern revolvers have some cylinder rotational movement by design.
That's to allow the cylinder to align with the barrel when the bullet passes from the chamber to the barrel.

Also again, buy the Kuhnhausen Shop Manual on the S&W revolvers. It shows all S&W repairs to factory standards and was designed to be a training aid for new pistolsmiths.

HERITAGE GUN BOOKS S&W REVOLVER SHOP MANUAL- 5TH EDITION

Also available from Midway and most book sellers.
 
Back
Top