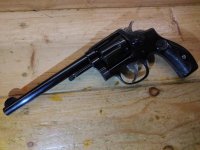
Fixing up a .32-20

OrlontheBrave

Member
Joined
Nov 21, 2021
Messages
89
Reaction score
196
Location
Austin, TX
Hello friends,


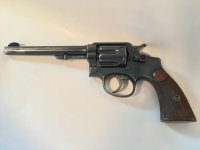
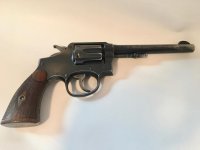
After many months of searching I finally found a .32-20 revolver that ticked all the boxes for me: heat treated cylinder, >4" barrel, and under $300 shipped. For a hair under $270 I had this beautiful specimen shipped to my door.
SJpa6cC.jpeg

DNzyYhC.jpeg


While the bore and chambers are pristine, as you can see, there's a reason for the price:

  • External rust and pitting
  • The finish has been removed from the side plate
  • The bug screw is missing
  • The left stock has some small chunks missing, the right stock has big chunks missing
However, I was looking for an affordable shooter/project gun, and this fits the bill. I aim to:

  1. Get the stocks into serviceable condition, cheaply
  2. Replace the bug screw
  3. Rust blue the gun entire
I'm not very good at remembering to take pictures, but in this thread I'll do my best to record my progress.
 
Last edited:
Register to hide this ad
Good for you. 6" barrel. You didn't supply the serial number, but the features indicate one later than 1922 and probably no later than about 1928.

You probably won't have a lot of trouble finding the correct stocks. The square butt M&P stocks from the 1920s are easier to locate than those from the 1930s, and probably those from before 1920.

Clean it up and then show us some "after" photos.
 
My first order of business is fixing the stocks. I thought about replacing them with Thai service stocks (which would look a lot nicer), but with these being a write-off anyways I figured I would give fixing them a chance. I've never repaired handgun stocks before and I don't know how to checker, however I have repaired rifle/shotgun stocks before and figured I could at least fill in the missing bits.

Jq6n44L.jpeg

As you can tell, a big chunk (with checkering) is missing from the front toe of the stock, and a smaller chunk from the rear. Given the difference in wear between the left and right stock, I'm guessing the gun was carried a lot and shot a little. Anyways, first order of business was to get the surfaces fairly flat and glue on some scrap walnut I had lying around.

eDExlSh.jpeg

In hindsight I should have used a better piece for the front of the grip. Here's what it looked like after some initial shaping.

7Nv8O1U.jpeg

A little better, certainly. I also ended up adding slivers to the shoulders and rear of the left stock, and sanding the backsides of both to help get them flatter and hew closer to the frame (they were rather shrunken). After further sanding and staining:
GYjifFM.jpeg

Does it look great? No. Does it look good? Also probably not. Does it look better than having chunks missing? Certainly. Was it cheaper than purchasing new stocks? Very much so. Does it feel fine in the hand? Yup. I'll add another picture once the BLO cures and I get them on the gun. If I ever learn to checker down the line I can try it on these.
 
Good for you. 6" barrel. You didn't supply the serial number, but the features indicate one later than 1922 and probably no later than about 1928.

You probably won't have a lot of trouble finding the correct stocks. The square butt M&P stocks from the 1920s are easier to locate than those from the 1930s, and probably those from before 1920.

Clean it up and then show us some "after" photos.


Woops! Meant to include that. 1346xx. My guess is around 1930?
 
Great find and an inspiring thread! Obviously, external condition won't be much better, but as a shooter, that one just about qualifies as perfect. When I first saw the grips, I thought, "No way he can make anything out of them." You proved me wrong! You spliced in those repair pieces so well, I'm about speechless.
As you said, it "checks all the boxes" for a great project and an even better shooter. I'll be looking forward to your continuing updates on its progress.
Froggie
 
I've been sitting here wondering about learning to checker. I've decided learning to checker from scratch is one thing---and learning to repair checkering is another. I'm thinking repairing checkering is a comparative "piece of cake"---compared to starting from scratch.

From what I've seen so far I'm figuring when we see the finished product, we are going to be properly impressed. ("Properly impressed" translates to flabbergasted!!)

Keep on keeping on!!

And when it comes to refinishing the metal, sending it off to Bubba's Bluing Emporium is one thing, and doing it yourself is another----quite another!

Like I said, Keep on keeping on!

Ralph Tremaine
 
Thank you Froggie! Here it is with the stocks back on and a BK grip added.
KMh9zxz.jpeg

FngD0TW.jpeg

It’s well on its way to a nice, if rustic, shooter.

I’m normally pro-patina myself quinn, but in this case someone’s already stripped the finish to the sideplate so I’ll need to do something to protect it, plus “silver sideplate blued frame” is not the kinda pinto I go for! However, while I usually take the metal to 4-600 before rust bluing, I know you can also rust blue over existing bluing. Perhaps I should leave the pits and wear as is and just rust blue over them? Maybe thay would better retain some of the ~98 year old charm.
 
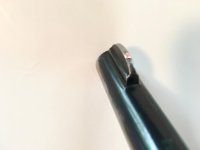
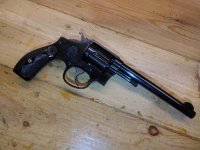
Congratulations on finally finding your .32-20 M&P! Yes, it's rough but that makes it a great project gun. Mine is a little older (s/n 118705, ca. 1923) and shows some honest wear, but should be just about identical to yours. Sometime back in the day, a previous owner added a copper bead to the front sight- but it definitely improves the sight picture! You're making some good progress on your restoration, and we'll be interested to see it when it's finished. Then your next challenge will be to find some .32-20 ammo...even Cowboy Action loads are hard to find these days. Good luck!
 

Attachments

  • IMG_2151.jpg
    IMG_2151.jpg
    38.9 KB · Views: 71
  • IMG_2152.jpg
    IMG_2152.jpg
    39.5 KB · Views: 67
  • IMG_2155.jpg
    IMG_2155.jpg
    21.4 KB · Views: 73
My first order of business is fixing the stocks . . .

Does it look great? No. Does it look good? Also probably not. Does it look better than having chunks missing? . . .

Actually, no. Take your time and sand the pieces down so they are flush with the rest of the stock. Checker the wood. That would then look better than the broken stocks.

Your purchase criteria did not need to include the case hardening, since the cylinder walls are very thick on 32-20s. No issues with buying an early 32-20 as far as chamber pressures are concerned. Remember that a standard 32-20 revolver loading has no more pressure than a 38 Special and those early 38 guns were also plenty strong enough. I recently picked up a 32 Winchester Model 1899 for a good price on GB. Paid $405 and am not afraid of shooting it all day . . . but probably won't do that.

attachment.php


attachment.php
 

Attachments

  • IMG_20240511_160435.jpg
    IMG_20240511_160435.jpg
    114.4 KB · Views: 1,055
  • IMG_20240511_160510.jpg
    IMG_20240511_160510.jpg
    102.5 KB · Views: 1,058
HawgRider and DRM, I picked up a couple boxes of HSM at the San Marcos gun show for a decent price! I still need to grab dies, but should be set for at least a little while. I’m a big fan of .32s (S&W long, .30-40, .303) And I tested it out before getting to work on it. It shoots fine to point of aim, although it does have more rotational play than I would like. The trigger is also a bit of a bear. Probably needs cleaning, but also perhaps the tension is set high to properly set off .32-20 cartridges primed with rifle primers? Not the HV ammunition, but I did read somewhere that small rifle primers were standard in .32-20 ammo.

glowe, that’s a gorgeous example! The round butt k frames have a pleasing shape. Once I get everything working and learn to checker I definitely plan to revisit the stocks. I tried to be very careful and avoid removing original material, but I might have been too careful. I’ll feel better about sanding flush once I learn to fix checkering.
 
I can almost guarantee that lots of 32-20 Colts and S&Ws were shot with whatever was available, including lots of 32-20 Rifle ammo. There are some old publications I have that even promote the use of the rifle ammo for both rifle and revolver, stating that it makes things easier when taking both a guns hunting. Current sources state that 32-20 rifle chamber pressures are supposed to be 16,000 psi according to SAAMI. In comparison, 38 Special SAAMI pressure is 17,000 psi for revolvers. I can find no 100 year old data that states what pressures rifle ammo was back in the day.

Had an interesting experience with what was my first early 32-20 M&P I ever purchased, probably near 30 years ago. I could find no commercial ammunition for the gun, so researched reloading. Found some interesting reloading information in a vintage reloading guide that stated loadings for this caliber in both revolvers and rifles. I believe it recommended a load of just over 4 grains Red Dot behind a 115g RN lead bullet. At the range I loaded up and shot a cylinder full without issues. Knowing the gun functioned at expected, I loaded up and down from the first load and took my chronograph to the range. Started out shooting the lowest load I put together and got a nice report and fair accuracy. Worked my way up to the Red Dot load I tested earlier and noted a much sharper report sound, but mild recoil. Shot the 6 shots and checked my chrono to find the velocity was over 1200 fps, that was supersonic in an pre-1910 Model 1905 revolver!! I did not test anything higher and settled on a lower load that was quite accurate. So, will a pre-case hardening of the cylinder S&W handle hot loads? Absolutely, but would not do it again. I keep my loads around 750 fps on these old-timers to avoid breaking parts. They deserve a gentle load to keep on shooting for many years to come.
 
I picked up my first 32-20 in 1968. I was on my way to Vietnam and stopped off in Chicago to visit a buddy. His uncle was a Chicago policeman and he was complaining he couldn't find ammo for his revolver (5" S&W 32-20) I offered to trade a Colt Targetsman for it. I had $40.00 in it. I didn't get to shoot it until I got back from 'Nam. Got hooked on 32-20's, I think I have 8 or 9. I lusted after a 32-20 target for years. Finally I picked up a Shooter for $200 and had a local gunsmith with a great machine shop build me a 32-20 target for another $200, Then Murphy's law Struck, less than 6 months later one popped up for sale. So now I have a safe Queen and a shooter.
SWCA 892
 
Some pretty bad condition grips can be salvaged by wood splicing, careful rreshaping the repairs, matching colors and grain and theen recheckering.
Lots of different techniques and not all are used in every job.

Re-checkering and checkering new work is a trade in itself.
It can be labor intensive and boring but otherwise the finishing touch on the project.

Checkering tools of late have become extremely expensive. The old line mfg'rs of them have seemingly dropped off in interest in making them in any numbers. Plus the quality is lacking in many. There are a couple newer names in the biz and they are good. But prices are not what they used to be that's for sure.

Re-checkering can have it's own issues.
One is that old work doesn't always line up exactly with the standard LPI tools. What was listed as 20LPI may actually have been cut as 20.5 or some other very close but not exact LPI.

If you re-cut one of those non-exact patterns with an eact LPI tool, you will seemingly be right on the money for the first couple of rows, but then the spacing starts to go off. The more rows you cut, the worse it gets and soon you are splitting old diamonds.

A new space tool that is a mere .003 wider than the old orig pattern lines will be cutting the 10th row .030" over from where the old pattern has it placed.
You will have certainly over-run the old diamonds by then if not aware of what's happening and messed up the pattern.,,and thats only a 1/2" width of 20LPI checkering on a flat surface.

Many older tools were hand made. Many were resharpened by hand. Some of the early commercial made tool heads were resharpened by hand as well. This all changed the LPI spacing of the tool ever so slightly.

Single point tools are great for re-cutting. But when the orig pattern is very weak or nonexistant, going by eye-ball method spacing really shows up.

The other main issue with recutting older work is that is very tough on the tools. Old work holds dried oil, dirt, grime, sand,,all things that quickly dull a checkering tools.
A CArbide checkering tool works great in recutting and is good for a once over on each line to deepen and clean out the crud. Then go back and deepen, get the spacing nice and even with the steel cutters.
If you find the standard steel cutters pricey, wait till you see what a single point Carbide tool costs.

Then there are the electric Checkering machines. Rotary cutters generally and Carbide. MMC was one of the first. There are few different ones around now.
Around $1400 to 2400, so usually for someone that's doing a lot of work. A great time saver, so a money maker as well.
I bought one in the 70's when I was doing a lot of checkering and still use it for layout the pattern. Then finish up with the hand tools.
You can get yourself into trouble with one real quick!

Here's some pics of set of pre-war 38-44 grips that were terribly cobbles and sliced up.
No particular order..

The front straps were carved up, the lower edges had wood missing, severe dents around the medallions which I did not want to remove to repair.
Wood surfaces were cleared and smoothed so new wood could be glued back into place.
New 'diamonds' were added to replace the damaged area ones. Oversize as added and then carefully cut to size as the re-checkering was done.


One oddity about this set of grips is that the back sides of each panel had to have wood added to make them set flat against the frame both at the ear and against the grip frame.
But one need wood one the 'ear'..the other on the grip frame area.

These pics show the back side of the grips in their orig wood.\
Then with 'New Wood' added to each, One one the Ear,,One on the Grip Frame area.. The lighter clean colored wood is the new added wood.
It is 1/32" thickness European Walnut veneer.
Glued to each panel and trimmed to fit, this brought each panel to dimension for a flat fit to the frame sides.


Finished sanded and fitted. Checkered and ready for wood stain and finish.
I have pics of the final product but the IMGBB site isn't co-operating tonite.
 
Last edited:
I lusted after a 32-20 target for years. Finally I picked up a Shooter for $200 and had a local gunsmith with a great machine shop build me a 32-20 target for another $200
Did you have the work done around here? I’ve been trying to find a good Austin area gunsmith, but most of the ones that come up on Google look like the AR-15 Glock type.

Some pretty bad condition grips can be salvaged by wood splicing, careful rreshaping the repairs, matching colors and grain and theen recheckering.
Lots of different techniques and not all are used in every job.
That’s great work 2152hq! That’s the dream, although my skills are a long way off. I really like the idea of adding walnut veneer to the back. I sanded the backs of mine directly to get them to stay flat, but I think adding extra material is a better idea.
 

Latest posts

Back
Top