Questions about .455 webley to 22lr conversion revolver

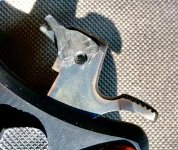
"....Also, do you believe the firing pin that broke on me was the original from the conversion or a later replacement? It seems like someone wouldn't go through all the work just to put in a mis-measured part.
From what I understand you're also saying a replacement pin would need to be a newly made part or a customized factory pin?
Would this work with modifacation?..."

Just my guess is that the firing pin is the original one made at the time of the conversion.
It would have to be a hand-made part as the need for the geometry is that the actual nose of the FP is up higher than on a standard CF firingpin for that hammer & frame.

It could have taken use for a long time before breaking.
I'm just thinking it likely was dry firing may have broke it.
That xposed a small fitting flaw that may have allowed the FP to take the impact of the falling hammer instead of the shoulders of the hammer itself onto the frame.

All speculation for sure.

That broken firing pin,, use it as a pattern for a new one.
A new FP is a simple make out of sheet tool steel. The old one traced
carefull around on it gives you a big headstart towards completion.
Drill the rivit hole first and work out shaping it from there.

The broken off piece of the orig is probably still trapped in the slot in the hammer. Drive the rivit out, the small remaining piece will probably fall out.
The rivit can usually be re-used if taken care with.


I'd leave the new pin a little generous in size around the point when made for extra fitting. The point may have to be angled slightly different, some taken off the top, etc

Then it's just a matter if 'try, cut & fit' to get it right.
The frame tunnel for the pin may need a little attention as well.

I'd harden the pin and then draw it back enough so it's not brittle but still tough enough for the job.
 
I don’t have any useful suggestions to add (other than that I’d pick up a spare factory type hammer nose to experiment on) but I just wanted to chime in and say how cool I think that revolver is.

My two ideas about where it was built are conflicting and self cancelling. The first is that the dovetail suggests that it was built for the British shooting discipline that didn’t allow adjustable sights as we know them, but at the same time, lack of British markings for the conversion suggests that the work was done elsewhere so that reasoning conflicts!

I’d be trying a standard GI rear sight from a 1911 semi auto just to see whether it would fit.

Please keep posting as you get this project going. It’s as interesting as most any I’ve seen lately.

Froggie

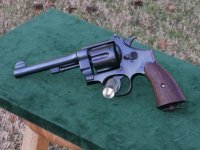
PS To whoever mentioned “triple lock” - it obviously isn’t. This is a second Model, without the ejector shroud and of course no third lock. Now that would be an interesting piece… a 22 RF triple lock would turn a lot of heads!! :D
 
PS To whoever mentioned “triple lock” - it obviously isn’t. This is a second Model, without the ejector shroud and of course no third lock. Now that would be an interesting piece… a 22 RF triple lock would turn a lot of heads!! :D

Yes, you are correct! I corrected my post. Totally obvious it’s a Second Model. There has been at least one similarly converted Triple Lock posted to this forum before. That one was way cool. This revolver is cool, just not quite as cool as a Triple Lock revolver with such a conversion.
 
Thanks again for all the interest and help.
Looking at the firing pin up close it does look to be non-factory.
At the moment I only have hand tools to work with, and my ability and knowledge doesn’t go very far beyond them. But I’m willing to go Khybar pass on the project (I have on small parts before).
I’ll also reach out to some local gunsmiths and get an idea what it would cost to have the part made correctly, with the ability and knowledge I lack.

The only comparison I have for the broken part is a highway patrolman. I’m not sure how close the firing pin on that would have been to a N-frame from 40 years earlier… but the rimfire pin definitely lays at a different angle.

60722E3D-05A8-485A-81BF-45B34865E277.jpg
 
Thanks again for all the interest and help.
Looking at the firing pin up close it does look to be non-factory.
At the moment I only have hand tools to work with, and my ability and knowledge doesn’t go very far beyond them. But I’m willing to go Khybar pass on the project (I have on small parts before).
I’ll also reach out to some local gunsmiths and get an idea what it would cost to have the part made correctly, with the ability and knowledge I lack.

The only comparison I have for the broken part is a highway patrolman. I’m not sure how close the firing pin on that would have been to a N-frame from 40 years earlier… but the rimfire pin definitely lays at a different angle.

View attachment 591976

This picture answers a lot of questions… the firing pin (nose) of the RF conversion is obviously a modified version of the factory CF version, and I’m not sure you could modify a factory one to work. If you are not pretty adept with tools and confident in your ‘smithing abilities, I would suggest seeking professional assistance.

What state/region are you in (are you actually in Brooklyn?) Maybe we can suggest a nearby gunsmith who could handle the work you can’t do for yourself.

Froggie
 
I was 5th generation Brooklyn, but left a couple of years ago when it finally went off the deep end of sanity, I’m now a NYC refugee in the free state of Montana.

I’m going to ask at the gun shop I purchased it from if they work with any local guys who know revolvers and could do a good job replicating and fitting the part. (If it’s a reasonable price I might ask for 2 for peace of mind)

Another option would be to just ship the part itself out to someone to copy and do any hand fitting myself. But I’m still concerned about why it broke in the first place. If it was an incorrect shape I wouldn’t want to put a duplicate back in it’s place.
I didn’t dry fire the revolver at all, it’s possible customers dry fired it at the shop, but I don’t think it was out for too long before I spotted it. And anyone interested enough to pick it up and pull the trigger a bunch of times probably would have purchased it anyway.
It’s possible it was just dumb luck that it snapped on my first outing with it after going thousands of rounds with previous owners.
 
Absence of reproof suggests it was not done in England (unless somebody did it themselves, and even then they would have to prove it later in order to sell/transfer it)
 
Stuff breaks,,don't put that on yourself.
It could have happened at any point in it's life. It appears from your description as though the broken FP will 'snap' back into place and function OK.
It may have happened yrs ago,,or not. It really doesn't matter.

Windshield wipers always seem to break when it rains out...but that's not your fault.

The part is a simple one and you have a pattern to work from.
Imagine if the gun came to you with the FP missing altogether.

That is a tough starting point but again one that can be overcome by working backwards using a CF pin first and then changing the design to fit a RF principle. That is what the orig gunsmith did.

So a Drop In replacement isn't going to be there for you.
You make one, leave some extra mtr'l up front for fitting, and with that fitting make it work correctly and smoothly.

What's the worse that can happen? It breaks.
Then you make another and fit it better, maybe diferent steel alloy, different heat treat..
Welcome to real gunsmithing. No bolt-on TinkerToy replacement parts that come to you in the mail in blister pacs from China.

For a good, cheap, common source of steel that is very good for things like this,,common hand files.
I save any and all I can find.
Annealed in a simple wood fire or by torch and cooled slowly, they are workable with common hand tools. Hacksaw, files, drill, tap, etc.
But the alloy can be rehardened if you want to and then drawn back. Or in this case I'd probably leave the tough stuff just in the annealed state and use the finished pin as it is.

Any small flat parallel or similar shape gives you a nice flat and square piece of steel to work with.
Leave the new part attached to the main piece by a small bit so it's easy to hang onto in a vise to work on and hold.
Then cut it off at the end of the process and do final fit.

Here's a Winchester '73 firing pin retractor that I made from a piece of file using the method. A sample pulled from another rifle served as the pattern. Same idea.
Annealed file, hacksaw, drill, hand files, marking fluid is Sharpie Pen.
Do all the work you can while it's still attached to the main piece of bar stock.


Very nice of SteelSlaver to offer up his assistance. He can no doubt get you rolling again on this interesting revolver.
These are right up his alley I'm guessing!
 
That is actual about 190 miles from me. A short trip in this country. If worse comes to worse get a hold of me, we will set up a time if you want come over here to Lewistown and we will get you a new pin made. would do it just to get a chance to study how yours was converted. There are some real clever people in gun smith world.
 
And here’s the thread about a Triple Lock revolver converted to .22 Long Rifle. This is likely what I was recalling when posting to this thread earlier:

http://smith-wessonforum.com/s-w-ha...ered-22-long-rifle.html?highlight=Triple+lock

In addition to Chad Gripp's converted Triple Lock, the thread referenced also has my S&W 1917 converted to .22LR in it. (It had dead picture links so I uploaded new ones in the original thread, and here.)

attachment.php


attachment.php


attachment.php


attachment.php


attachment.php
 

Attachments

  • 2012-10-30-08-24_P1110557.jpg
    2012-10-30-08-24_P1110557.jpg
    112 KB · Views: 67
Last edited:
In addition to Chad Gripp's converted Triple Lock, the thread referenced also has my S&W 1917 converted to .22LR in it. (It had dead picture links so I uploaded new ones.)

attachment.php


attachment.php


attachment.php


attachment.php


attachment.php
Can you add these photographs to that other thread? For future reference?
 
Back
Top