Revolver trigger job questions

MT2AShooter

Member
Joined
Apr 20, 2018
Messages
9
Reaction score
10
Location
Montana
I just finished my third trigger job on Smith revolvers. They were done on a 15-3, a 624, and a 27-4. So far, so good. All guns go bang and both single and double action pulls were improved without compromising function. My primary sources were Jerry Miculek's trigger job video, which was helpful, and Kuhnhausen's shop manual.

In addition to very conservatively stoning and polishing the parts referenced in Jerry's video, I've been installing Wilson's mainsprings and 13 lb rebound springs. SA pulls run at or just below 3 lbs and DA somewhere above 8 lbs. Despite some success, I've seen double action triggers that were better than mine, so I know there's room for improvement.

Here are my questions:

1. Are there better spring kits than Wilson's?
2. Has anyone used a Power Custom stoning jig? If so, what's your assessment? Which version did you use?
3. Aside from what I've already done, are there any improvements to make or problems to eliminate that enhance performance without compromising reliability or safety?
4. What other sources of information have you used?
5. What other questions should I be asking?
 
Register to hide this ad
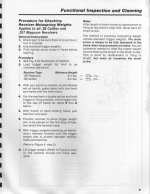
What you should be doing, as per the S&W Armorers manual is setting the hammer weight or as S&W calls it, checking the mainspring setting. See below. The weight for a .38 revolver is 3.25 lbs = 52oz. for a stock gun without any trigger work. I have found info stating that the Custom Shop sets them to 38-40 oz. For .357's the numbers are 56 oz. stock and 42 oz. custom shop. For my well polished .38's I find 46 oz. the low end for total reliability and never experiencing a failure to fire. I use Winchester primers. These numbers are for the stock hammer, the target hammer is set 52-54 oz. minimum. Just order a supply of strain screws and start playing. I use a little bucket, a bent piece of welding rod and lead bullets/ingots and a scale. I have not been able to find data for N frame guns.

Stu
ycpr9ruy

attachment.php
 

Attachments

  • Hammer Weight Text.jpg
    Hammer Weight Text.jpg
    65.8 KB · Views: 541
Last edited:
I should have added the adjustment method. You file/grind down the strain screw until you get the desired weight. I just start backing out the strain screw until I get the weight I want, then count the turns from full tight to get there and it is approx. .031"
per turn so you know how much to remove. Approach slowly, but strain screws from S&W are only $1.58 ea. in blue or nickel or stainless.

Stu
 
The only thing I can add here is, for folks who own revolvers and do NOT do their own work, what these guys are talking about (and what to know, or expect, before you take your gun to a smith, for that kind of work).

They are actually talking abut 2 different things:1.) The "stoning and polishing" (actually, they use stones and sandpaper to do the same thing- polish moving/contacting parts) is to smooth up the trigger pull, hammer break and trigger reset. IF you have a new gun and when you SLOWLY pull the trigger, it feels like you're pulling across sandpaper or a gravel bed and you have to pull a little extra to get it to break, it probably could use some polishing. 99% of the time, that is ALL you need to do to your new Revolver. When it's all polished up, it will FEEL like a lighter trigger pull and will break and reset better, etc. (Btw forget that "break like glass" thing. I work in glass and I've NEVER felt a trigger "break like glass". I'd reckon a "hair trigger" to be the closest thing to "breaking like glass" and NO ONE, except if your name is Bob Munden, needs a hair trigger).

2.) Changing out springs is something else completely. New guns usually do NOT need that. With revolvers (and semi auto), the guns run at a specific mass/spring formula, for a perfect "timing" cycle( timing is when all moving parts, move perfectly together, so when the gun goes bang, everything is where it's supposed to be- much like the timing in your car. Cycle is a complete cycle, from bang to bang). Folks change out springs for 2 reasons: 1) The gun has been shot SO many times the springs have become SO weak, they do not detonate a round or the trigger doesn't reset right or the timing is slightly off (but other factors contribute to that, also). 2.) They are a trick shooter or (semi) Pro and are HIGHLY skilled and want a gun to run as fast as they do, etc. 99% of shooters are NOT in #2 ( but many think they are). John Lovell said that alot of shooters will add things/make upgrades to their guns to make up for poor practice and technique. if you suck at the the trigger, adding a new trigger or getting a "trigger job", will not change the fact that you suck at the trigger. Get training and practice more.

Know that with a handgun, when you change the springs, you need to change something else, to keep the "formula" correct, or else your gun will not run correctly. For instance, JMB designed the 1911 to have a 5" barrel. The springs in them were designed to move the mass of a 5" slide and cycle correctly and in perfect timing. When Mfg changed the barrel to 4" and 3", they had to put stronger springs in, to make the lighter mass of the shorter slide run, or cycle correctly and be in perfect timing( and alot of times, fail). That concept is equally true for revolvers.
 
Last edited:
... All guns go bang and both single and double action pulls were improved without compromising function. .....5. What other questions should I be asking?
Can I fire a minimum of 500 rounds in rapid double action mode without a misfire?
 
I got a number of K frame strain screws recently and a couple are pre-shortened-excessively so.

Call me a Neanderthal, but I prefer stock S&W mainsprings, adjust strain screw to suit.
 
Last edited:
FWIW: back when I smithed, I used a trigger scale, not weights, as described in the manual. I wanted to see slight hammer movement at a given weight. Somewhere around 44-46 oz worked fine for N frame magnums with target hammers. I've got a well used model 28 with a weight at 44 oz that feels a lot lighter never had any problems.

OTOH, I did a K frame for myself last year and had the tension in the 44 oz range, measured on the lower curve of the hammer nose. Worked fine with Federal and WW primers. With CCI, if I did 100 rounds or so, the second box showed some misfires. I got paranoid enough to take the trigger scale to the range and when I got a misfire, weighed the hammer tension. The mainspring was new (famous name reduced power), and had let down about 4-6 oz. It would recover, but right then and there, it was enough to cause issues. I decided I needed 48 oz of tension measured at the hammer nose. I got out a new screw and worked it till I got what I thought was enough to ensure reliability under all conditions and maintain a minimum of 44-46 oz of tension even when fatigued. This turned out to be 56 oz measured in the hammer notch when well rested to ensure ignition/46-48 oz of tension on the hammer nose. This, by the way, is why several hundred rounds through the gun is a good idea before mucking about with it.

After reading stu1ritter's post, I'm gonna try the old strain screw again and see what happens. Maybe the spring has cycled enough to maintain tension. ADDED EDIT 12/21/20: After working with a new factory mainspring and exercising it significantly I found that the hammer showing slight backward motion at ~48 oz at the hammer notch produced reliable ignition, even with extended strings of fire. Trimming the strain screw to produce this when fully tightened was a pain, but worth it.

BTW OP, you can do quite a bit a stuff if you use your firearm to play games where alibis are allowed for firearms malfunctions. If you play gun games where there are no alibis, you do less. If you're betting your butt on said firearm you do way less.

Being a really auld coot, there's more to cutting springs than just using a pair of side cutters. You do have to recreate the dead coils at the cut end. We're talking art form here.
 
Last edited:
Thanks everyone

Thanks all of you for the thoughtful comments. The support and knowledge available on this forum is amazing.
 
If you decide to follow these instructions provided for adjustment of your revolver, (optimum mainspring threshold) be sure to follow the instructions carefully. Read, re-read and double check your measurements prior to making alterations. Double check the results both at the work table, and at the shooting range.

Keep in mind this is from the armorer's manual, which is geared toward evaluation of service guns. You may be able to go lower in terms of mainspring tension on "range only" or target guns.

Also, a common problem to avoid...... when doing weight measurements, be sure to hang the weight at the correct point on the hammer. The weight should be just below the shoulder of the cutaway for the hammer block , not on the face of the hammer just below the hammer nose. Failure to place the hook of the weight scale stem at the correct location will result in incorrect results. See below for clarification.

This is difficult to see in the factory drawings, and is crucial to getting the correct readings for your evaluation.


Last edited:
Back
Top