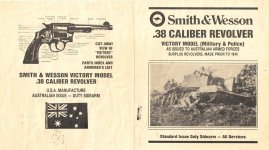
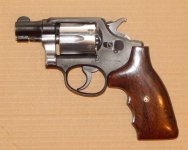
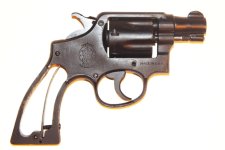
Can a modern 3-screw cylinder stop be adapted to a 5-screw frame? Success!

SG-688

Member
Joined
Sep 22, 2007
Messages
1,188
Reaction score
2,521
Location
Illinois
I’m helping a friend with a rough condition New Zealand marked 1942 S&W M&P that started life as a 5 inch .38 S&W. Besides the probable reaming to .38 Special, the cylinder has damage that makes it unusable. On top of the good lock work with a smooth DA/SA, what makes the thing worthy of further effort is the honest .38 Special 2 inch barrel that was installed at some time in the past.

A newer .38 Special cylinder dropped in with good hand to ratchet fit & carry up. I’m surprised too. That's not supposed to happen.

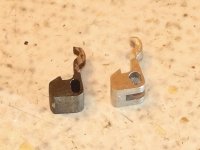
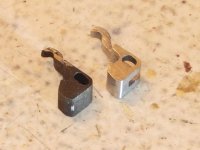
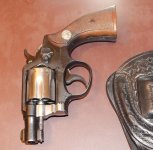
The next problem is replacing the severely worn cylinder stop. 5-screw stops I’ve seen listed for sale appear to be in dubious condition. SO – can a modern cylinder stop - with the hole for a spring right where the plunger in a 5-screw stop must bear - be adapted to a 5-screw frame?

I can see a couple of ways to go about it, but what is best and/or easiest?

The easiest solution would seem be to Dremel out a deeper recess in the frame for the spring. Is there enough metal in the frame – following the hole for the 5-screw plunger and spring – for that to work?

It’s already a Frankengun, so anything done to make it safely functional can only be an improvement.

===========================

Edit to save scrolling to the end: yes, it works to fill the hole in a new cylinder stop and then modify - a bunch - the profile to match the 5-screw cylinder stop.
..
 

Attachments

  • S&W M&P NZ 965xxx RKB R 1-23.JPG
    S&W M&P NZ 965xxx RKB R 1-23.JPG
    107.2 KB · Views: 58
  • S&W K M&P NZ 965xxx B-C 22.jpg
    S&W K M&P NZ 965xxx B-C 22.jpg
    93.7 KB · Views: 23
  • S&W cylinder stop mod 5 screw 3-23 1.JPG
    S&W cylinder stop mod 5 screw 3-23 1.JPG
    92.6 KB · Views: 22
Last edited:
Register to hide this ad
Yes on the cylinder, I have put several newer cylinders in older guns. In fact a new od arm style cylinder in a 1917, no problems except a bit of minor fitting.

But, no on the cylinder stop. I tried that and no go. The plunger for the plunger used on a 5 screw gun cylinder stop will stick in the hole on a modern stop and tie it up. I guess you could try a longer spring or a spacer on top of the screw. But, I think the hole is drilled different and the spring would not stay in place. You might be able to make a spacer similar to a plunger. Make it with a tip about .020 or so long on it that fits inside the spring. Install the stop. then the spring, then your spacer and screw. The idea being the tip on the spacer holding the frame end of the spring in place.

I would NOT modify the\ frame. Get a stop. they are around. That is your best bet. You are not building a target gun. I checked ebay and saw some that looked like they had no wear on them. Plus, I bet if you asked in the WTB section of the classifieds one would show up.
 
Last edited:
cylinder stop

I think I have 5 or 6 in my parts bin. You can have one for the postage. measure the one you have or tell me how wide the new one has to be and I'll measure mine and tell you if I can help. I don't think i can put one in a letter so it will have to go in a padded letter. cost ? let me check.
SWCA 892
 
...
The plunger for the plunger used on a 5 screw gun cylinder stop will stick in the hole on a modern stop and tie it up. I guess you could try a longer spring or a spacer on top of the screw. But, I think the hole is drilled different and the spring... .

I'm talking about removing the trigger guard plunger and spring.
"Modern" springs are larger in diameter than the hole in the frame for the plunger, so might, maybe slide over the hole as though it were not there.

or

Filling the hole in a "modern" stop and profiling to match the old one. How critical is that profile?

Checking dimensions....
The stop notches in the new cylinder measure 0.102 to 0.105 inch by my fast check. The stop I'd laid out to experiment with is 0.10 inch.

I'll also look again but the ones I'd seen at auction did not inspire confidence.
 
You can fill the hole in new style cylinder stop with Devcon or similar product. It was a trick from Ron Powers and it works fine.
 
Why not accept the generous offer for austintexas. I think your way over thinking a 2" gun. The forcing cone will handle way more than .001 rotational movement. Thats its job.

The stop need a bit of clearance to quickly fully engage the notch eevery time.

BTW most cylinders are not even within .001 from throat to throat. I have measured some to satisfy my curiosity. Place the tightest pin gauge that fits in one chamber throat and the next size smaller in the one beside it. Measure outside to outside of them with good calibers. Go around the cylinder and guess what. There are variances in their spacing, often over .001

The standard is to get a range rod that just fits down the barrel. Hold cylinder one way then the other checking to see if it hits. But remember the rod is lad dia not groove dia.

Your forcing cone mouth should be just over groove dia. as the bullet passes from throat to barrel the forcing cone will cause the cylinder to line up 100% as this transition occurs. To tight of cylinder can cause problems instead of fixed them.

If cylinders were perfect and stops and notches were also perfect revolvers would not need forcing cones,, yet they all have them,
 
Last edited:
When I say the stop is severely worn, I mean the cylinder will rotate backwards!

The offer of a stop is very generous, but I have a dozen of the new ones. I'll try to modify one first. Thank you.
 
Is the stop moving high enough to fully enter the notch? That is adjustable.

I will be interest to see if you can make a new style stop work. I am not into repair my revolvers with epoxy.
 
Believe me -- it's worn to a nubbin on the right side.
I don't know how that happened except for abuse, but there it is.

I'm leaning toward inserting metal - rod or screw - into the spring hole and securing that with high strength Loc-tite rather than filling the hole entirely with epoxy. Doesn't seem like that would wear well.

And then, there's still the Dremel solution ....!! Unless that cut into a void, it ought'a work.

BTW - pic of the NZ mark confirmed by my Canadian pal as New Zealand.
G also sent pictures of an Australian manual that's probably well known on the forum.
 

Attachments

  • S&W M&P NZ 965774 RKB bs 2 1-23.jpg
    S&W M&P NZ 965774 RKB bs 2 1-23.jpg
    29.8 KB · Views: 18
  • 38-200 Victory Australian (2).jpg
    38-200 Victory Australian (2).jpg
    98.9 KB · Views: 14
  • 38-200 Victory Australian (1).jpg
    38-200 Victory Australian (1).jpg
    72.9 KB · Views: 12
On the 5 screw guns the plunger and spring hole are connected to the hole for the yoke pivot. I know that for a fact.

I will accept that your stop is shot. I do not get doing a bunch of McGiver stuff to get a new style part to MAYBE work when an original part is so easily available. But, it isn't my gun so have at it and good luck Let us know what you figure out.

I get modifying guns LOL. but, that I am a guy who has made revolvers into carbines, reamed them to different calibers, chopped barrels. I have even sleeved a 357 mag cylinder to make a 22lr cylinder that would work in a model 53 22 jet as thy need a longer cylinder than a regular K22. And on the other hand I have a K22 that has a shrouded 22 jet barrel and a 22lr and 22 mag cylinders.

In your case I would use the part that belongs in the gun unless there was no other way to make it run.
 
Last edited:
McGiver is the name of this game!

I give up. You certainly know 100 times more than I do.
 
No, I actually am interested in see if it will work. I like the metal insert in the hole idea better than epoxy. Red loctite would probably hold forever with a tight fit.

I just do not want you to modify the frame when you do not have to do that. I think that is a bad plan when you can get a part and not need to do that.
 
Last edited:
OK, finally measured my stops, #1-.98, #2-1.03, #3-1.0, #4-1.03 . If you want one let me know. They all came out of functioning handguns.
SWCA 892

With the encouragement, I'm going to try a stainless screw (it may be an 6-32) that is about right.
Failing that, I accept!
Hold my beer.......

Scratch the screw. I found a broken drill bit that looks good.
 
Last edited:
Success

It turned out that filling the hole in the modern cylinder stop was the easy part. Pictures attached. Fill the hole & file flat. Then file bevel on the bottom to fit the stop plunger.

Fitting the stop was difficult. I've been spoiled by the couple I've replaced before that were virtually drop-in. This one required more. Part of that is likely dimension differences in the 5-screw long action although the original stop looked nearly identical but for the bevel on the bottom.

Picture of the M&P with Model 64 cylinder installed and wearing Farrant grips.

The grip frame is cockeyed. Like the rough internals, I guess that to be because of shortcuts during war production. I won't risk splintering the Farrants.

Thanks to all for the help.

attachment.php
 

Attachments

  • S&W cylinder stop mod 5 screw 3-23 1.JPG
    S&W cylinder stop mod 5 screw 3-23 1.JPG
    92.6 KB · Views: 10
  • S&W cylinder stop mod 5 screw 3-23 2.JPG
    S&W cylinder stop mod 5 screw 3-23 2.JPG
    101.5 KB · Views: 11
  • S&W cylinder stop mod 5 screw 3-23 3.JPG
    S&W cylinder stop mod 5 screw 3-23 3.JPG
    101.9 KB · Views: 11
  • S&W cylinder stop mod 5 screw 3-23 4.JPG
    S&W cylinder stop mod 5 screw 3-23 4.JPG
    106.7 KB · Views: 91
  • S&W M&P NZ 965774 Farrant L 3-23 78.jpg
    S&W M&P NZ 965774 Farrant L 3-23 78.jpg
    94.7 KB · Views: 15
Last edited:
Back
Top