Help with identity of Top-break ... Model 3

It is my understanding that S&W did not have in-house plating facilities at the time these revolvers were manufactured in the1870's. The plating was done by a subcontractor such as King. As such, S&W did not have complete control of the plating process and that is the reason there are plating anomalies. Some of these are plating of triggers, trigger guards and hammers, etc.
 
That is one reason why full plating might not be reflected in a factory letter. I was aware of the tip-ups not being plated in-house, but did not know the Model 3s were also plated outside the factory?
 
If you can't remove the grips using James' screw method, take a wood or plastic handled tool, like a hammer or screwdriver, hold the gun by the barrel/cylinder and rap the frame with the tool handle behind the hammer at the knuckle to jar the grip panels loose. The vibration should allow them to just fall off.
 
Last edited:
First Model Russian: "Made from 1871 to 1874..". The Model 1, Third Issue was manufactured 1868 - 1881. The 'newest' Tip-up is the Model 1 1/2, Second Issue was made 1868 -1875. In my opinion, it is entirely possible that the plating of the OOM Russian could have been subcontracted in the 1870's. I have not seen any dates published that definitively pin down the dates of the subcontracting. Can anyone help?
 
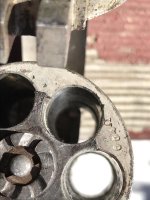
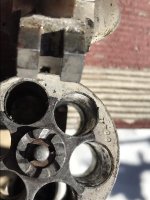
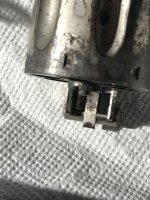
I may be wrong, I thought that I was wrong once before but I was mistaken, but my old eyes almost seem to see U 799 as the mark on cylinder and frame butt. Normally the guns that I have observed (and that is a small sampling compared to the antique experts here) it is a letter and one or two numbers, not three.

It is possible that someone chose to use three numbers to use as assembly numbers but it also may just be a misread by my old eyes.

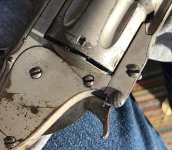
Pam, stock removal is not impossible but should be done very carefully. Usually, the older the gun, the harder they may be to remove. Years of accumulated gunk can almost glue them in place. The other major stock destroyer is the locator pin. If you do not remove the stock straight up from the frame and off the pin but push them at the top in an angle to the butt, the locator pin can crack or break the stock or cause a huge chip.

The key is to loosen the stock screw except maybe the last thread and then gently tap on the screw head driving the opposing panel downward. Place a soft cloth below to catch the stock. Once the one panel is removed, turn the gun over and gently tap on the inside of the remaining panel through the opening in the frame. It too should drop to the cloth. Once the panels are removed, clean the gunk from the frame and apply a coat of Renaissance Wax so sticking in the future will not be a problem. Probably wouldn't hurt to clean any residue from the panels as well.

If stocks seem to be stuck and won't budge, try gently heating them and the frame with a hair dryer. Many times a little heat will break the gunk bond and facilitate their removal.

Hope that helps. ;)

Hey, Jim ... since you have a "few" years on me (like 20 or 30), will the hair dryer trick work on my joints when they're "stuck and won't budge" or move properly in the morning ?

All in good, wholesome, jest and with respect ... Sal
 
Last edited:
It looks like James might be the winner-winner of the chicken-dinner. Those stamps most likely are all U799. I’ve attached more pics! Someone tell me to stop!

Oh, and as much as I’m tempted to have a go at removing those grips, not going to happen. When my sister gives me that piece of missing ivory from the grip, I shall go in search of smith who can clean, refresh, and do no harm.

Thanks, guys!

Pam
 

Attachments

  • CE2B1ED1-962D-4285-841F-2877FB3E4503.jpg
    CE2B1ED1-962D-4285-841F-2877FB3E4503.jpg
    67 KB · Views: 57
  • CB85E7D8-CC2A-4464-B4CF-8B25E93AFCEB.jpg
    CB85E7D8-CC2A-4464-B4CF-8B25E93AFCEB.jpg
    68.7 KB · Views: 51
  • 158CDA90-FB5F-45B8-AB4D-3B1794BB93A3.jpg
    158CDA90-FB5F-45B8-AB4D-3B1794BB93A3.jpg
    86.2 KB · Views: 55
  • 3CB195A4-8591-4AA0-A345-FADE5C903526.jpg
    3CB195A4-8591-4AA0-A345-FADE5C903526.jpg
    60.3 KB · Views: 59
  • 1D8C236A-3D6C-4A39-AA67-5F23B8EB6C53.jpg
    1D8C236A-3D6C-4A39-AA67-5F23B8EB6C53.jpg
    60.3 KB · Views: 47
It is my understanding that S&W did not have in-house plating facilities at the time these revolvers were manufactured in the1870's. The plating was done by a subcontractor such as King. As such, S&W did not have complete control of the plating process and that is the reason there are plating anomalies. Some of these are plating of triggers, trigger guards and hammers, etc.


That makes perfect sense as most of the nickel American and 1st Russians I have seen have plated latches and triggers.

Its when you get to the later nickel DA models and NM #3 it seems like the latches are consistently blued and triggers are cased.
 
"Its when you get to the later nickel DA models and NM #3 it seems like the latches are consistently blued and triggers are cased." Agreed. I wish that the date of the inhouse S&W Factory plating was known. I suspect around 1880 as that is the debut of the Double Actions and the observed consistency in regards to the nickel and blue parts.
 
Oh, and as much as I’m tempted to have a go at removing those grips, not going to happen. When my sister gives me that piece of missing ivory from the grip, I shall go in search of smith who can clean, refresh, and do no harm.

Thanks, guys!

Pam
Welcome aboard.
Glad to hear that. I shuddered upon hearing the advice to beat on the screw, heat the ivory, and tap on the grip. Sorry guys, but I've removed my share of grips, and I have YET to tap a screw or heat ancient ivory. ;) When I lose the hand strength and dexterity to get them off like I always have, I'll quit.
This is not the gun and the grips that a novice should learn on!

BTW- I have seen lots of escutcheon nuts that were knocked out of grips by tapping the screws while the grip stayed where it was. It almost always chips the grip around the nut. I also hate to pull a pair of grips and see all those screwdriver dings inside the grip like a woodpecker had been working on it where it was tapped off.:rolleyes: 
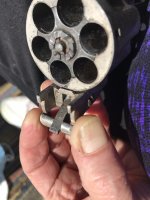
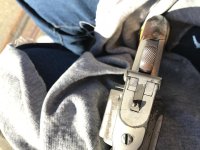
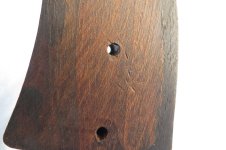
Yeah, it doesn't show with the grips on the gun, but why ding them up? Do no harm. Be good stewards.
You might want to rethink that.
There! I feel better. :D

Pam, you are wise in having a good conservator clean that gun up. It does need it. Left alone, it will continue to degrade.
That is nickel that the norcal sea air has been working on for those 50 years you mentioned.

NEAT old gun!
 

Attachments

  • IMG_0003 (2).jpg
    IMG_0003 (2).jpg
    100.4 KB · Views: 43
The key word in Lee's post is "conservator". There are very few gunsmiths that fit into that category. Almost all gunsmiths out there today have little to no experience with top break S&Ws, so I would be afraid that those things Lee advised against might be many smiths first choice! Many gunsmiths do great work on modern revolvers and pistols, but the lack knowledge and experience when tackling a fine old hogleg S&W. I hope you get some recommendations from the members here.

BTW - I contacted Roy about when the factory started to plate their own revolvers and here is he stated. His response puts your revolver right at the cusp of in-house plating. It is possible that it was all done by S&W.

The original nickel plating done in the 1860s was handled by Adams Plating. I believed that the factory started plating in house in the early 1870s . . . Roy
 
Last edited:
Thanks Gary. Now I wonder how early "..in the early 1870s . . . Roy ". 1871 - 1874 is early in my book also.
 
My 1875 shipped 2nd Russian has a blued latch with a cased hammer

3FR1CQ9l.jpg
 
Pam, casehardened; case colors on the hammer and trigger. I'm sorry I don't have a picture but the colors are blues, greys and sometime straw.
 
It means case hardened.

Lee, I certainly didn't suggest that one "beat" on the stock screw with a sledge hammer. Nor would I think that anyone with half a brain would use the tip of the screwdriver to tap on the second panel. I believe that I said "turn the gun over and gently tap on the inside of the remaining panel through the opening in the frame". That can be accomplished by a finger tip or I sometimes use a wooden dowel. I also suggested a hairdryer, not a flame thrower.

IMHO, not removing the stocks can allow the crud underneath to continue to destroy the metal frame and hurt the gun. Certainly my method is better than taking a razor knife, a putty knife or a screwdriver and prying them off as I have seen done.

Perhaps explaining your method would be more productive than ridiculing mine.
 
Thanks, Mike. So, is the discussion of inconsistent plating, which years various parts started appearing as ‘blued,’ etc., important because it would help put a tighter understanding of S&W’s earliest years?

I’ve attached today’s pics. My dad was a police photographer; I am neither. :).
 

Attachments

  • C27DC4D9-E0F9-46F1-92F4-38587EB1371A.jpg
    C27DC4D9-E0F9-46F1-92F4-38587EB1371A.jpg
    62.7 KB · Views: 59
  • A3F235A6-E83A-461E-83D4-F7C16B48598F.jpg
    A3F235A6-E83A-461E-83D4-F7C16B48598F.jpg
    103.3 KB · Views: 65
Pam, The accepted 'norm' for factory finishes is that the hammer and trigger would be case hardened (case colored) regardless of model. Some revolvers had case colored trigger guards and some (of different models) were blue. The barrel latch would be blued also (yours is plated; the 'T' piece) and the top of the 'posts' where the barrel latches to the frame would be in-the-white (bare metal). The 'non standard' plating or bluing raises the question as to whether the revolver was refinished at some point. The refinish would diminish the collector value of the arm. I am under the opinion that your revolver configuration has the original finish as it was initially sold by the S&W factory. I see no signs of any attempt at a refinish. Nice heirloom.
 
Back
Top